Painted glass jars with mod podge poison labels


I don't love fall.

Don't get me wrong, the fall that most people love are these cool crisp 60 degree days with the sun shining.
Pumpkin spice latte in hand, leaves falling at their feet.
I like those days.

The fall I don't love, is the reality of the weather in the Seattle area.
Rain, grey skies, and bone chilling cold.

But I do love Halloween.
Candy is a weakness of mine and the fact that people pass it out to you
  FOR FREE makes it one of my favorite holidays.

I thought I would add to my Halloween decor by making some mod podge poison bottles from bottles that I found this summer cheap at garage sales.


Do you remember these jars that I shared with you earlier this month as part of garage sale finds Friday?
I paid $1 for all of them.

I wanted to color the jars, so I did some research on how to do that.
Some tutorials say that you can use regular paint and then bake it, but most follow ups say that doesn't work so well.

I decided to look for some glass paint at Hobby Lobby and guess what I found?
This transform Mason glass enamel.
It's specially made to dye Mason jars. 
I thought it was the perfect thing to try!


The directions on the paint specifically say not to mix it with water.
Guess what the first thing was that I did?
I mixed it with water.


I filled the bottom inch up with my watered down paint mix, and then shook it up.
Then I turned the bottles upside down to dry.


I wasn't super impressed with how the paint dried.
It started to chip off, so I thought I would take a few of the jars and actually follow the paints directions.
In the picture below, the jar on the left is with the enamel paint mixed with water, and on the right is the enamel paint left thick from the jar as per the directions.

Once I read the directions again, they said that you have to let the paint dry 24 hours, which is probably why the paint was chipping and rubbing off.
Both techniques work, it's just a matter of preference.


After I finished painting the bottles, I found some graphics that I wanted to put on the bottles as labels.
Graphics Fairy came through on these vintage labels.


I saved them to my desktop, opened them in my Silhouette SD software and made them in to print and cut images.   You can find a Silhouette print and cut tutorial here.

Once the images were cut, I simply mod podged them on to the jars.


I love how the jars turned out and they were so simple.


What's your favorite way to decorate for Halloween?
0

Garage Sale Finds Friday

Welcome to another week of garage sale finds Friday
where I share with you my favorite garage sale finds.

This week, everything I bought ended up at Persnickety's in Sumner, WA to be sold.
They are all things I love, but I just can't get my husband on board to let me go totally vintage in a room.

Up first I found this awesome set of matching suitcases.
I was so excited when I opened them and found not one, not two but three suitcases all nesting inside.
They were all in great shape and I got them for $5!
I was dropping some other stuff off at Persnickety's and I saw them walking out the door with a happy customer!


I found some really cool rustic antique tools at another garage sale for $1 each.
I think the big rake would be cool with pictures on it, and the smaller rake could be turned upside down and used as a picture hanger.


This wrought iron bed is to die for!
My daughter begged to keep it, and we did everything we could to see if we could make it work, 
but alas, my daughter is a hoarder, and she could not part with the three storage drawers underneath her current bed.
I paid $25 for it.


I wouldn't trust this ladder to hold my weight, but it would be really cool leaning up against a wall holding a vintage quilt collection, or hanging from a ceiling.
It was $5 and I thought I had a major score!

The garage sales are slowing down, so our weekly fun is going to start tapering off.
I know I am already dying for May when the sales start again!
Are garage sales still happening in your neck of the woods?
What did you find?
0

Going, Going, Gone! Feeding the furry member of our family.

This is a Sponsored post written by me on behalf of ALPO® Brand Dog Food for SocialSpark. All opinions are 100% mine.
This week, our dog Sophie turns 3 years old.
Sophie has become a part of our family and we couldn't imagine life without her!
She even thinks she's a person and takes up her very own seat in the car!


As parents of our three children, we want to do what's best for them by feeding them a balanced diet, making sure they get exercise to run off that kid energy and supporting them in their interests and activities.

Being a puppy parent isn't much different.  

We want to make sure we are feeding Sophie a balanced diet, that is made of quality ingredients to support her growth, activities and give her a happy healthy life as part of our family.
ALPO®  wet dog food helps us do just that!


It's 100% complete and balanced and has quality ingredients like healthy protein sources, wholesome grains and accents of vegetables.
We tried ALPO®  chop house chucks in gravy and I have never seen Sophie so tail wagging excited for dinner before!

Going,


Going


Gone!

Sophie is a part of our family.
We want to do everything we can to support a healthy lifestyle for her.
A healthy dog is a happy dog!


To keep up to date on all the latest that ALPO® has to offer,

0

Homemade carpet deodorizer

We have a dog and three kids
but I don't want my house to smell like I have a dog and three stinky kids!

So I make my own homemade carpet deodorizer that I use once a month when I vacuum.
It's so easy!
I'm excited to show you how.


I pour baking soda into a bowl and add about 5-6 drops of fragrance to the baking soda.
Mix the two together.


I sprinkle the baking soda on to the carpet,
especially on the high traffic areas and those that the dog likes to sleep on,
and then vacuum it up!
If my kids are home, this is their favorite part.
They love making a mom approved mess!

Easy as that!
The house smells nice and fresh!
0

Nerf target practice birthday party

My youngest son turned 8 in August.
Yes, I'm a little late sharing the party,
but it took me some time to recover!

Only kidding!

Eight is a right of passage for our kids.
When you turn 8 you can finally have sleepovers with your friends.
All three kids have celebrated their 8th birthday with a sleepover party.

Outside of just having a sleepover, Owen wasn't too particular about what he wanted to do
but Mom knew with 6 boys over we needed to have some plan of action to keep them entertained!

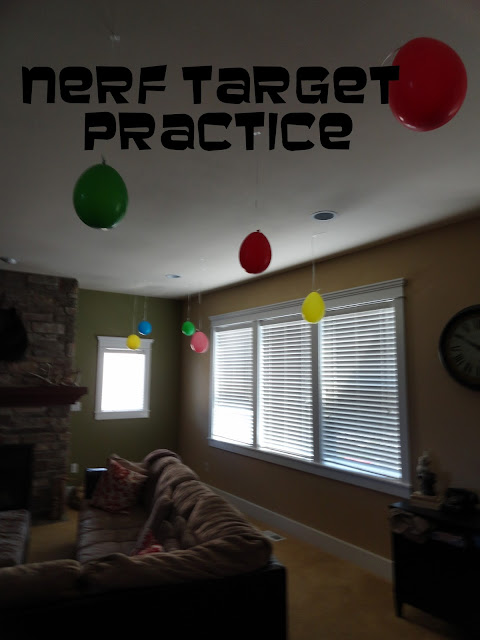
The party started at 4 and around 2:30, I decided we should set up nerf target practice.
You can find inexpensive Nerf guns or have the kids bring their own.
Consider providing the bullets for everyone. Those are too hard to keep track of.

nerf birthday party target practice

Thankfully, I had a few helpers!
I recruited my younger two kids to cut up targets and place them around the house.


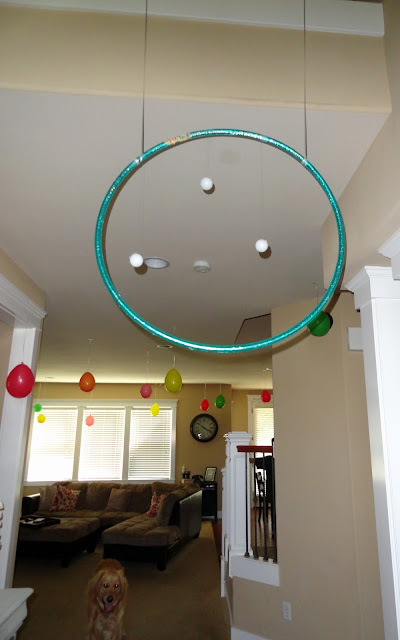
That morning, I found a hula hoop at a garage sale for a quarter.
I quickly hung three ping pong balls from the edge and put several strings 
through the balcony in our front entry.
I hung balloons from strings all throughout the house.

Nerf birthday party target practice

 I stacked cups on a step stool in the corner


Looks like a party!


The final touch was this tissue paper nerf target that I made with an old frame, tissue paper and paper plates

Nerf birthday party

I started with a paper plate


I cut the center out of the paper plate.
It isn't pretty, but it doesn't have to be.
I cut squares out of tissue paper that would fit behind the plate and taped them in place.


Your plate is ready for target practice!


I used a hole punch and string to secure the plate in the frame.
I placed extra tissue paper and tape so the kids could easily change out the targets once they hit them out.


We had a great time!
6 weeks later, I am still finding nerf bullets all around!

0

Master closet built in's finally moved in!

Back in May we started the long process of putting built in shelving and drawers into my master closet.
Yes, that's right, MY  master closet.
My husband has his very own {much smaller} closet.

We got several bids from local companies, but ultimately settled on ordering custom 
shelving from a company called Easy Closets.

After revealing the built in's in June, I spent the next few weeks slowly moving 
things in and getting settled in to my new closet.

I'm still so in love with my closet and have to pinch myself nearly every day
when I walk in!
It's probably been my favorite home improvement project ever.

I'm happy to give you a little tour inside.
On the left I have endless shoe shelves.
You can see how I made custom boot shapers out of pool noodles here.


I have 27 {!} drawers
and endless cubbies


I found a few boxes from Ikea to help hide some of the clutter.
Snow pants and coats are in the rectangular boxes on the top shelf
books and craft supplies are in the boxes below
and my jeans and sweaters are folded on the shelves.


On the other side of the closet, I have open rod shelving.
We ordered a valet pole and a belt hanger.
I didn't think that I would like the valet pole as much as I do.
I was wrong.  My husband was right.
I'm glad her ordered it!


I changed all of my hangers to black velvet and because I have a limited amount of hangers
I have been really good about getting rid of anything that I don't love to 
make room for those things that I do love.


At the back of my closet, I still have my sewing area.
It's such a beautiful space to work.

I'm not a super organized person.
I am actual quite surprised that my closet has stayed as orderly as it has.
I would highly recommend Easy Closets
{and no, I was not compensated by them, though I wish I had been!}
Thanks for coming along on a tour of my master closet.
0

Crockpot Applesauce recipe

Last week, after the kids spent a few hours climbing trees at the beach,
I was left with a ton of apples.


I decided to try making applesauce in the crockpot and had great success.
It was so easy, and I would love to share with you how I did it.


I started by peeling the skin off of the apples.
I cored them and cut them in to small chunks.
I filled the crockpot about 3/4 full with cut apples.


I poured 3/4 cup of water
1/4 cup of brown sugar
1/4 cup of sugar
1 tsp of cinnamon
and a dash of vanilla
over the apples


mix it all together and cook the apples on low for 5-8 hours.
Once the apples are cooked, you can keep it chunky and do nothing
or you can let the apples cool and put them in the food processor to blend the applesauce a little smoother.


That's it!
You can freeze your applesauce or eat it right away.
It got the kids stamp of approval as well being labeled 
''the best applesauce ever!"

What do you like to do with the apples that are in abundance right now?
0
Back to Top