Get Joanna Gaines fashion style for less

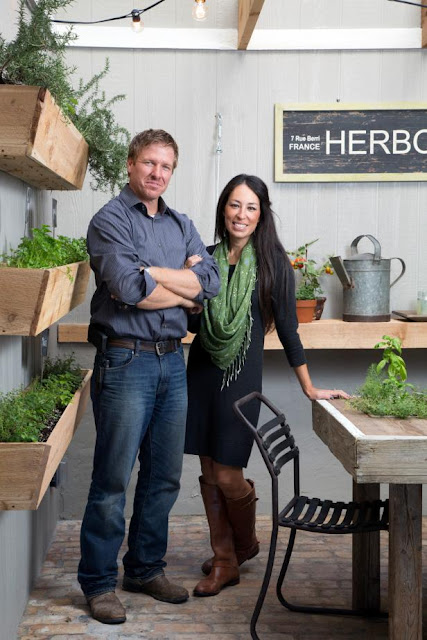
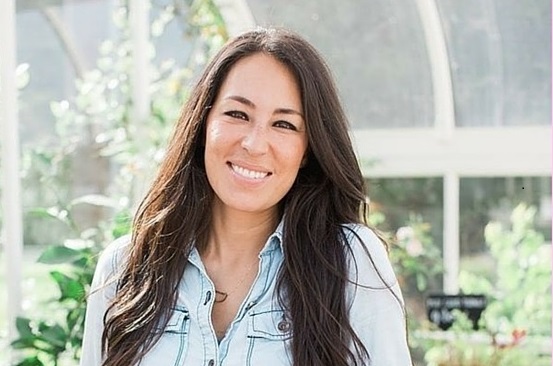
I blame it all on my recent visit to Waco, Texas. I am now obsessed with HGTV's Fixer Upper. You too? Seems like it since y'all {see what I did there?} about blew up the internet reading the exclusive Fixer Upper interview with a client on season 3. The reason I even knew about Fixer Upper is because I had a few people stop me and tell me that I looked like Joanna Gaines. One person clarified and said, I think it's because you guys have the same style. I will take that as a compliment because I love Joanna's style, but I think what they meant is that we seem to have the same neutral wardrobe. It's funny because I buy at least 90% of my clothing at garage sales or thrift shops {you can read more about how to buy second hand clothing and saving on clothes for the whole family}. 

Joanna Gaines style on a budget

So, I decided to peek in my closet and see if I could find similar items and then I went to my favorite on-line thrift shop ThredUp to see if I could pair up the same style for a fraction of the cost so that you can get Joanna Gaines style on a budget.


I started shopping at ThredUp after using a referral code. I was able to get $10 off my first purchase, so I shopped, and found a $10 dress that I ended up getting for free. It was so much fun! I have a referral code just for you so that you can get $10 off your first purchase. If you buy something under $10, your purchase is free.  That's how I shop. 

{ThredUp is a thrift store with limited quantities. I apologize in advance if any of these items may not be available when this post goes live}

Skinny Jeans + Boots + Neutral Top 


Look 1, 2, 3 and 4 are all about the skinny jeans and the boots. The neutral tops can be traded in and out for a new look every time.

Joanna's style

neutral clothing in my closet that can be worn with skinny jeans and boots

Meanwhile, in my closet...
neutral clothing in my closet that can be worn with skinny jeans and boots

navy blue half button {garage sale $1}
ivory sweater {garage sale 50 cents}
thin belt {clearance years ago $7.99}
ivory t-shirt {clearance $14.99}
skinny jeans {ebay can't remember the price}
ivory blouse {garage sale $1}
boots {Christmas present}

Get the look at ThredUP 

skinny jeans: Old Navy $8.99 {or free with referral code}
boots: Steve Madden $28.99
Look 1: Splendid short sleeve top $16.99
Look 2: Cynthia Rowley long sleeve t-shirt $8.99 {or free with referral code}
Look 3: Gibson Sweatshirt $17.00
Look 4: Old Navy 3/4 sleeve button tunic $11.99
skinny belt: Banana Republic $14.99

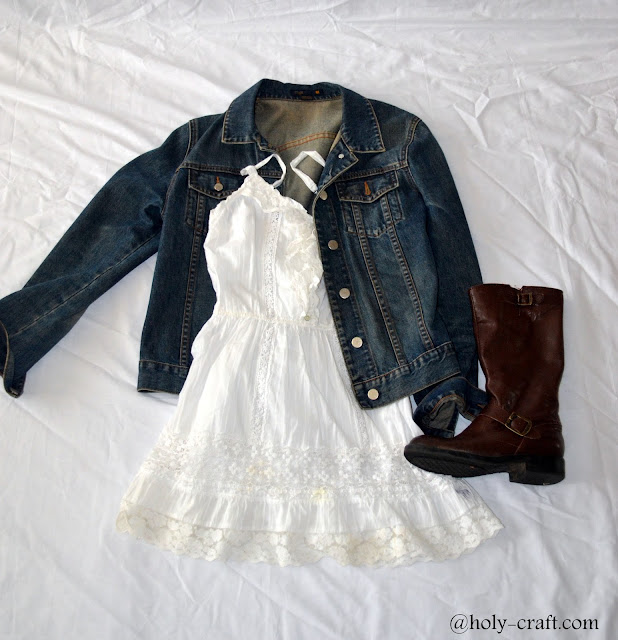
Dress + Jean Jacket + Boots

Look 5 is a dress with a jean jacket and boots

Joanna's style

lace dress with jean jacket and boots

Meanwhile, in my closet...

lace dress with jean jacket and boots

Jean Jacket: J Crew {garage sale $1}
White dress: Abercrombie {garage sale $1}
boots: Christmas gift

Get the look at ThredUp

jean jacket: Gap Denim $23.99
white dress: Divided by H&M $9.99 {or free with referral code}

Dress + Scarf + Boots


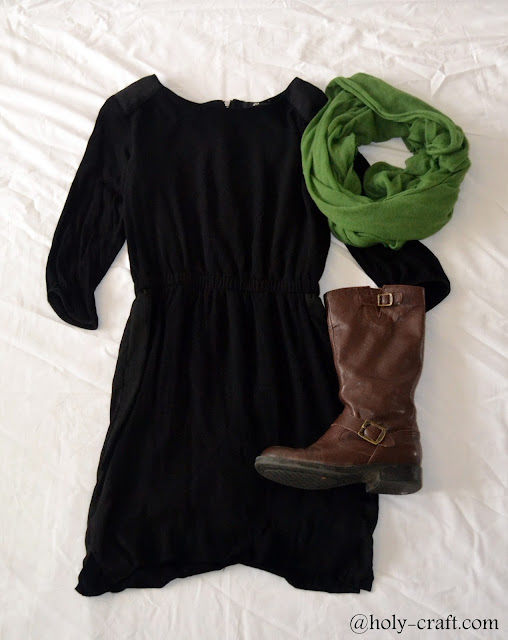
Look number 6 is a LBD {little black dress} paired with a scarf and you guessed it...boots!

Joanna's Style


little black dress with scarf and boots

Meanwhile, in my closet...

little black dress with scarf and boots

LBD: H and M dress, my first purchase on ThredUp I used a referral code so it was free!
green scarf: Goodwill outlet {pennies since you pay by the pound}
boots: Christmas gift

Get the Look at ThredUp

scarf: DKNY $17.49 
boots; Steve Madden $28.99

T-shirt + jeans + boots


look 7 is super casual and can usually be seen worn with a baseball hat

Joanna's Style

casual outfit with boot cut jeans and t-shirt
Meanwhile, in my closet...
casual outfit with boot cut jeans and t-shirt

boot cut jeans: Ebay {can't remember the price}
grey t-shirt {garage sale 50 cents}
boots: Born my favorites! Glued together with Gorilla Glue because I can't find a replacement{garage sale 50 cents}
wide belt: Express {bought it in college 20 years ago!}

Get the look at ThredUp


Leather belt: Ann Taylor $11.49
Grey t-shirt: Merona short sleeve $4.99
boots: Steve Madden $28.99

denim + denim + boots

Look 8 is denim on denim

Joanna's style

Joanna Gaines denim on denim

Meanwhile, in my closet...

denim on denim

Boot cut Hudson Jeans { Ebay}
Denim shirt {garage sale $1}
Bjorn boots {50 cents}

Get the look at ThredUp

boot cut jeans: Hudson $33.49
denim shirt: long sleeve button down Club Monaco $15.49
boots: Steve Madden $28.99
I had a ton of fun peeking around my closet and then shopping at ThredUp. I hope you did too. The best part of a neutral wardrobe is that it looks timeless and the pieces rarely go out of style. Don't foget to give ThredUP a try. I love shopping there. You can find so many great deals!
Use this referral code to get $10 off your first $10 purchase.
disclaimer: If you shop with the referral code, I will get a small credit for recommending the site to you. But I promise you, I wouldn't recommend something I didn't love 100%.
0

Paper Magnolia Wreath

I've sort of been on a Fixer Upper fan girl roll lately. It all started on a college trip with my oldest son to Waco where we got to stop in at Magnolia Market. I knew I loved Joanna's style I just didn't know how much I loved it until I left the market wanting every single item in the shop. Then I did a little interview with a season 3 Fixer Upper client and loved getting the inside scoop so much that I found myself googling all things Fixer Upper and binging on past shows. Chip and Joanna Gaines are smart business people who have done a great job with branding. One of the things I looked at while I was at the Magnolia Market was their signature magnolia wreath. At $95 each, it was a bit out of my price range, but they are pretty darn gorgeous. This one is a little less expensive but it still seems like these things are made of unicorn tears!

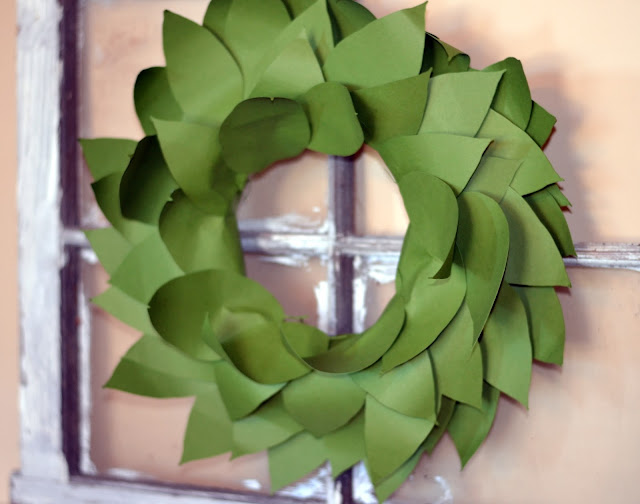
I decided to come home and make one of my own...with a twist. I used green scrapbook paper and used my silhouette machine to cut out the leaves. The whole thing cost less than $5 to make and I love it. I call that a win!

paper magnolia wreath using the silhouette cameo


paper magnolia wreath get the fixer upper look for less


I started with supplies that I already had here at home. I bought the burlap ribbon at a garage sale for $1 and the foam wreath at the Dollar Store {for a dollar...duh}. The green cardstock was on sale 3 for $1. I purchased 12 sheets of it but ended up with too many leaves. Depending on the size of your wreath form, you could probably get away with 9 sheets of paper.

supplies needed for paper magnolia wreath

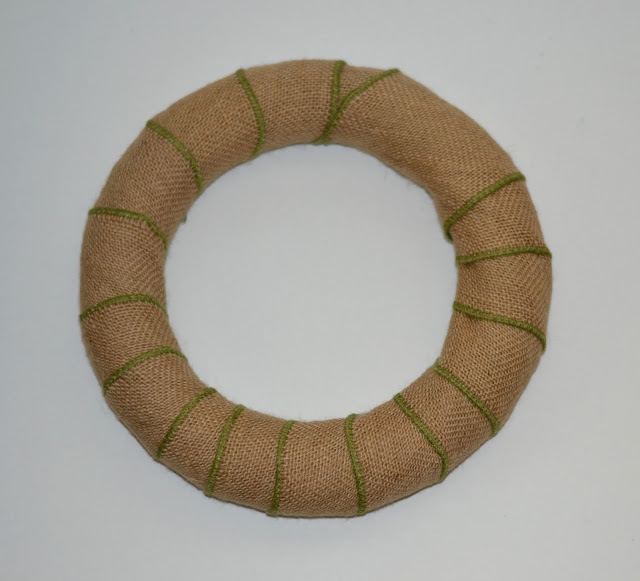
I wrapped my wreath form in the burlap ribbon. I wanted it totally covered just in case any of it showed. And also because hot glue on Styrofoam is no bueno. I secured the ends of the ribbon in place with a few straight pins.

foam wreath form wrapped in burlap ribbon

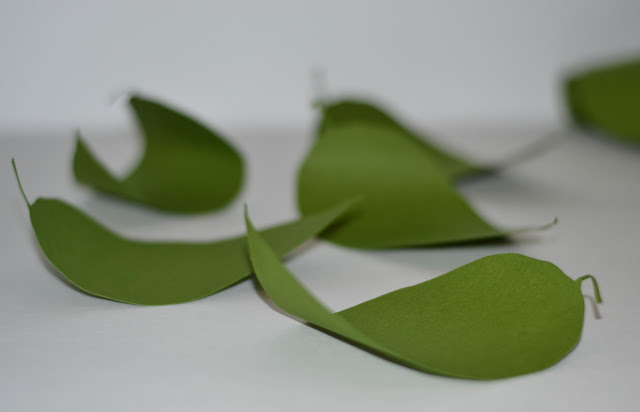
I found a magnolia leaf on line as a part of an encyclopedia page and used my trace feature on my Silhouette to create a cut file for my leaves. If you want to know more about how to use trace and cut, so that you can use any image in your silhouette, you can find that tutorial here.

magnolia leaves cut out of paper

I got the new Silhouette Cameo for Christmas {my Silhouette SD served me well for so long but I needed something that cut 12x12 and this does the trick}. I'm not quite sure if it was the sticky mat or the way these leaves were cut, but they curled all on their own as I peeled them from the cut mat. It was perfect and saved me a step in the process.  If yours don't curl, you can roll them on a pencil and get the curve with a little extra step.

magnolia leaves cut out of paper

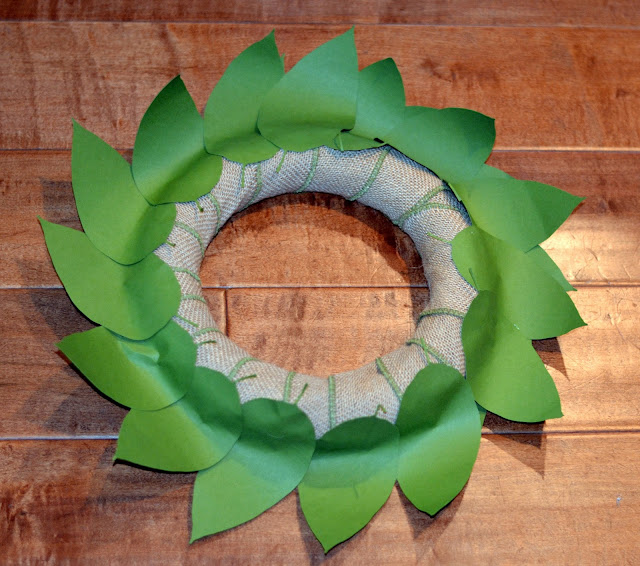
I started by putting my back layer on first. I used hot glue to adhere them in place.

how to make a paper magnolia wreath

My second layer was a little more folded back so that I could cover the curve in the top.

how to make a paper magnolia wreath

The third and forth layer were placed on the inside of the foam wreath and along the edges. Filling in any gaps that you might see.

how to make a paper magnolia wreath

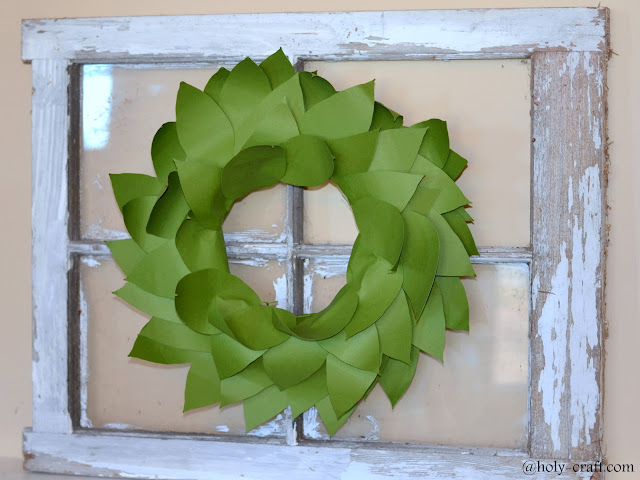
Magnolia wreaths that I have seen have so much texture and the leaves are always bent. I think the paper version of the magnolia wreath does a great job replicating that. If you want to make it look a little more authentic you could cut a few brown sheets of card stock and layer those leaves in randomly.

magnolia wreath made from card stock cut on the silhouette cameo

I love the $90 in savings! And the fact that it's made completely out of paper.

magnolia wreath made from card stock cut on the silhouette cameo

What do you think? Think it looks authentic enough?

magnolia wreath made from card stock cut on the silhouette cameo

For only $5 and about an hour of my time, I was able to create a pretty impressive wreath made totally out of paper. Be still my Fixer Upper loving heart!
0

Chocolate espresso cupcake with Kahlua creme frosting

Being a blogger is one of the most fun jobs ever! I get to do one of my favorite things {create} and participate in challenges that allow me to think outside of the box.  I'm part of a group of extremely creative bloggers called the Wayfair homemakers and recently we were give the challenge to take a cocktail and create a cupcake out of it. One of my favorite drinks is a mudslide, mostly because it's like a chocolate milkshake with alcohol in it, don't judge. It's delicious. 


mudslide cupcakes

So I immediately thought, how can I make that into a yummy cupcake, and will it really be just as good as the cocktail. I did it and it is just as good, if not better than the cocktail! I know you are going to want to try it yourself!


mudslide and mudslide cupcakes

Chocolate espresso cupcake with Kahlua creme frosting

cupcakes: 

1 cup butter, softened
1 3/4 cup sugar
2 eggs
1 cup buttermilk
1/2 cup coffee, cooled
2 cups flour
3/4 cup cocoa powder
1 tsp. baking soda
1 1/2 tsp. baking powder
1/2 tsp. salt
2 tsp. vanilla

Preheat oven to 350 degrees. Line your cupcake tins with cupcake liners. Beat together your butter and sugar until fluffy. Add the eggs and mix in the flour, cocoa powder, baking soda, baking powder, salt and vanilla. Slowly pour in the buttermilk.


cupcake batter

I use a scoop to add the mixture into my cupcake liners. Bake for 12-15 minutes or until a toothpick comes out clean. Let cool.

filling cupcake tins

While your cupcakes are cooling you can make your frosting.

frosting:

8 oz bar of cream cheese, cold
1/2 cup of butter, softened
1 tsp vanilla
4 Tbs. Kahlua
3 1/2 cups powdered sugar

Beat the cream cheese and butter until blended. Mix in vanilla and Kahlua. Slowly add the powdered sugar 1/2 cup at a time. Once all the powdered sugar is added whip the frosting until it's fluffy.

kahlua cream cheese frosting

 Before frosting your cucakes, poke 5-6 holes in the top of the cupcake with a toothpick. Add about 1/2 tsp. of Kahlua onto the top of your cupcake. The holes will soak it right in.

You can use a piping bag or spread your frosting however you want on top of your cupcakes.

cupcakes and mudslide

I sprinkled cocoa powder on top.

kahlua cupcakes

Whip up a mudslide and serve up some cupcakes and you have quite a treat!

kahlua cocktail and cupcakes

cupcake with cocoa powder


chocolate espresso cupcake with Kahlua cream cheese frosting
Enjoy! I know you are going to love them!
disclaimer: I wrote this post as part of a Wayfair homemakers campaign. 
All opinions are 100% my own. I did receive gift card compensation in exchange for this post.
0

How to plan the perfect college visit for your high school student

My oldest son is a senior in high school this year and while it feels like just yesterday I was holding his hand walking him into pre-school, it won't be long before I'm packing him up and saying goodbye for months at a time.

Let's not talk about that part though. Let's talk about the fun part where we get to travel and spend time together and make memories and plan futures. That part is fun and not as scary.

If you are in this phase of life with a junior or a senior in high school and college looks like it's in their future, this guide will help you plan the perfect college visit.

college visit


1. Start local

My son knows that he's not interested in attending school locally. And by locally, I mean anywhere in our great state of Washington. That hasn't stopped me from  a) trying to convince him {heck, in state tuition is so much more reasonable!} and b) taking college tours at local schools.

Most kids don't know what they like and what they don't like about a college campus. They may not even know what they should like or be looking for. Going to some local universities for a tour gives them the barometer they need to start comparing one school with another, and it may just help them narrow down where they want to apply when the time comes.

Does your son or daughter want a big school or do they prefer a smaller university? Do they want a rural campus or do they prefer something more urban? Hitting up a local college or university is a great way to get an idea of what type of school that your child is interested in and give them an idea of what a campus tour is like, what kinds of questions they have and gives them an opportunity to find out what's most important to them in a college.


2. Schedule your visit

Once you have your list of schools that you want to visit, go to their website. Most will have a tab that has more information on planning and scheduling your visit. I have found that you really need to give a college visit at least four hours. 

In my experience, starting your campus visit is best if you start it with a guided college tour. The college tour guide is usually a current student not much older than your son or daughter but they can answer questions about college life and point out the highlights of the campus.

If touring a residence hall is important, make sure you schedule a tour of them. There is so much information on-line now that many websites provide virtual tours of dorms and living spaces. 

3. Make time to sit in on a class

Many universities have an open door policy for perspective students. While I haven't had my son sit in on a class at every college we have toured, I do think it's important that he's had that opportunity. At nearly every college you will visit you will hear the mention of class size. Just knowing what your son or daughter is comfortable with in terms of class size is important. 

Have them sit in on a class with 100+ students if they plan on attending a large university where that is the norm. Let them get a feel for what that is like. On the flip side, have them also sit in on a smaller class. Your college visit is all about being able to compare and contrast and use their findings to narrow down the best fit for their future education.

4. Make an academic appointment

While your college bound student may not know exactly what degree they want to pursue just yet, have them meet an advisor {or two} in the college department that they seem to be interested in. Most college applications will make you narrow down what department you want to apply to, so now is a great time to get a feel for what it is that your son or daughter may be most interested in. 

When my son has had these appointments, I have sat in on them but it's important to let your child take the lead on asking the questions and steering the conversation.  If you need to, role play with your child ahead of time so that they are comfortable engaging in conversation.

If you know ahead of time the advisor or professor that you are meeting, it's probably not a bad idea to take a second to google their name.  Read some of their published works, get to know what their interests and specialties are. Just taking this time will make your child seem more prepared and will give them a talking point that will probably take the heat off of them in a conversation. 

5. Meet with the admissions advisor

Not all schools require an interview, but if your child has strong interpersonal skills, the opportunity to meet with an admissions advisor while you are on campus may be very beneficial during the application process.  

The few schools that we visited my son's junior year all made notes of the interactions he had either through information sessions, college fairs and most importantly the time spent face to face with the admissions advisor.  These interactions gave him opportunities to apply early decision, sometimes without fees.

6. Stay local

When you are visiting a college, try to stay local. If you need to spend the night, try to stay on campus or on the outskirts. Walk around campus at night, eat dinner at a local hot spot. If you can, have lunch at a dorm or in the student union. This gives you the opportunity to see what college life on the campus is really like.  

Don't be afraid to strike up conversations with the students. Ask them what they think of the college and why they selected it. My son is interested in being a part of the greek system. We happened to be at lunch and saw a group of students with fraternity and sorority shirts on. We struck up a conversation with them and got the inside scoop on greek life at this particular university. My son even made a connection with one of the fraternity members and has his number should he attend the school in the fall. 

These conversations are usually the most honest conversations that you will have. The campus tour guide, the college admissions advisor, the visitors staff are all doing their best to sell you on the university. You will only ever hear the positives. Candid conversations with students on campus usually gives you a different perspective into college life that you might not have gotten otherwise from those people you have come in contact with so far since they are trying to sell you on their university. Don't be afraid to stop college kids. It may be the most insightful conversation you have on your whole tour.

7. Make a list

We visited 3 universities in 5 days, they all started to blend together. Have your child keep a list of the pros and cons of each school. Use the time after your visit to talk together about what they liked and what they didn't like.  This chance to debrief after your visit is the best time to find out what's really important to your child in a college or university.

8. Follow up

Make sure that your child follows up with the college staff that he or she has met. Most of the academic advisors and admissions officers are quick with their business cards, but if they aren't make sure that your child made a note on their list {see #6} of the person who they spoke to.  This follow up is a great way to prepare your child for future job interviews.

This is an exciting time! Make the most of the opportunity and enjoy the preparation. If you have anything to add, I would love to hear it! Simply comment below or send me a message rachelholycraft@gmail.com

0

Talk of the Town link party #8

Welcome back to Talk of the Town!

Before we look at this week's wonderful features, here are a few little tips about how to get featured at Talk of the Town, and improve your blog at the same time. We really want to feature you!

How to get your blog featured at link parties - Talk of the Town party tips - www.knickoftime.net

How to Get Featured at Talk of the Town (or any link party!)

As everyone knows a picture is worth a thousand words, and that's so true for blog photography.
No matter how awesome your project, recipe, or post is, if you don't have great photos, you aren't doing it justice.
Here are some problems we frequently see in photos linked up at the party.
1 - The photos are too small.
I guarantee you, you are more likely to get featured if your photos are LARGER.
We frequently see great projects we'd love to feature, but the photos are just too small.
2 - The photos are either too dark, or too bright.
A cloudy day outdoors, or a well-lit spot indoors tend to make the best places to take photos. Along that line, don't use your flash. It ruins otherwise great photos.
3 - Create a "scene".
Dress up your photos with props that make your photo more interesting.
4 - Use a foam board as a backdrop.
A white foam boardmakes a crisp, bright background for small projects and instantly makes the photo POP!
Those are just a few little tips we hope will help. Now, on to the party!
Talk of the Town link party button
First, let's take a look at what you may have missed from your party hosts!
TotT This week at Knick of Time
featured posts at Knick of Time TotT8
TotT This week at My Salvaged Treasures
Trash to Treasure Cubbies
TotT This week at Beyond the Picket Fence
TotT8 featured posts Beyond the Picket Fence
TotT This week at My Repurposed Life
featured posts at My Repurposed Life
TotT This week at Love My Simple Home
featured project Love My Simple Home
TotT This week at Holy Craft
featured posts Holy Craft TotT8
TotT This week at Sadie Seasongoods
vintage washboard message center
ToTT Features
Here's what we're talking about from last week's party!
TotT Pick Angie
refinished empire dresser
TotT Pick Betsy
antique typewriters collection TotT8
TotT Pick Becky
refinished antique baker's cabinet TotT8
TotT Pick Gail
shoe cubby dresser TotT8
TotT Pick Julie
repurposed railing photo display TotT8
TotT Pick Rachel
Rencourt Table Knock off TotT8
TotT Pick Sarah
repurposed tea pot bird house - TotT8

TotT Featured Blog
Each week we feature a blogger and their blot to introduce you to different bloggers that link up with each week.
Make sure to pay them a visit and say hello while you're there!
This week our featured Blogger is Mistie from Homespun Engineer!
Featured Blog Homespun Engineer - TotT8
Mistie is a wife, mom, and super creative crafter. She loves dressing up in high heels and pretty pink lip gloss, and other days craves a baseball hat and paint splattered t-shirt. Be sure to pay her a visit!
If you were featured today, feel free to spread the word and display this button!
Talk of the Town featured button
Now, it's your turn!
TotT Something to talk about
0
Back to Top