
I am so excited about today's post! I not only have an awesome project to show you with my favorite heat transfer vinyl, I also am giving away the chance to win one of my favorite craft products of all time...a Silhouette Cameo! EEEKKK! Want to know what the cherry on top is? 16 other amazing bloggers coming together to show some pretty amazing Silhouette crafts. If you don't have a Silhouette yet, you will be adding one to your list!
My oldest son has become a pretty amazing photographer. He mostly uses his iphone for photos because it's what he has on hand. Last week, he was downtown Seattle with some friends at snapped a photo of the Space Needle.

Not only is the Space Needle iconic to Seattle, it also holds a special place in my heart because that's where my husband proposed. I'm going to show you how I took his photograph and turned it into a custom t-shirt by using my Silhouette machine.

Pocketful of Posies - Sultry and Saucy One of a Kind DIY DIP Cups
Hobnail House - Silhouette Craft Blog Hop: Cut Vinyl Art Upcycle
In The Loop - How to Create a Silhouette Using the Silhouette Cameo
Craving Some Creativity - Silhouette Project Challenge: Distressed Laundry Room Sign
DIY Passion - Cheeky DIY Tote Bags that will Make You Smile
Domestic Abiliy - Paper Boxwood Wreath
Our House Now A Home - A Silhouette Giveaway and Creating New Wall Art
My Life From Home - Silhouette Challenge: What's Cooking? Recipe Holder
Holy Craft - How to Use a Photograph to Make a Custom T-Shirt with Your Silhouette
Knock it Off Crafts - DIY Otomi Coasters using a Silhouette Machine and Silhouette Giveaway!
One Project Closer - DIY Princess Party Decorations
Dream Design DIY - Chalkboard Workout Calendar and Silhouette Giveaway
The Country Chic Cottage - Makeup Organizer
Refresh Living - Custom Word Throw Pillows with Vintage Fabric
The Deans List - Scalloped Milk Glass for Valentine's Day
Tried & True - "Life Is Good" Bicycle Lover's Tee
So many great projects out there, but first...how to use a photograph to create your very own custom t-shirt. This tutorial uses a few of my favorite silhouette software features. I started by taking the photo and opening it up in PicMonkey. I wanted to change it to black and white since you really need the contrast for our next step. While you are in PicMonkey, go to exposure and auto adjust your contrast as high as you can go and still have your necessary details. 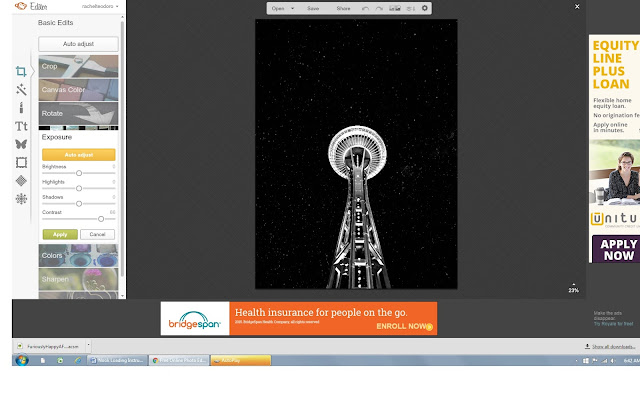


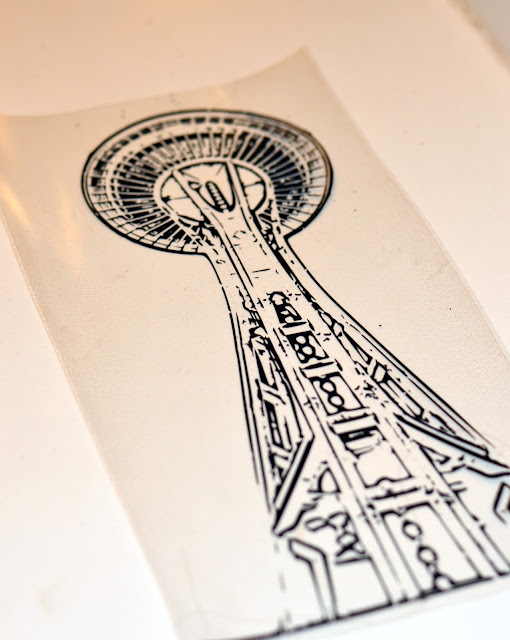
I am not going to lie, this design took a LONG time to cut out on the Silhouette. It has a lot of detail that I didn't want to skimp on. If you notice some of the lines are missing on some places. I actually really like that in the design. I think it makes it look more screen printed.
I expected this design to also take a really long time to weed, but it didn't. I love Expressions Vinyl their heat transfer material works amazingly and cuts like butter. But the last time I made an intricate design it took me a few hours to weed the design, so I was prepared and if you do the same thing, you should be prepared too, just in case!
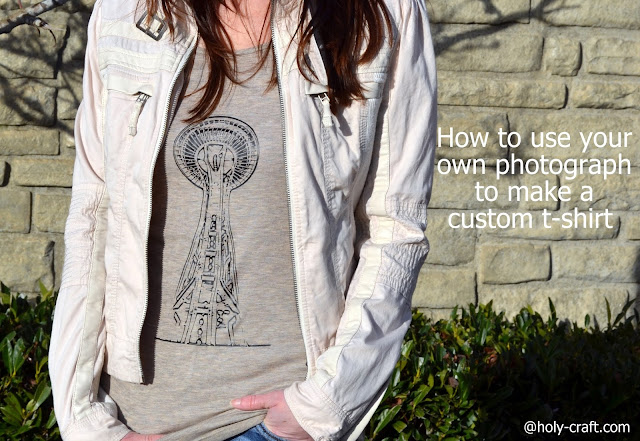
That's it! It's super easy to take any image and create your own design. {Not so easy to open your eyes all the way when staring into the sun apparently.}

I think it's pretty cool that I was able to use a photograph that my son took and created something wearable out of it.



How to use any image using your silhouette software 
Silhouette popcorn containers 
You can also use my search bar right on over there on the right to find other silhouette projects. If you don't have a Silhouette machine this post and all the other cool projects by bloggers is probably making you drool and wish you had one. Seriously people, it takes crafting to a whole new level! If you don't have one, put it on your wish list! This is the one I just got to replace my original one. It will change how you create! 
disclaimer: there may be affiliate links in this post
0
My oldest son has become a pretty amazing photographer. He mostly uses his iphone for photos because it's what he has on hand. Last week, he was downtown Seattle with some friends at snapped a photo of the Space Needle.


I also can't wait to share with you 17 pretty amazing Silhouette crafts made by some pretty awesome bloggers! Make sure you check them out!
If you don't have a Silhouette, read on to find out how you can win a Silhouette Cameo II of your very own!
Hobnail House - Silhouette Craft Blog Hop: Cut Vinyl Art Upcycle
In The Loop - How to Create a Silhouette Using the Silhouette Cameo
Craving Some Creativity - Silhouette Project Challenge: Distressed Laundry Room Sign
DIY Passion - Cheeky DIY Tote Bags that will Make You Smile
Domestic Abiliy - Paper Boxwood Wreath
Our House Now A Home - A Silhouette Giveaway and Creating New Wall Art
My Life From Home - Silhouette Challenge: What's Cooking? Recipe Holder
Holy Craft - How to Use a Photograph to Make a Custom T-Shirt with Your Silhouette
Knock it Off Crafts - DIY Otomi Coasters using a Silhouette Machine and Silhouette Giveaway!
One Project Closer - DIY Princess Party Decorations
Dream Design DIY - Chalkboard Workout Calendar and Silhouette Giveaway
The Country Chic Cottage - Makeup Organizer
Refresh Living - Custom Word Throw Pillows with Vintage Fabric
The Deans List - Scalloped Milk Glass for Valentine's Day
Tried & True - "Life Is Good" Bicycle Lover's Tee
Tastefully Frugal - Valentine's Day/St. Patrick's Day Reversible Sign

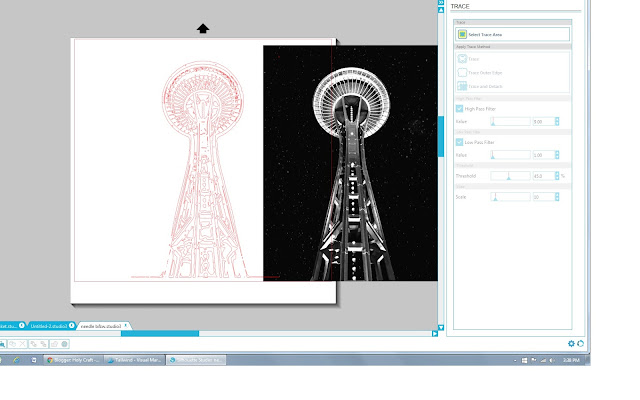
Once you have that done, save your image and open it up in your Silhouette software. If you want to know how to use any image with your silhouette software, you can see this tutorial. I love the trace feature and if you don't know how to use it yet, you are going to love it!
This is just a partial tutorial since you can find the full tutorial on how to trace above, so sorry if I miss any details, this will cover the high points. Select trace area, highlight what you want traced,
make sure high pass filter is selected and move it until your image is lit up like a Christmas tree, and then click trace.

Once you have done that, you can move your original image over and you are left with your red cut lines. Amazing right!

I used the erase tool to clean up some of the lines, but really, I like most of them being there and with the exception of a few random strays, I didn't erase too much.
This image didn't really have a "right" side so I didn't need to mirror it, but if you are using an image that has lettering or a true left and right don't forget to mirror it!
I keep my eyes peeled for sales on plain t-shirts throughout the year. I found this tank top on clearance at Target for $3.50. I also buy blank t's at garage sales and if you would believe it, the dollar store even has then sometimes.

I am not going to lie, this design took a LONG time to cut out on the Silhouette. It has a lot of detail that I didn't want to skimp on. If you notice some of the lines are missing on some places. I actually really like that in the design. I think it makes it look more screen printed.
I expected this design to also take a really long time to weed, but it didn't. I love Expressions Vinyl their heat transfer material works amazingly and cuts like butter. But the last time I made an intricate design it took me a few hours to weed the design, so I was prepared and if you do the same thing, you should be prepared too, just in case!

I love using heat transfer vinyl and wrote a post on how to cut heat transfer vinyl like a pro. I'm assuming you have already read it and know all the tips so you are ready to iron on your cut image.
I always set my iron to a cotton setting and once I get my design placed just right on my t-shirt {or whatever blank medium you are using}, I have a thin cotton scrap of paper that goes on top of my design before I iron it. I have learned that you need to press hard with your iron and keep it in place for at least 30 seconds. I always go over and up and down my design several times.
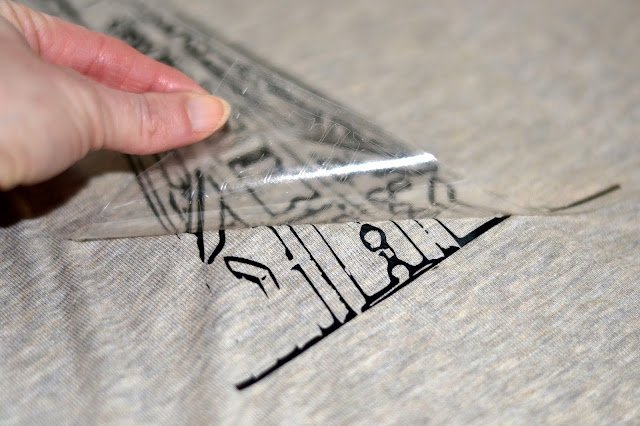
Another tip is to let your plastic cool and then use the back of your hand to rub the top of the design to make sure it's firmly in place. Then simply peel back your plastic cover and your design should be adhered to your shirt. I always use my iron with the cloth and take one more sweep over it all to make sure there is no peeling vinyl. We want that design to be stuck there for many washings!

That's it! It's super easy to take any image and create your own design. {Not so easy to open your eyes all the way when staring into the sun apparently.}


You might also like these other silhouette tutorials


