Showing posts with label spray paint. Show all posts

Transformation Tuesday

Welcome back to transformation Tuesday!  It's becoming one of my favorite new series on the blog.

I share with you on Friday my favorite garage sale finds, and then on Tuesday, I follow up with a transformation from the previous week. 

This past week, I bought all the large things.  I bought a rare art deco dresser for $20 that ended up being worth thousands, Ethan Allen pieces and some other large awesome goodies. Any idea what the transformation item will be this week?  

Think I painted some furniture? I did!  Bet you can't guess which item I painted.


I love painted furniture, but even I know that I shouldn't paint over a rare mint condition piece!  If you guessed that I painted the large wicker basket then you would be correct!  

Just to refresh your memory, I bought this sucker for only $2. It was brand new and in great shape. The seller was at a loss of what to do with it, and I had endless possibilities running through my mind.  


While I was out garage saleing, I found these three, new in the package chalkboard signs for $1. I knew they would work great with the laundry basket I was envisioning this wicker basket becoming. 


Painting wicker isn't the easiest thing you can paint. Actually, it's probably the hardest.  Thankfully, there is spray paint! I used Rustoleum because that stuff can cover up any surface and it doesn't drip or run!


I labeled each sign and tied them on.


I could have just as easily written 1, 2, and 3 for each child too.


I just love how this wicker basket transformed into the perfect laundry basket for our laundry room.


I just love transformations don't you? Any other suggestions for uses for this three compartment basket?  What would you have written on the signs?
0

Transformation Tuesday-an updated hamper goes from the 70's to glam with some spray paint

I am so excited about this new summer series called transformation Tuesday, where I take one of the previous weeks garage sale finds from Friday and transform it into something amazing.


This week, all it took was a little spray paint to take a really old 70's looking storage hamper into something really awesome.  Here's a glimpse at what it looked like before.


You won't believe how good the after looks!


Seriously!  For only $1, this plastic dark wood hamper jumped into the next millennium with a coat of spray paint and about ten minutes.


All I did was wipe the hamper down with a wet rag.  I took off the two screws that were holding the lid on and removed the top.


I always have white spray paint on hand because you never know what you are going to need it for. I love this Rust-Oleum satin paint with primer because it works on any surface, even plastic. Check out that nozzle.  It sprays like a dream!


How much better does this storage container look now? Isn't it a great transformation?


I think the most important thing to remember when looking for an item to transform at a garage sale is to pay attention to it's lines.  This one had great lines with that geometric pattern so I knew that it was going to turn out great.  If you can get past the ugly duck first impression, you may end up with something awesome that you love!
0

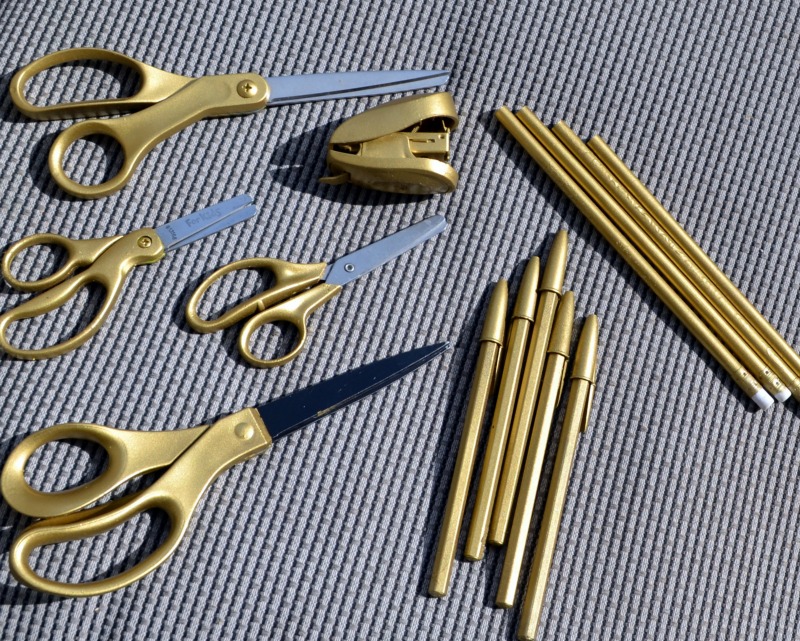
Update your boring office supplies with some gold spray paint!

Am I the only one that wants to gold all of the things? I am loving this gold trend right now and love it even more when I can take some boring office supplies from my junk drawer and update them in a matter of minutes.  This project didn't cost me a dime since I had everything on hand, but now, my office supplies look like a million bucks!  It's so easy!


We all have a junk drawers with pens and pencils right? Why not use gold spray paint and make all of your supplies cohesive? I just love it when things match!


I can never find a pair of scissors when I need them, but when I do have them, they have all kinds of different colored handles.  Nothing in my drawer matches.  The pencils from my kids incentive programs at school never get used and my pens are just boring.


I changed that with a little bit of gold spray paint! Simply mask off the parts of your office supplies that you don't want painted {the erasers on the pencils and the blade on the scissors} and give your supplies a few light coats of spray paint.


 Don't they look so much better now?!  I'm happy to move them out of my junk drawer and onto my desk.  I just love what a little paint can do to makeover something as ordinary as a pencil!

Are you loving the gold trend right now as much as me? What have you painted gold?
0

Gold painted seashell candles

We live very close to the beaches of the Puget Sound.  In fact, spending time at the beach is one of my favorite things ever!  I'm still a kid at heart and love walking the shore collecting shells and sand dollars.  The big question is, what do you do with them once you get home?  Well, I have a fun craft that didn't cost a lot of money but will help you make your shells a keepsake.


The Puget Sound isn't known for having the most incredible looking shells.  They all pretty much look like this.  That is, if you can find them before the seagulls have destroyed them! I got lucky, and this was my collection from the day. You want to find shells that don't have any barnacles on them and that aren't covered in seaweed.


Start by spraying a layer of gold spray paint on the outside and the insides of your shells.


I picked up a pack of votive candles at Wal-Mart for $2.50. I used about half of them {25} for this project. Start by grabbing the wick of your candle and carefully pulling it out of the tin that it's in. Once you pull that out, you can then loosen the silver wick base on the bottom and do your best to pull out the wick.  It probably won't come out in one piece.  That's fine.  Take your pliers and unpinch the wick base and reinsert the wick making sure you secure it again with your pliers.  Use your hot glue gun to secure your wick into the bottom of your shell.  Finally, put all of your candles into a glass measuring cup and slowly heat it in the microwave.  Start out with a minute, and then put it in for 30 second increments {checking each time} until the wax is fully melted.

Once your wax is melted, carefully pour it into your shells.  This can be messy, so make sure you have some plastic on your work space for easy clean up.  Let your wax cool in your candles and then enjoy!


I like having candles next to my bath don't you?


It was a super fun project that didn't cost a lot.  I'm always curious...how do you decorate with shells or keepsake items you find on your travels?
0

Patriotically painted mason jars

I am attracted to mason jars like a moth to a flame.
I have quite the collection of jars and needed to start coming up with projects to do with them besides canning.  

I love putting cut flowers in mason jars, so I thought self, how awesome would a painted mason jar with cut flowers be?  Actually, I know I'm not the first person to come up with this idea,
 but in case you live in a cave,
this is my version of the painted flag mason jars.


I started by finding three of the same sized mason jars in my collection.


I spray painted them white and was actually quite impressed with how well the spray paint adhered to the jars.  Keep your eyes peeled, there may be more spray painted mason jar projects.


These are the supplies I used in this project.
I wouldn't recommend the foam star stickers that I used.  They didn't peel off the jars well, though I have read other tutorials where they had great luck with stickers as a stencil.
I used American acrylic paint and frog tape to make shape crisp lines.
Oh, and a brush.
You will need a paint brush for a painting project.
Duh.


If you are using stickers, this is when you put them on.
Again, my garage sale free box stickers did not work for me.
Maybe stay away from the foam kind?
Just a suggestion.


It's self explanatory, but paint your jars.
I used about twenty three coats of blue.
No exaggeration.
I literally left the project out on my counter and came back to it every five minutes between cleaning and errands.  Super fun, right?
Which is why I am thinking there will be more spray painting projects in my near future.


Because the stickers didn't work,
I hand painted stars on my jar.


Fill your jars with half dead flowers from your anniversary a week ago and you are set!
Next time, I will probably put something not quite so dead inside of the jars,
but hey, I used what I had.

I think these would be great at a BBQ holding silverware, or as a table centerpiece with flowers.
 Fresh flowers.
Be classy...unlike me.
0

Bird cage and glittered bird

For the past two months, I have been going to this great Saturday junk show called Second Saturdayz in the Old Post office building in Tacoma.  

My 10 year old daughter loves to go with me {have I created a monster???}, and we share that time {and lots of money} having our best time picking out some great new {to us} things. 

My goal this year, is to re-do the younger two kids bedrooms.
Since our move two years ago, neither one of their rooms has felt like them.
We are sort of in design limbo.
But as I get a better sense of what their style is, I am moving in the right direction with coming up with a good design plan for their rooms.

Like I said, my daughter loves to go junk shopping with me.
So I think we are going to be leaning on an all white design in her room with some really shabby chic vintage items as the focal point.

When she saw this birdcage, she fell in love.
It needed a coat of paint, but I had to agree, it was pretty cool.


Later on in the day, while shopping at my favorite store {The Dollar Store...duh!}, 
I saw them stocking these ugly birds on the shelves.

I figured while I was spray painting the bird cage, I might as well attempt to spray paint the bird as well.


One thing that I have learned over the years is that not all spray paint is created equal.
Krylon is almost always worth the splurge {nope, they didn't pay me to say that, but if you have Krylon connections and you want to pay me, I would be on board!} so I was happy when I found some white in my stash.

It's always best to start out with light coats of spray paint, but to do lots of them.
This is a picture after the first coat.


Five coats and 45 minutes later, this is what we ended up with.
Isn't it so much better?!


I don't know why the Dollar Store doesn't just leave their birds white like this.
It's a huge improvement over the painted green that some poor person had to meticulously paint for less than pennies for their labor.


I couldn't just stop there though.
I broke out my mod podge and some shimmery glitter and glitterfied {yep, it's a word} my bird.


Seems simple enough, but anytime I wonder how something is done, usually it's the "simple" steps that get left out assuming that someone knows how to do something.

So I'm not assuming because you know what happens when you assume? 
Oh, you don't?
Look it up.

Anyway, I started by taking my foam brush and brushing mod podge all over the bird.


Once he was completely covered in mod podge, 
I took my shimmer glitter and sprinkled it all over that little guy.
Make sure you get every nook and cranny.
It's sort of obvious if you miss a spot.


That's it!
Amazing what a coat of paint and some glitter will do.


What's that?
Oh, yeah, that's not the same bird cage that I painted earlier.
Are you trying to say that I have an obsession or something?
I call it a collection.
Whatevs...
Birds watch out.  
I'm coming for your home!
0
Back to Top