Duck Tape Valentine's Day Candy pouch tutorial


My tween daughter could not have been more excited about the new Valentine's day duck tape designs.

Duck tape is always coming up with something awesome and their new designs did not disappoint!
My daughter immediately knew what she wanted to make with the Valentine's day designs, and she quickly set to work on these Valentine's day candy pouches!


My daughter was excited to help put together a tutorial of her Valentine’s Day craft, so that you can make these awesome valentine's day pouches too!

Start by folding about 8 inches of tape in half on itself to make a 4 inch long strip.


Do this three times and place them down side by side.


With your three pieces of tape side by side, put a horizontal strip of tape around the front.
One side works, however, you can put the tape on both sides to give it a cleaner look.
At this point, you will have 3 strips long, and 2 strips wide holding everything together.


Repeat these steps with your coordinating color tape


Once you have both of your sheets of duck tape brand tape made, place them on top of each other and fold them in half.


Cut out a heart in one of your tape pieces and then use it as a guide to cut out your second heart.


You will now have two duck tape hearts


Take a piece of duck tape and cut it in half.
Use half of the piece on one side of the heart, and the other half on the other.
Your tape will only cover the side edges.
This will be your adhesive to make your pouch.


Fold up the other half of duck tape piece and carefully stick your coordinating heart in place.


You can't just make one!
Fill your pouch with your favorite treat and share the love to all of your friends!


0

Candy Cane Valentine's day heart treats

It took me awhile, but I have finally gotten into the holiday spirit and started crafting for Valentine's day.
Valentine's day is not my favorite holiday.
I don't know why I don't like it.
I love Halloween because of the free candy,
 but to me Valentine's day seems like Halloween's sad second cousin.

Anyway, all that aside, I spent last night burning my fingertips
{only kidding}
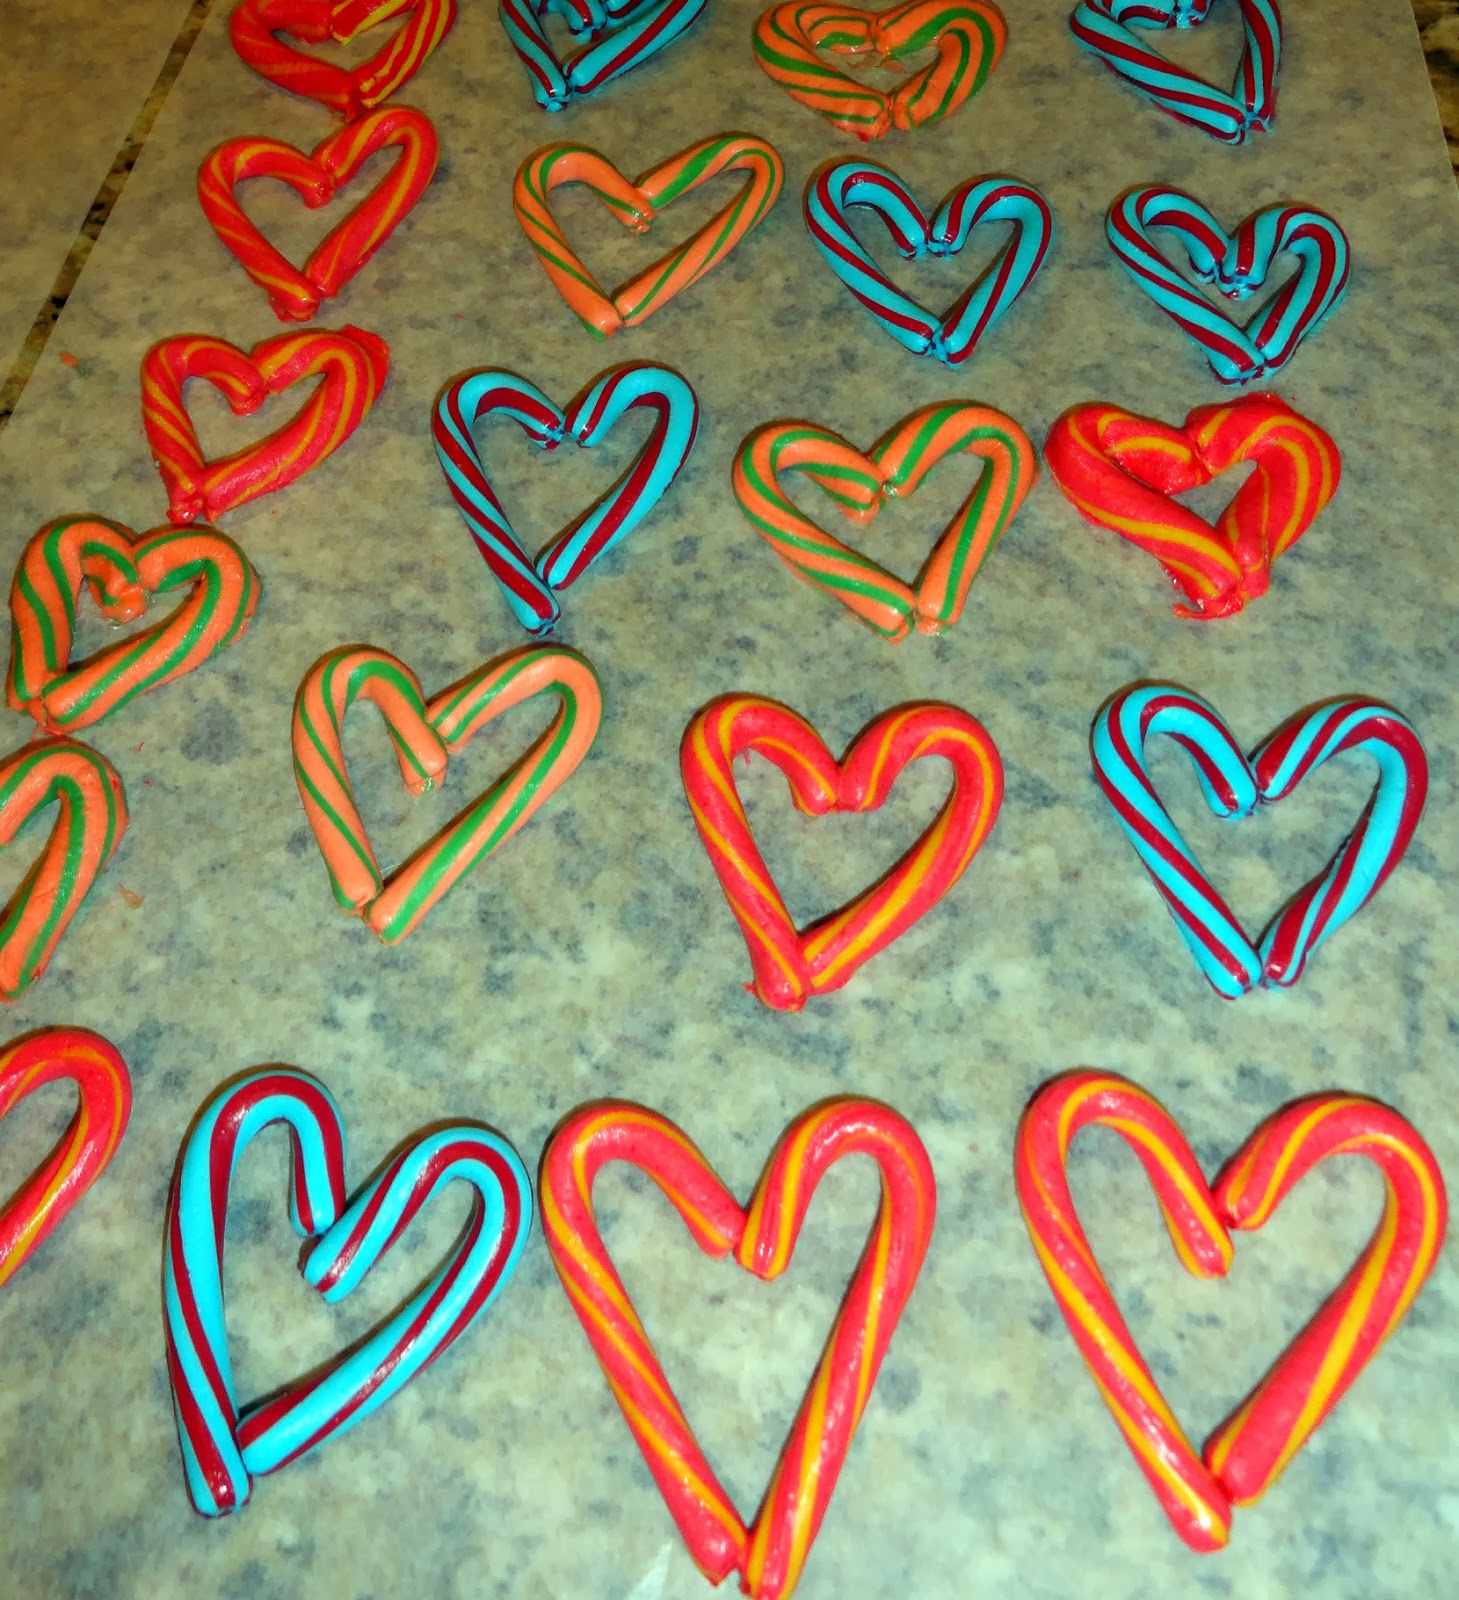
but creating these candy cane Valentine's day hearts.
I love how they turned out, and they will be the "goodie" that my son hands out to his class.


They require a little forethought.
Which is why you may want to just take a second and pin this project so you can get back to it next year.
I saw these sour fruity mini candy canes at Target for 90% off.
Each box was .17 cents.
I bought three boxes, so the total for this project was less than 50 cents.
That's my kind of project!

I was inspired by The Idea Room's candy cane heart suckers back in 2011
and have tried these several different ways
  {with sticks attached to make suckers, filling the inside with chocolate, using large candy canes, using mini candy canes}.
These mini candy canes, were by far the easiest to work with.
They didn't get too hot, they were easy to stick them together, and they weren't big enough that they were breaking and overly fragile.


Start by heating your oven to 350 degrees.
While your oven is heating, unwrap your candy canes and place them together in a heart shape on a silpat {or wax paper} sheet.


Cook the candy canes for around 3 minutes or until the candy cane is pliable but not melting and distorting.
You may need more or less time depending on how your oven heats.
These candy cane hearts are fresh from the oven.


Once you take the hearts out, pinch the ends together.
Heated perfectly, the candy cane won't be too hot to the touch, but will easily mold.


Pick up the candy cane heart with a spatula and place them on a wax sheet to cool.


 It's inevitable that you will cook your candy cane hearts too long, and they will end up coming out like this.
That's o.k.


These candy canes have been heated for longer and will be hotter, so use a spatula to help mold the candy cane back into shape.


Once your candy canes are cooled, 
you can package them up for Valentine's like we are doing,
or put them on a tray for everyone to enjoy!


Aren't they adorable?!


0

Seahawks DIY shirt for only $2


If you have been reading my blog for any amount of time, 
you will know that I am a west coast transplant from the good ole' Midwest.
I've lived in the Seattle area for 13 years, but no matter how hard I try, it doesn't feel like "home"
if you know what I mean.

I grew up cheering on the Colts and the Pacers,
watching the Indy 500 and preparing my brackets for the final four.
That said, I'm not a huge sports fan.
I actually only like watching sports when I know the people playing.

However, there is a wave of excitement in our community as the 
Seahawks prepare for the Superbowl this Sunday.  
I figured it was time to embrace the sport
{and also all of the coupons and discounts available to those wearing team colors...hello 12 cent coffee at Starbucks and 10% off my total at Albertson's.}

I loved the shirt that Emily at Jones Design Company made her daughter,
and decided that I would copy the idea.


I picked up scraps in my scrap fabric bin,
ironed on fusible web to the back of the fabric,
cut the logo out
and ironed all of the pieces in place.
No sewing required!

Best part, I bought the shirt for $2 at Deseret Industries, so the total project cost me $2.
And if I am completely honest, I'm actually really digging my homemade shirt so much more than the ones I've seen on the shelves.
Go Hawks!
Or Bronco's.
0

#trumoo Chocolate Marshmallow drink...the perfect chocolate milk for your family!

As a mom of three, I get brownie points with the kids depending on the afternoon snack I have ready for the munchkins when they walk through the door after a long day at school.

Today, I poured three big glasses of TruMoo Chocolate Marshmallow drink for the kids in fancy glasses 
{seriously, anything in a fancy glass or container is 100 times more awesome!}
and scored some major points!


Chocolate and marshmallows are the best combination EVER
{and if you don't agree, there is probably something seriously wrong with you!}
It was a slippery slope when our family found out how to make s'mores in the microwave!

Speaking of microwaves, you can enjoy the TruMoo Chocolate Marshmallow drink hot or cold!
Be creative and try it as an ingredient in your favorite mocktail
{chocolate s'mores martini mocktail anyone???}

Add crushed up graham crackers or crushed peppermint to the rim of the glass for a festive treat!
Float a marshmallow inside...the possibilities are endless!


As a mom, I love that it's nutritious and delicious!
I have three growing bodies in my care and it's important for them to get enough calcium and protein in their diet.  I am able to offer that with TruMoo.

TruMoo contains no artificial growth hormones and no high fructose corn syrup.
It's made with fresh white milk sourced from regional dairies around the country.

The kids aren't the only ones that will love it.
Moms and Dads will love it too!
While training for several half marathons, chocolate milk was always my go to drink after a long run.


Don't miss out!
TruMoo chocolate marshmallow drink is available in the dairy section at grocery stores nationwide through the month of February.
Find a store near you!
Don't miss out on any updates.
Follow TruMoo on Facebook and Twitter


disclosure: this is a sponsored post.  All opinions are 100% my own.  I would never write about a product I didn't like or use personally.
0

What's in my cart at The Dollar Store

It's been awhile since I did a What's in my cart at The Dollar Store post.
I know you have all been dying to know what I have been buying while I have been shopping there.
Oh, you haven't?  
Well, that's too bad!


My son's Boy Scout troop recently had a cake auction fundraiser.
I bought a plastic platter and was quite pleased with how easy it was to use.
Many scouts cut up foam board or a box as a base for their cakes, 
I spent $1 and none of my time and provided the winning bidder a reusable platter.  
Double win!


I still love my silver plate chalkboard sign I made last year.
I picked up a few so that I could make more.


I have never been a fabric softener user.
Ever.
But there is something about having growing {stinky} children and a dog, that creates a need to eliminate odors.  I've been mixing half water, half liquid fabric softener to create my own febreeze in a squirt bottle.
It works.
Occasionally I add it to the laundry and my daughter gushes over how much she loves the smell.
We don't get out much.


I don't buy a lot of food at the dollar store, but occasionally there are deals to be had.
For instance, these marshmallows.
I used them as a topping on the aforementioned Boy Scout cake auction s'mores bars that my son and I made.  And only because when we first made the recipe and toasted the marshmallows in the broiler, they caught on fire {like blow it out before it burns the house down fire}.  We had to scrape off the burnt marshmallows {that I paid $1.49 for the bag for at Target} and ran to the Dollar Store hoping they would come through.  
Spoiler alert. They did.


I seemed to have misplaced all of my microfiber cleaning towels so when I wandered down the cleaning aisle, I picked up this 2 pack of white towels.
A typical trip for me to the dollar store requires wandering down every.single.aisle, so while I was going down the automotive aisle, I saw these much larger microfiber cleaning towels.
If you think I still got the smaller white kitchen towels, you would be wrong.
I did not.


My teenage son would be shocked to know that the underwear that he is currently wearing came from the dollar store.
I guess it's better than coming used from a garage sale.
I snatched up a few pairs of these Starter brand boxer briefs and the jury is still out 
{I keep forgetting to ask him about his skives}
so I don't know if they are worth the buy or not.
The pickings were slim though.
You had your choice of small or 2XL.


I found myself in need of a bandana
{don't we all every so often?}
and I am glad I held out to see what the dollar store's selection was.
Hobby Lobby had 1 bandana for $1, but the dollar store had 3 for $1.


I needed a nail file.
I bought a 4 pack.
That is all.

And finally, my last purchase was a stock up of Styrofoam balls and cones.
I use these for crafts all the time and they can get quite expensive at a "normal" craft store.
I used the cones last year to make twine wrapped carrots
and I used the balls to make snowmen.
Stock up, it's a great price and worth adding to your stash of craft supplies.

That's what was in my cart
Have you snatched up any winners at the dollar store lately?
0

Finding balance as a blogger. A few tips to keep you focused on what matters most

I've been blogging for nearly four years now and as I mentioned last week, I am starting to make money through the writing and publishing of this blog. 

I still very much consider myself a stay at home mom.
The money that I make generates enough income to be considered a part time job, 
{all be it, a very poorly paying part time job!}
 There are a lot of reasons why I chose to become a stay at home mom, 
none of those reasons have changed just because I started a blog or because my blog is making money.

I've read several blogs this year, blogs that I have read along with for years, whose bloggers have decided to either quit writing their blog, or to take a step back from blogging to focus on their family more.
I've read their posts and through their descriptions, I am thankful that I haven't been sucked into some of the common blogger traps that suck away family time.

I'm no expert, but i'm hoping that I can share a few ways that I find balance as a blogger and still maintain my home and family life.


1. Set realistic goals for your blog
When you have a realistic goal, you will be able to cut out other unnecessary things that may suck the time away from meeting your goals and distract you from your home and family.

I would love to publish original content five days a week, but after attempting that for a year, I realized that it's more realistic for me to attempt to publish three times a week {Monday, Wednesday, and Friday}. It's a priority for me to have my three posts scheduled at least the week prior to them going live, though that doesn't always happen.  I get most distracted when the kids have a school break or during summer vacation.
I make it a priority to schedule three posts a week and with a little planning that is a very do-able schedule for me.  There are times when I have had to carve time out {I skipped Bible Study today} to make this possible, but publishing three times a week is a realistic goal for me.

2. Set bonus goals
My family comes first, but there are times that I find that my family is taken care of, my home is cleaned and organized and I have bonus time.  This is mostly because I have three kids in school {I don't know how moms with small children blog!}, because believe me, if they are around, there is no bonus time!  
Like I mentioned before, my priority is to publish content three days a week.  There are weeks that I get five or six days of new content scheduled.  That would be a good week!  Reading other blogs is another bonus goal of mine.  I like to spend time being inspired by other bloggers.  It is afterall, why I started blogging in the first place.  Another bonus goal is cleaning and updating my blog.  Obviously, it's a super bonus goal since my tutorial page hasn't been updated in two years!  
3. Schedule
I wish I knew about scheduling my posts when I first started blogging, but I must say, I did't realize that I could schedule posts until I had been blogging for over a year!  It makes an amazing difference and gives me peace of mind, knowing that I have content that I can plan out.  Scheduling makes it possible for me to take trips with my family and never miss a beat.  Once a post is scheduled, there is very little maintenance I need to do.  Sure, it would be great if I joined link up parties, or if I pinned my posts but if I have scheduled a post, all of that is secondary for me, especially if I am spending time with my family.  
Last summer my family spent two weeks traveling on a great midwest road trip. The extent of my blogging during that time came down to responding to e-mails {less than 10 minutes a day} since all of my posts were pre-scheduled.
4. limit social media
I must confess that this is getting harder and harder for me now, especially since I got a smart phone.  I find myself getting drawn in to instagram or facebook because afterall, they are part of my "job".  Hands free mama wrote a great post about How to Miss a Childhood.  It's a great reminder for me as a mom to not get sucked into my phone and to be present with my children.  My husband and I have made it a priority to put aside all electronics during our evening date time.  Every night from 8:30-10 we disconnect so that we can connect. It's shocking how distracting a little hand held device can be.
5. focus on your priorities
As I mentioned before, my priorities as a stay at home mom have not changed just because I have started blogging.  I still very much want to be present for my children, I still want to volunteer in their classrooms or  at their schools and I want to cook dinner and take care of the house in the same way that I was before.  If my house isn't clean, I don't blog.  Blogging doesn't come before helping in a kids school, nor does it come before taking care of my family.  
I have between 9:45 and 2:30 Monday through Friday to get everything that I need to get done during the time that my kids are at school.  This includes running errands, making/completing projects for blog posts, cleaning, prepping dinner, and loads and loads of laundry!  That time can sometimes go very quickly during the day, and there are days that I don't even get a second to think about my blog.
To be completely honest, I could grow my blog bigger.  I could put more effort into social media and marketing.  I could do 100 things to make my blog more user friendly.  I could spend more hours on my photography.  I could go to blogging conferences, I could update my page, I could make more money, I could accept every opportunity I was given, I could, I could, I could.  But I don't.
This year, I wrote about a few blogging goals for myself.  Those goals were written to keep me more focused on what I want to achieve as a blogger this year.  Really, they all hinge on making relationships with other bloggers.  Relationships are important, especially those relationships that we have with the people who live in our homes.  Make them a priority.  They are what matters.

pitfalls for bloggers
If I could sum up what I have read is the demise of other bloggers, it is that their blog keeps them away from what matters most.  Bloggers are working long hours into the night on projects, editing photos, answering e-mails, writing tutorials.  Sometimes bloggers take the time out to be with their kids during the day, but then blogging takes place of their time with their spouse at night.  Staying on top of social media can suck hours out of the day and while you may be in the same room as your family, are you really present?
The things that bloggers love about blogging {making our own hours and working from home} are the same pitfalls that can distract us. The work never leaves us.  You have to find balance in your own life and sometimes that means that you say "no" I won't be a guest contributor or "no" I won't take that job this month because it would require more hours of my time than I would like.  It may just mean that you put your laptop down after naptime or that you set a timer when you use social media so that you don't get sucked in for hours.  It may mean that your blog doesn't grow at an astounding rate and that your analytics go down, but in the end, the only numbers that matter are the number of people in your home that are receiving your love and your attention. 
Do you have any tips on finding balance as a blogger?
I would love to hear them.
0

Felt airplane pillow

On Monday I shared with you the woven felt pillow I made for my youngest son's room.
Because it looked a little sad and lonely on the bed being the only pillow, I thought I should whip up another pillow friend to go with it.
My 8 year old is airplane obsessed and wanted this SR 71 Blackbird to be a part of his room.
I simply ironed on adhesive to the back of a piece of grey felt.
Then I printed off a silhouette image of the airplane and cut around the felt.
Once your image is cut, iron it on.
It's as easy as that!


I bought the pillow insert at IKEA in their as is department for $2 and the felt I used was left over from my woven pillow.
The total cost for this project was under $3.

Without giving away a whole room reveal, 
this is what the pillows look like on his bed.


Give me time!  
I'm still trying to wrap up the details of his room for a big reveal.

0

My thoughts after today's school shooting at Purdue, my alma mater

Today, as I have been in the comfort of my home thousands of miles away from my Alma mater,
my heart has been with my Purdue family.
Today there was a school shooting on the campus of a college that I love.
There aren't many details but because of social media, a sorority sister who works on campus updated her status literally minutes after the shooting began.
There was one fatality and one person has been taken into custody.


I was quickly reminded of a time in 1996 when I was a freshman at Purdue.
I was in my dorm room after a long morning of classes.
My attention was drawn out my 8th floor window to armed SWAT team on top of the nearby dorm and co-rec building.  A freshman student was turned in by his grad student RA for drug possession and quickly sought revenge in what became a murder/suicide.

There was no social media.
No live updates through twitter, 
only rumors and thoughts spread by campus co-ed's walking past the dorm on their way home from class.
Students talked of hostages but the reality was, this 18 year old shot his RA then went directly to his own room where he took his own life.

It took hours for the area to be secured.
Boys were finally allowed to re-enter their dorm rooms after complete lock down for hours.
I had recently started studying with a guy in my math class who happened to live in that particular dorm.
He had given me a good number to contact him at a few days prior in case I wanted to study that evening.
I dug up that number and called it to check in on him.
The number he had given me, was the number of the killer.

It was shocking for me to hear the recently named killers voice on his voice mail.
This 18 year old guy who days before was just another co-ed.
A friend of a friend.

Classes resumed like normal.
Campus went unchanged.
Fast forward nearly 20 years later and the news of a school shooting on campus, my campus, made these memories of this shooting my freshman year flood back.

Purdue will be changed this time.
It's inevitable.
Life as we know it has changed.
This shooting may make high school seniors think twice about the fresh ink on their acceptance letters.
It may make parents rule out the possibility of looking at a school like Purdue because it's been tainted.
It shouldn't.
Purdue seemed as prepared as they could be for a school shooting.
Students received texts minutes after the shooting started alerting them to lock down and seek shelter.
Officers were on the scene in minutes.
Out of respect for the victim and for the boilermaker community, classes were canceled, and a candlelight vigil is scheduled.
Counseling is being offered for those affected.
I'm sure there are things that the school could work on and improve, 
but we should hope and pray there isn't a next time for their improvements to be used on.
Purdue has my heart and holds so many fond memories.
While my mind continues to be drawn back to the events of the school shooting that I experienced, 
I will do my best to focus on the memories of the friendships and good times that were had while on campus.
I'm praying for the families and students affected.
It's never an easy day.
Ever Faithful
Ever True
Thus We Raise Our Song Anew


0
Back to Top