Showing posts with label baby gifts. Show all posts

Personalized Handmade Muslin Blanket and How to Cut a Large Image

New babies are the absolute best aren't they? It's so hard sometimes to remember how small those babes are when they are first born, such teeny tiny little hands and feet! My newest niece was born last week. Sweet little Lottie James. She's baby girl number three for my brother and sister in law and she's got plenty of hand me downs so I thought she needed a little something personalized just for her. I made a muslin swaddle blanket {like I did for this project}, and used stretch heat transfer vinyl instead of normal heat transfer vinyl. Read more and I will tell you why.

personalized baby blanket with bible verse


The best part about having a Silhouette is that there are unlimited possibilities for what you can create. You can make just about anything that you want on almost any surface. I am a bit out of the baby loop since my youngest son is nearly 11, but when I was at Magnolia Market this past winter {read more about my visit here}, I saw a beautiful muslin baby blanket with the sweetest Bible verse on it. I don't even remember the verse, but the idea for the blanket stayed with me and with my niece's arrival, I finally got to make one.


I ordered my vinyl from Pro World because they have everything! Muslin is a very thin material, so you don't want a heavy heat transfer vinyl being used on it because it will weigh it down. Instead, I ordered the Siser Easy Weed stretch vinyl in black. It cut like butter in my Silhouette and the best part is that it doesn't weigh the blanket down.


Remember how fun it was so spin those huge display wheels filled with bike license plates with personalized names on them when you were a kid? It was usually hit or miss if I found one with my name on it {my husband Mike, not so much. Easy score every time.}, but my guess is little Miss Lottie won't find her name personalized on anything. Again, another bonus of owning your own cutting machine.


When cutting vinyl of a large surface {this blanket is 42x42},  I always set my Silhouette cutting mat in the design software to the size the item is that I am cutting. If you look closely, you can see the outline of the 12x12 cutting mat at the top left. Doing this, just gives you an idea of how the text size will look on the item you are making.

I knew I wanted to curve the name, so I made an oval and sat her name on top of it. The oval doesn't cut.
Once you have all of your design made, then you can start moving your cut images around so that they fit on the space to be cut.  You will probably have to change the length {mine is 30" long}, but all of the cut images are on the roller to be cut {a Silhouette must have!} and not a whole lot of material will be wasted. 

Always remember when cutting HTV that the shiny side goes down and that you need to mirror your image!

Because it was such a large space, I put my iron on the floor in my bathroom and did my application there. For more tips on how to cut and use heat transfer vinyl, see this post.

handmade muslin swaddle, heat transfer vinyl

Now, let's get back to looking at cute little babies shall we.


If you don't have a Silhouette Cameo, I highly recommend it. It will seriously change your crafting game. If you need to stock up on vinyl go check out Pro World. Give the stretch vinyl a try. It's perfect for those delicate projects since it's the lightest vinyl out there or if you are making any project that needs a little stretch like an athletic style shirt.
stretch vinyl, heat transfer vinyl, bible verse, baby


dislaimer: this post may have affiliate links. By clicking on them and purchasing through them, I may receive a small commission. These small purchases help me to continue to keep writing content and creating at Holy Craft. Thank you!
0

Hand stamped muslin swaddle blanket

I don't know what it is but I love a good handmade baby gift. I've enjoyed crafting and creating baby gifts for as long as I can remember.  Babies are just so small and fresh and new and there is so much excitement about their impending arrival. It's fun to dream and remember all at the same time! The older I get, the less and less baby gifts I seem to be making for friends and family members. It's just sort of that season as we wait for them all to grow {which is exciting too!}, but thankfully, my youngest son has young teachers and sometimes I get to craft some hand made baby items for them. 

This time though, I wanted my 10 year old son to do most of the crafting for one of his favorite teachers. It's nice to have a gift handmade by a parent. It's even more special if it's created by a student don't you think? 

handmade swaddle blanket

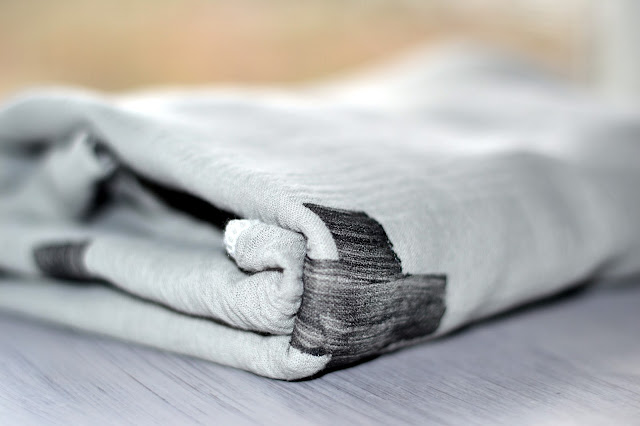
I could not be more excited about how well this hand stamped swaddle blanket turned out. If my 10 year old can make it, I know you can too!
swaddled baby

 Come find out how!


Things in baby land change through the years don't they? One thing that hasn't changed is how much babies love to be swaddled. One thing that has changed is how these swaddle blankets look. Muslin swaddle blankets are all the rage now and look so sweet on those babes who need a lightweight blanket to keep them all snug as a bug. If you don't want to make one, these are pretty sweet.

I was able to find cotton muslin in a few different colors {I settled on grey} at my local Hobby Lobby. I think it was $6.99 a yard but I had my coupon of course to sweeten the deal. I wanted my blanket to be 46x46 inches square, so I got a yard and a half. I pre washed the material and then ironed it and I used my serger to finish the seams. You could also roll the seams and do a straight stitch.

swaddle blanket plain

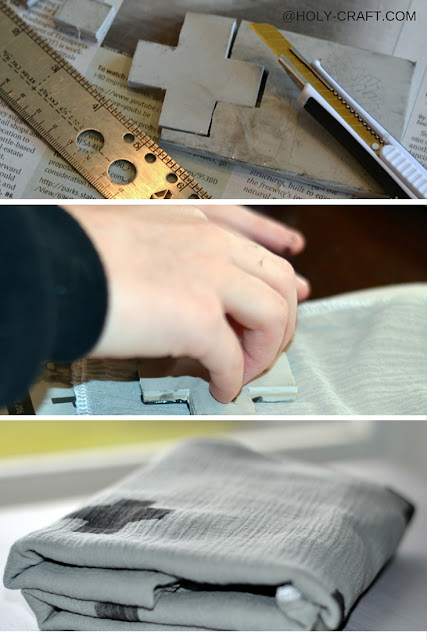
The possibilities are endless as far as stamp designs go, but I knew I wanted to try something simple that wouldn't be discouraging to my 10 year old as he crafted this precious blanket. I stuck with a plus sign {also seen on this project} and since the image was small, I used a sheet of tracing paper and an image on my phone to come up with my design.

phone image

To make the stamp, I used a rubber mat, and an exacto knife. I put my tracing paper over the rubber, and used the knife and a straight edge to cut the design out.

rubber stamp

Once the design was cut and I had my stamp, I let my son loose! He used Tulip fabric paint that we squeezed onto a paper plate and used a foam brush to apply it to the stamp. He had a wet paper towel near by to wipe his finger tips on so he wouldn't get paint where he didn't want paint.

painting the stamp

I didn't do a single one of the stamps. Owen crafted it all!

rubber stamp design

The stamp worked really well and Owen learned that if he used his brush just right, he could paint in these cool brush lines that would show up in the stamp.


Here is a little recap of how these hand stamp blanket was created.

how to make a handstamped muslin swaddle blanket

We were both so happy to work on this project together, but even happier that we could give something Owen worked so hard on to a teacher that worked so very hard with him.

hand stamped muslin swaddle blanket

I can't wait to see her sweet little baby boy all wrapped up in this hand stamped muslin swaddle blanket.

swaddle blanket

What is your favorite thing to make and give for baby gifts? I would love to hear about it!
disclaimer: there are affiliate links that are used in this post. 
0

12 month onesies custom order


Earlier this month I received an e-mail from a reader who wanted to buy a set of the 12 month onesies that I created for baby shower gifts several years ago.
I don't normally take orders and I don't have a shop,
but I thought I could whip up a set for this lovely lady who was buying them as a shower gift for her sister.

I think they turned out too adorable not to share!
They are gender neutral since the mama to be doesn't know what she is having.
I always love the side by side of the smallest onesie and the largest one.
Those babies grow fast!


Since the mama doesn't know what she is having, I threw in a little gift...
a bow tie for him or a flower headband for her.

I sure wish these were around when my kids were little.
How fun to track their growth each month!
Do you do anything to document each month for your babies?
0

Mod podge mod melts and mod molds cell phone case and baby keepsake box

Last week I shared with you a sea glass jar

and a few coral jars that I created using mod podge collage clay.


I had some time to play with this whole line of mod podge supplies and I created a few other projects I wanted to share with you.
Silver airplane push pins to go in my son's vintage airplane room.
a baby keepsake decoden box for holding treasures from your little one.

and a travel inspired cell phone case


Because the baby keepsake box and the phone case are very similar,
I want to share that tutorial with you here.
Check back on Thursday for a very easy tutorial on how to make the airplane push pins.

These are the supplies that you need to create your own decoden cell phone case.


 You will start by using your glitter mod melts in your mod mold 
{you can pick yours up at Michael's}.
Place your mod melt in your high temp glue gun.
A low temp glue gun works, though it's harder.


Squeeze in your melted mod melt and let it harden for about ten minutes.
Once it's hardened in your mod mold it will pop right out.


I used both collage clay and the collage drizzle paint.


Practice using your collage clay.
There are three different tips that come with your clay.


It's a little bit like icing a cake.


Use your collage drizzle paint to add a little color to your project.


Gently press your mod melt embellishments into your collage clay.
Let your project dry overnight.


Enjoy your completed project!


To make your baby keepsake box, 
 I made a ton of different colored mod mold embellishments using mod melts.


I bought a box and painted it.


I used my star tip on the collage clay to create my keepsake lid top.


Place your mod melts randomly on top.


I added a line of coordinating ribbon around the edge of my box top.
You can use your baby keepsake box at a baby shower for guests to write messages to mom and baby,
or place note cards inside for mom to write down memories when full coherent sentences just aren't happening!


I'm having my best time playing with these mod podge supplies!
What would you create?
Don't forget to come back on Thursday for a full tutorial on how to create the silver airplane push pins.
0

Teacher classroom baby shower celebration


Several years ago, my daughter's fourth grade teacher was pregnant with her first baby.
I thought that it would be fun to throw a baby shower for her as a classroom celebration.
It was a fun party that you can read more about here.

Fast forward a few years, and my son's third grade teacher is pregnant with her first baby
{a boy they plan on naming Kamden} due in July.

I thought that it would be fun to host another classroom baby shower celebration.
The kids have had the chance to see their teachers belly grow and have been excited about the baby since they found out that their teacher was expecting.

The week prior to the classroom baby shower, 
I used my silhouette software to design a few items.
I found a cute whale in my silhouette library and decided to use that as my theme.

The whale image came with two small tear drop shapes for the spout,
I just replicated those and made enough for the kids in the class to each sign one.
While the teacher was out, I brought the grey shapes and a sharpie pen in for the kids to write their names.

I glued the shapes down in a pattern that I liked and put it in a frame with a mat for the teacher to have as a keepsake.


 I think it turned out really cute!


I used the whale image and designed two more keepsake type mementos for the teacher.
It's always fun to see what kids say when they fill in the blanks.

Since we are still in school, we played a few games that had an educational spin on them.
For the literary component, we did a fill in the blank nursery rhyme game.
You can find the free printable here.
For the science component, we matched animal baby names.
That free printable can be found here.

We also talked about math.
For instance, the kids guessed how many diapers a baby would go through a day
{3 was a popular answer!}
The kids took the average {it's 10} and calculated how many diapers a baby will go through in a week, month and year.

We also talked about using averages to guess the baby's height and weight and also how a due date can mean that the baby can be born two weeks before or two weeks after.


The kids filled in their "how to be a good mom" advice sheets and the teacher can keep those in a keepsake book for reference.


We collected money for a classroom gift card and some of the kids brought in some of their own presents for the teacher.
While we didn't have a real cake, we did have Popsicles outside on the playground during recess.


The kids will all remember the year their teacher had a baby, 
and hopefully their teacher will remember how very special this time of celebration was.
0
Back to Top