Showing posts with label birthday party. Show all posts

Sophie's birthday! How we celebrate with a puppy party.


Did you know that this week is National Dog Week? You know what else it is? It's also Sophie's birthday! Sophie is our 5 year old golden retriever that is everyone's favorite furry member of the family. I love that we get to celebrate both this week!

I wanted to share a little bit about Sophie with you.


We love spending time with Sophie and like to include her in everything that we do. The picture above was from a recent beach vacation to the Washington coast. She had her best time running in the sand and chasing seagulls! If there is one thing that Sophie loves, it's being at the beach.  Pretty sure she gets that from me!


We are capping off National Dog week and Sophie's birthday week with a dog food cake. How fun is this?! I made it using a can of wet dog food and sprinkled it with some dry dog food.  The candle is made from a treat and it's resting on a pretty awesome Frisbee she can play with later.


Since mealtime is her favorite time, I think she likes her birthday cake!


0

Nerf target practice birthday party

My youngest son turned 8 in August.
Yes, I'm a little late sharing the party,
but it took me some time to recover!

Only kidding!

Eight is a right of passage for our kids.
When you turn 8 you can finally have sleepovers with your friends.
All three kids have celebrated their 8th birthday with a sleepover party.

Outside of just having a sleepover, Owen wasn't too particular about what he wanted to do
but Mom knew with 6 boys over we needed to have some plan of action to keep them entertained!

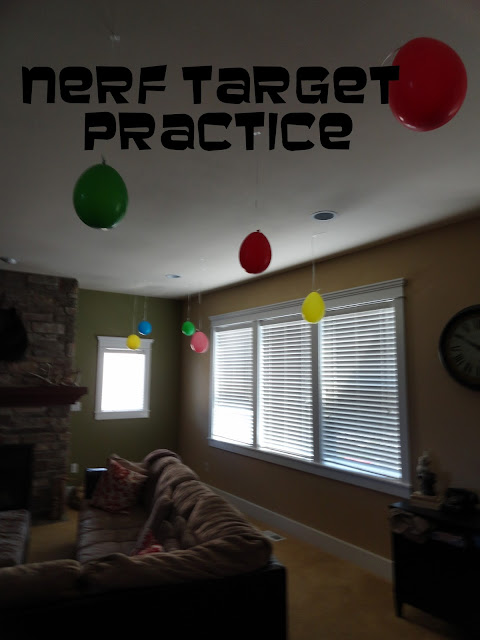
The party started at 4 and around 2:30, I decided we should set up nerf target practice.
You can find inexpensive Nerf guns or have the kids bring their own.
Consider providing the bullets for everyone. Those are too hard to keep track of.

nerf birthday party target practice

Thankfully, I had a few helpers!
I recruited my younger two kids to cut up targets and place them around the house.


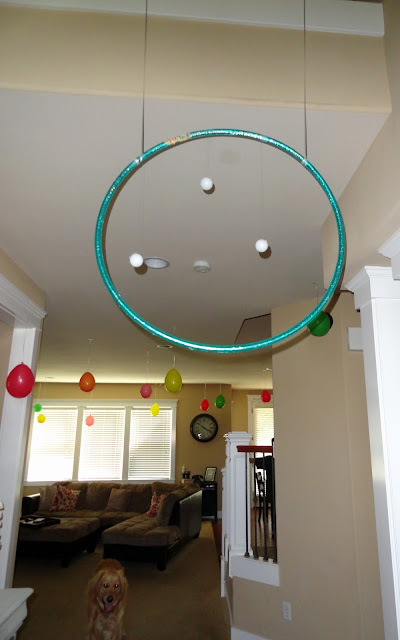
That morning, I found a hula hoop at a garage sale for a quarter.
I quickly hung three ping pong balls from the edge and put several strings 
through the balcony in our front entry.
I hung balloons from strings all throughout the house.

Nerf birthday party target practice

 I stacked cups on a step stool in the corner


Looks like a party!


The final touch was this tissue paper nerf target that I made with an old frame, tissue paper and paper plates

Nerf birthday party

I started with a paper plate


I cut the center out of the paper plate.
It isn't pretty, but it doesn't have to be.
I cut squares out of tissue paper that would fit behind the plate and taped them in place.


Your plate is ready for target practice!


I used a hole punch and string to secure the plate in the frame.
I placed extra tissue paper and tape so the kids could easily change out the targets once they hit them out.


We had a great time!
6 weeks later, I am still finding nerf bullets all around!

0

Candy box party favors

My kids love to provide a special treat for their classmates on their birthday.
This year, my daughter's 11th birthday fell just before 5th grade camp.
I made up these special birthday candy box party favors for her cabin mates to enjoy while at camp.


You all know how much I love the Dollar Store,
in our local mall, we have a Japanese dollar store called Diaso.
Everything in the store is $1.50.
You can usually find some really interesting items, but some of my favorite finds are the bento box accessories.

I picked up these small foil liners and these food packs 


and then picked out my daughter's favorite candies.
I may have over planned with candy because I didn't end up using it all.
Oops!  More for me!


I laid out the food boxes and found small cupcake liners and the foil liners to be great candy dividers.


I filled the liners up with some sweet treats

and topped it off with an M&M packet.


 I closed up the food container and tied a ribbon around it.


Aren't these fun?!
The kids at camp loved their special treat!

0

How to make custom invitations in your Silhouette software

The thing I love about the Silhouette designer software, is that it allows me to use almost any image I find as a design.  I've been using that to design custom invitations.  
There was a bit of a learning curve, but I think I have finally mastered the technique and I want to share it with you.
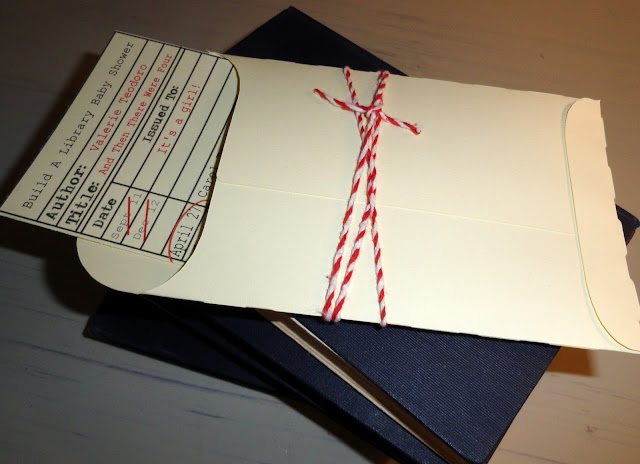
The latest custom card I made were these library card invitations for my sister in law's storybook baby shower.  You could use this same basic template for so many different invitations.  Save the dates perhaps. Today, I'm going to show you how I made these library card invitations in my Silhouette software.
I found this library card template from Misc Makers.
I was able to just copy and paste the image straight into my Silhouette designer edition software.
librarycardblank
Begin by sizing the image. 
Then, I used my eraser tool to remove the text at the top and at the bottom that I didn't want.


I find it easiest to move my image to the left when I am writing my text.
For this particular invitation, I did every line separately so that I could move it around the invitation as I placed it.  It's tedious, but in the end it's easier to manipulate.
I used Courier font for the text.


The final invitation had more words and text than I am showing you here, but the whole idea for the end product is the same.  Hit shift and mouse click to select the font that you want to work with.  I wanted all of the font so that I could change it from a cut image to a printed image and also so that I could change the color.


Silhouette wants to automatically cut your image.
If you are printing, you need to make it a no cut image.
Once you change your image to no cut, Silhouette automatically lightens your image in that screen.

Escape from that screen and it will go away.

If you are ever not sure if your image is a cut image or a no cut image, go back to the cut style screen.
If it shows up in red, it's a cut image and needs to be selected and changed into a no cut image if that's what you want.  I could have taken this time to select "cut edge" around the library card, but it was an easy straight line that doesn't take long to cut with my paper cutter.


Next, I wanted to change the font color.
I used black and red on this invitation.
I always click first on the line color and then click down to the fill color.
If you want a specific color (for instance, I made custom Starbucks invitations once and wanted that Starbucks green) you can click on advanced options at the bottom and use the color scale to select your color.


After my text is the color I want it, I can now go to text style and change the size and adjust where I want my text to be on my invitation.


***IMPORTANT STEP***
This is probably the most important step to creating printed custom invitations in your Silhouette software.
I placed my text where I wanted it on my invitation, then I went to edit, and selected all.
Once your whole image is selected, go to options and select "group".  This will make your image a cohesive image and not one with a bunch of parts.
Now you can move your image as a whole.
Then, the most important step.  Make sure you go to line style and at the very bottom check that box that says "print lines of selected shapes".  If this isn't selected, it won't print.  It took me hours to figure that out.  Don't make the same mistake.  You can read about my experience here.


Once your image is complete the way that you want it, save it.  I didn't save this invitation when I made it and my printer froze and I lost everything.  See, huge learning curve!
When you are ready to print you can go to options and select replicate and then duplicate right or if you have small images, you can select "fill page".  
Then, print as normal.


This is my completed image (before replicate), with all of the information included in the invitation.


After I had the invitation printed, I used the library envelope image I had in my silhouette library.
It was an easy cut, I just had to make sure that the pocket would be large enough to hold my card.
Once you have the measurements correct, cut it out in the Silhouette.


I used my tape runner to seal the edges and slipped my library card invitation inside.


I added some bakers twine to complete the look.


That's it!
Easy custom invitations using your Silhouette designer software.


Please let me know if you have any questions, or if you have any tips to make my custom invitation making easier.  It's been really fun figuring out the software.
0

I'm off and running again and have some Merrell shoes for training

If you have been reading along with my blog for long enough, you would know that I run, but don't call myself a runner.  I've never embraced the title of runner even though I have trained for and completed numerous 5k's and three half marathons. 

I even went as far as to write a post about how I was hanging up my running shoes...for a little while.
When I turned 30, I celebrated my birthday by participating in my first official 5k race.
Each year, I like to celebrate turning one year older by participating in some type of athletic event during my birthday month of September.
I didn't do that last year, and I sort of missed it.

This year, I am turning 35.
Sort of a milestone birthday.
I'm hitting my mid 30's and decided to sign up and train for half marathon number four.

The good people at Merrell heard about how I was celebrating my birthday, and offered me a new pair of running shoes to help get me inspired to train for this big event.

I had no idea that Merrell had so many athletic shoes to choose from!
It was a hard decision with so many fantastic designs that don't just look good, but that perform well also.

I ultimately settled on the Road Glove Dash 2 in grey and pink.
Aren't they cute?!
I'm sure at this point we have all heard or seen the shoes that are part of the barefoot collection.
The shoes that look like toes are less my style, but these look like normal running shoes, but with the benefits of barefoot running.

Merrell Road Glove Dash 2 Grey/Pink
What are some of the benefits of barefoot running you might ask?
The Merrell Barefoot collection (found here) allows the feet to discover a more natural stride and gait, and encourages a lower impact midfoot landing.  They are designed to engage the feet efficiently, avoid injury, improve alignment and strengthen the body's core.  These super light shoes (6 oz) stimulate the senses and increase quickness and agility. 

Are you sold?  Because I was!
That sounds like everything I want in a running shoe.


I've had a few opportunities to take them out to the track for a test drive.


They are so light, comfortable and easy to run in.

Merrell has more than just running shoes.
They also have tons of mens, womens and children's shoes for anything you need.
And Merrell stays true to comfort without compromising style, even in their everyday shoes, boots and sandals. 
You can shop Merrell here.
Let's start training!
0

Mermaid pool party


On Monday, I shared with you a few of the details from my niece Sofia's fifth birthday party.
If you missed it, you can go here to catch up.
Today, I want to share with you the rest of the details of this special day.
I can't take credit for making the cake.  
My sister in law hired someone to make this three tiered ombre cake.
I did however, make the cake topper.  
I used the mermaid image from the birthday party invitations (thanks Emily!) and made custom print and cut shapes in my silhouette software.  Since the cake was in the middle of the banquet room, the topper was double sided.  I used embroidery floss for the shell detail and shimmery glitter to make the whole thing stand out.
The cake stand was custom made from an aqua colored plate and a large white candlestick.
You can see more of my custom cake stands here.
I bought yards and yards of fabric at JoAnn's to use as draping.
You can read more about my custom mod podge sandcastle here.
Tissue paper pom poms and lots of grasses, lanterns and fishbowls decorated the mantle.
Along with this custom birthday banner (that had a hard time staying in place with the wind blowing in from the large patio doors).  
The most talked about detail of the party were these two custom pineapple palm trees.
I saw the idea on pinterest and had my engineer husband draw up a plan for making the base to hold the pineapples.  My brother in law had the tedious job of coring the pineapples to fit the base.
At the top of the pineapple palm tree, some palm fronds were inserted to make them look more palm tree-esque.  Each palm tree fruit platter flanked the ends of the two buffet tables.
There was lots of yummy food catered by Marination and Bitterroot.
Thankfully, there were lots of people (over 100!) to enjoy all of the yummy food!
What's yummy food, without yummy drinks?
Here are some of the kids selections
Even a wine with the guest of honor's name!
No child's party is complete without a mermaid margarita bar!


There were four different combinations offered, or you could make your own specialty!


There were several different kids activity tables including custom mermaid stickers and tattoos.
Kids could color their own mermaids, decorate a drawstring bag, make a mermaid crown or merman sword, and color their own fish cup.
The kids really enjoyed all of the activities!


And what's better, we had a gorgeous day of sunshine to celebrate Sofia's party with a swim in the pool!
Here's the birthday girl enjoying a swim with her Uncle Steve!
Happy birthday Sofia!
I hope you had a wonderful day!
10
Back to Top