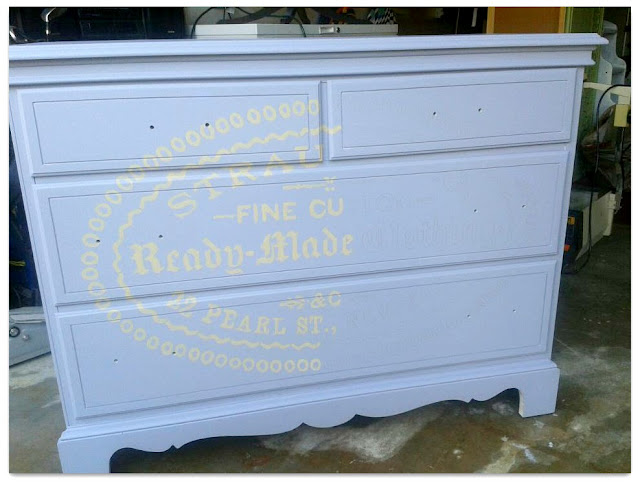
Using an Overhead projector to create an image transfer on furniture

Can I confess a few things?
I have a passion for good photography but I am really bad at it.
I also love painted furniture but I'm bad at that too.
Both things I wish I was better at, but unfortunately, no matter how hard I try, I've not gotten any better at either!
Thankfully, God gave me other gifts {bonus points if you want to list them below in the comments section}, and so I celebrate other people's talents.
I am excited to introduce to you, my new friend {we met for coffee once, so I'm pretty sure we are new besties} Laddie.  Laddie is the mastermind behind the facebook page Re-New Furniture Finds and Re-finishing.
I've been following along on her facebook page for a few months now, and am amazed at how talented Laddie is for seeing an old piece of furniture and breathing new life into it.
So without further ado, I'm excited to let Laddie take it away.
ps-Laddie, your BFF necklace is in the mail. 
Let me start by introducing myself, I am Laddie from Re-New Furniture Finds and Re-Finishing. I started up a little garage business of making over furniture that for me had begun as a hobby. I see great pieces of furniture at secondhand stores, yard sales, Craigslist and the curb and instantly see potential in them becoming more than they are. I love color and the un-expected and taking cues from fashion for some of my designs. I like trying new techniques and am not afraid to fail and start over. Some of my favorite pieces have come from experimentation and failed attempts.
So, the Lovely Rachel asked if I might share with you one of my recent triumphs.
 I call her "The Amazeballs Dresser".
She began as an image in my head.
You know when you formulate a vision of an outfit you want to wear but when you go to your closet you discover you have none of those items in your wardrobe...that's how this dresser started.
One day while thrifting at a local Goodwill I saw my starting point like a gleaming beacon of light.
Well, actually it was just an old school projector that didn't even light up. But,
it was only $7.99 and happened to be the colored tag of the day which gave me another 50% off
so I was willing to take the gamble on it possibly not even being functional.
Then I went about scouring EBay for the proper light bulb and transparency film so that I could
print out images I wanted to use.
The bulb arrived. I carefully installed it.
 I plugged in the projector and before I opened my
eyes could hear the hum of it working! YAY!
Next I found a fabulous image I wanted to use from a site where the printables were
A W E S O M E
and FREE!
Printed it out at home onto my transparency film and was ready...um, wait nope not yet.
What piece did I want to try this out on? Hmmm...
Low and behold only days later I had a fan from my Facebook page message me with an offer to
come get a dresser she was wanting me to HAVE... for FREE!
She was inspired by what she had seen me do and wanted to donate the dresser.
Guess what?
Perfect piece for this project - I knew it at first site!
I took her home and got right to work. I chose a light lilac color that I found at Home Depot in the Oops section of paint.
(If you ever want to meet me in person you can probably find me there any given day. I sort of stalk that section of the store...regularly!)

After she was primed and painted I closed the garage doors, set up my projector
across from my dresser and went to hand tracing the image onto the front of the dresser.
The trick I found on doing this is to use watercolor pencils which can be
washed off once you have painted in your image.
It took along time to trace it out and I was careful to get into the creases
and seams of the dresser drawers.
Then I used a small jar of oops sample paint in light yellow
for filling in my vintage label design.

I thought I had picked an easy "try it out" image...turns out it was more
than I bargained for! Different fonts, symbols, shapes, etc...
But it came together.

   I re-used the original hardware by giving them a fresh coat of gold paint and re-placed them
on the dresser.
The plain Frenchie dresser was now complete and I had amazed myself with how
she turned out. Hence the name "Amazeballs Dresser".
I had challenged myself to step it up and try something new and more difficult.
The result; a one of a kind, hand painted dresser that I was thoroughly happy with!
I encourage everyone to see the potential in old un-wanted items. To be creative and trust your gut.
To challenge yourself to try new ideas and to not be afraid to fail...you
might just succeed! Start small with an item you can "Re"-New.
Here are a few of my other experiments with color, design and technique.
Materials used for the project in this post were:
  • vintage dresser with oodles of charm
  • overhead projector that probably came from my elementary school
  • transparency film found on EBay
  • the use of an image host site and my home printer
  • watercolor pencils
  • primer
  • 2 colors of oops paint from Home Depot
  • gold spray paint
  • poly acrylic sealer
Thank you Rachel for having me on Holy Craft!
Laddie

Isn't that dresser amazing?!
Such a smart technique!  So wish I hadn't passed up that overhead projector I saw at a garage sale last week!  Thanks for sharing Laddie!  Nice work!
0

Guest Posting at The Southern Institute today

You can find me sharing my tutorial on book page and twine pumpkins at The Southern Institute today.

Can you believe these pumpkins cost me only $1 to make?
Swing on by and see the full tutorial.

0

Gift card envelope tutorial from David Tutera's new Celebrate card making line

 Several weeks ago, I received a very large package with the opportunity to review the new David Tutera Celebrate card system that will be available soon at Jo Ann's.  I was like a kid at Christmas when I opened the box!

I had such a fun time with this easy 1-2-3 system.
I immediately thought that I would create a gift card holder from the David Tutera Celebrate line for an upcoming baby shower I will be attending.


Step 1 of the David Tutera Celebrate collection is to choose a card, in this case, I chose the envelope.

 Step 1: choose your envelope
Step 2: fold that envelope in half
Step 3: open the envelope
Step 4: cut on the crease down the middle on the envelope closure end
Step 5: tape down one side of the envelope that you just cut and press closed.  This will now be the top inside piece of the inside of your gift card holder.

Step 2 of the David Tutera Collection is to select your decorative layers.
For this gift card holder you will need four pieces of coordinating paper.
I choose 2 of the small polka dot embossed papers, and 2 of the white polka dot embossed papers.
I cut the papers down to 3 1/2 x 5 inch size.


I love that the celebrate papers are so versatile.
I looked at this white polka dot paper and immediately thought about painting it with water colors.


While the paper that I painted dried, I put on the grosgrain closure ribbon.
Step 1: choose the ribbon
Step 2: put a strip of tape down the middle and place the ribbon down
Step 3: tape down the two outside pieces of decorative paper on the front and back of the card holder

Step 3 of the David Tutera Celebrate collection is to finish with sentiments and embellishments.
Step 1: choose your embellishments
Step 2: glue your embellishments together and place on the front of the gift card holder

Now it's time to embellish the inside of the gift card holder.
Step 1: I sanded down the embossed paper that I just painted with watercolors and glued it in place on the upper part of the inside.  I attached the David Tutera paper crafts sentiment embellishment.
Step 2: The bottom half of the gift card holder is the envelope that will hold your gift card.  I used my large hole punch to cut a half circle  into the paper to make a little peek into the gift card.
Step 3: Embellish the bottom half of the gift card holder.  I used the small piece of the remaining white polka dot paper that I cut off when I cut my paper down to size.

I made a small circle gift tab for the envelope closure using the David Tutera step 2 papers and the embellishments.
Step 1: cut a circle
Step 2: glue the embellishments together
Step 3: glue the embellishment down on the envelope tab

You have now completed the inside of the gift card holder!
 Notice how easily the gift card fits inside.


Tie the bow and your gift card is now a beautiful gift!

It was a snap to use the David Tutera paper crafts line to complete all of these beautiful baby gift cards in just three easy steps.  Seriously, each one took minutes to put together!  


I bet you can't even tell that several of them were made by my 7 year old son and my 10 year old daughter!
The David Tutera Celebrate collection is that easy!
It can make you look like you know what you are doing, even if you don't have a crafty bone in your whole body!


No need to stop at baby cards.
I made oodles more handmade cards from the David Tutera paper crafts collection in no time at all!
Honestly, I made all of these cards in less time than it would take me to drive to the store, browse their selection, and drive back home again.
I'm not the only one to love this new collection.  Check out the many videos on the Core'dinations color core cardstock YouTube page to see many more possibilities of the collection.
I know you won't want to miss anything!


disclosure: I wrote this post as part of a paid campaign with David Tutera and Blueprint social.  All opinions are 100% mine.  I wouldn't endorse a product that I didn't love.
0

A shop keepers life. A guest post with Mandi from Persnickety's Awesomeness Emporium

If you have been reading my blog for any length of time, you would know how much I LOVE pernickety's awesomeness emporium!
I've blogged about this amazing local boutique here, here and here.
Mandi's little shop is a diamond in the rough.
It's literally sandwiched between a tattoo parlor {flash Friday anyone?} and an industrial garage, but what's inside is amazing!

Mandi has a real talent for painting furniture and seeing the vision in old pieces with good bones.
She's also been a huge supporter of other local crafters {like me} and allows us to sell our junk {and I use that term in the best way possible} in her store.
I am so excited to welcome Mandi here to my little corner of the world to share with you...

Dirty and Blessed...A Shopkeeper's Life 

At least once a week here at the shop, a wonderful customer or two will wander back into my work area in the warehouse and tell me, while looking around in wonder, that I have the coolest job ever.

Lila the Sideboard, awaiting paint.

The customer is always right...right?
I do have the coolest job. I LOVE it. I am grossly blessed to the point it’s truly frightening. I own a vintage and painted furniture shop called Persnickety’s Awesomeness Emporium, and dude…it is fun here.


Every hour is happy hour!


I get to work with my amazing mom most days of the week. 

We have THE BEST customers, the most amazing and talented contributing designers…everyone is family and our family is the raddest! I adore them all! I haven’t the first clue how I bumbled my way into this kind of luck, but lucky and grateful I am. 

That said, this is work. As in manual labor. Dirty work. 

I am not wearing a sundress, perfectly coiffed hair blowing in a light breeze, leisurely painting priceless furniture in a lush field of free (yet high quality) paint brushes. 
Source:  Brobible
Nor do I have a slightly stubbled Gilles Marini body double on hand to wordlessly move all of those heavy pieces of priceless furniture while I sit back, perfectly pedicured feet upon the counter. 
 

Source:  IMDB


Nope. 
Here’s the reality the starry eyed customer may not know: 
Paint, brushes, waxes, knobs...they're expensive, yo!  
I am always, always, covered in dirt and paint. 
There’s unladylike sweating, a lot of it.  
Some extremely unladylike swearing (caused by splinters, fingers nearly broken off by rogue cabinet doors, unexpected spider appearances, project mishaps).
Cuckoo crazy deadlines that I can’t even blame on an unrelenting boss (since the unrelenting boss is just me...well, me and the bills).  
So. Much. Dirt.  
Paint on every article of clothing I own. (Have I mentioned I look like Pigpen every single day?) 
Not nearly enough time in the day or days of the week and no real time off. Tears, sometimes. Stress, usually. No social life.
I eat entirely too many meals from the parking lot taco truck. 
 

Seriously.


My ruined lower back is not unlike that of an 87 year old arthritic woman and I am certain we take the same nerve pain meds. And I am always poor, because I am a startup and every penny goes back into the business. If my hair is actually brushed don't ask when my last shower was. 

You know what, though? 

I love every minute of it. I couldn't live without it. 
I wouldn’t change one single thing. Except...maybe...the shop's location. But, hey, why be like everybody else (have I mentioned we are betwixt a tattoo shop and a smoke shop...oh I haven't...weird)? So I like a challenge, whatev.

There are folks out there with brands much bigger and talent much deeper, those that have been doing this much longer, with amazing locations and oodles of hard earned cash. 
They probably started not far from where I am. A place called Scratch.
I see what they have done, and I see what I have done differently, because I like different, and I am different.
To those that are better than me (and the numbers are many): I don't hate, I congratulate!
I am glad they are out there and am honest to goodness happy for their successes.  
It gives us little guys something to shoot for someday.  
In the meantime, there is work to do.
And...it's worth it. 

Because every time someone enjoys something I have painted, or buys a piece that they like so much they choose to showcase it in their home...there are no words for what an honor that is.
 

Simone the Sideboard...all tarted up!


Every person that has walked through this door and shared a laugh, some of their daily struggle, takes a class, becomes a friend, or emails just to say hi graces my life with more riches than any amount of money I could ever make.

Our Drab to Fab Painting Class...these ladies rule!

Each day I get to work to work with my mom, who makes me laugh with her brand of under the radar hilarity, touches my heart with her hard work and thoughtfulness, and touches a nerve every time she tries to talk me out of painting something wood ("Mom! THAT'S WHAT WE DO HERE!")....


Ma and Me


...I know I couldn't be more tired.  
More lucky.
More thankful.
Or more loved.
And that's the real life of a shopkeeper. Dirty and blessed. :)
Thank you to the marvelous maven of Holy Craft, Rachel, for having me and thank you all for reading! 
Xoxo,
Mandi

  Um, hello, don't you just love her?! 

 I must say, I have known Mandi {and her mama} for several months now, and love them both.  Mandi never looks like Pigpen and she does wear a sundress every time I have seen her, and never have I noticed that it's paint stained.  

If this post doesn't make you want to go support your local small business, I don't know what will! 

 So, go.

 If Persnickety's is close to home, pop in and see my friend Mandi.  If you aren't local, find another local small business owner and support them.  Remember, these small businesses of theirs is their life, their dream and their mere existence.  Support their vision.   

0

Garage Sale Finds Friday

I'm afraid garage sale season is winding down.
I've had a few final hurrah's and won't stop searching for those signs, but unfortunately, this will probably be our last garage sale finds Friday.

I did find a few things last week that are worth mentioning.
I picked up these really cool red lanterns for $1 each.
I have a hard time passing up lanterns when I see them.
When they are red {my favorite color} it's even harder!


Last week I wrote about the garage sale finds I helped score for the most beautiful outdoor wedding ceremony I've been to in a long time.  If you missed it, you can read more about the details here.
This milking stool was one of those deals that wasn't mentioned last week.
I picked it up for $1 and I *think* that it's dying to be painted.
What color would you suggest?


I also picked up this simple and small vintage suitcase for $1.


I have a little obsession with vintage suitcases, but this one is so small and compact, I knew even my husband wouldn't have an issue with it because it didn't take up a lot of space.
Double score!


I'm always on the look out for window panes.
You can read more about my vintage window {and door} finds in this past post.
Even though this has a tag for $3, I actually only paid $1 for it.
You can visit here to find some of my negotiating tips.
Negotiating is one of my favorite things to do at garage sales!
Never pay full price people!


I picked up this massive linen canvas for $3.  
I'm not sure what to do with it, but the possibilities are endless!
Do you have any suggestions for me?


So those are a few of the things I found at garage sales this past week.
What did you pick up?
0

Kiwi Crate review...spoiler alert: you should get one too!

Win a Year of Creativity from Kiwi Crate

Earlier this month, I was asked to review a kiwi crate
I had actually never heard of kiwi crate, but was immediately intrigued when I went to their website.

You may not know this about me, but while at Purdue University (Boiler up!), I studied child development and family studies.  I always loved my child development classes, and it was particularly interesting when we had our oldest son mid way through my college career.  He sort of became my guinea pig to test theory's on and find out where he was in the Piagetian developmental stages.
Enough about that...hope I didn't lose you yet!

Everyone in our family loves getting mail.  Usually the littlest guy gets skipped over in the mail delivery unless it's his birthday, so he was so excited when he got his very first kiwi crate in the mail.


kiwi crate delivers right to your door with {the best part} free shipping!

Delightful kids' crafts delivered right to your door.  Free Shipping!  <Visit Kiwi Crate!>

So by now, you know
*that I studied at Purdue
*my kids love to get mail
*kiwi crate has free shipping

But you don't really know what kiwi crate is. 
Kiwi crate is a monthly subscription service for kids ages 3-7 {appropriate for girls or boys}

UPDATE!! You can also find Tinker Crate, Doodle Crate and all kinds of crates for all ages! 

 Each month subscribers receive boxes filled with plenty of materials (ours even came with a package of brand new scissors and a SHARPENED pencil!) and inspiration to complete 2-3 theme projects in arts and crafts, science activities or imaginative play.  Each project is designed by moms, reviewed by child development experts, and, of course, tested by kids!

The people at kiwi crate thought of EVERYTHING to include!  We didn't have to supply anything from our own stash.  Every.little.detail was taken care of!
Here's a little peek inside our kiwi crate.


Owen was so excited to see all of the cool things inside his new kiwi crate!


Not only could mom not believe that they included a sharpened pencil in the kit, Owen couldn't believe his eyes either!


Owen received a bug themed kiwi crate.  Other sample crates can be seen here.


Each of the instruction manuals explain how much parental involvement is needed and how messy it is {two very important components for me!} and also what the child learns while doing the project.


This particular kiwi crate came with these informational bug cards.
While Owen was busy with his crafts, I was reading along some of the facts from the cards.


My 10 year old daughter thought the kiwi crate looked pretty fun too!
So get this, if you have a few kids who you think would enjoy the kiwi crate too, there is a special sibling add on so that the kids don't have to fight about the supplies in the crate.  
I love that!
The people at kiwi crate thought of everything!


Owen was hard at work making his firefly.
It came with a working glow stick (and a back up glow stick for another night) and a long zip line so your firefly could actually fly!


Isn't it the cutest little firefly you have ever seen?
The next day, I found Owen complaining that he was bored.
I immediately reminded him that he had a kiwi crate with another project inside and he happily skipped to find his kiwi crate and his supplies.
Again, this kit came with everything!
The best part were the decompressed sponges that grow when you put them in water.
The whole project could have been done after that!


This particular kit was a sponge bug painting kit.
It came complete with two slick scenes ready to be embellished, and one blank scene to encourage creative freedom.


Again, Owen worked quite hard at completing his bug scene and it kept him busy for quite some time!
As a mom of three, it's always been important for me to find the time to have one on one time with my kids.
I really enjoyed my one on one time with Owen while we completed the kiwi crate together.
The holidays are quickly approaching, and I am always fond of giving experiences, rather than toys that will just sit collecting dust.  I have a few kids in mind that I know would love to receive a kiwi crate in the mail.  More information about gift subscriptions can be found here.  Subscriptions can be ordered month-to-month or annually, and there is even a 3 and 6 month gift subscription option.


I really was impressed with kiwi crate and loved that they thought of every detail.
Why don't you give kiwi crate a try?
I know you will love it too!


disclaimer: I did receive a free kiwi crate for my son and will receive commission if any of my readers subscribe.  However, all opinions are 100% my own, and I wouldn't endorse a product I didn't actually love!


0
Back to Top