An anniversary re-mix

I married an engineer. Usually that's all I need to say to describe how romantic he is. But sometimes he surprises me. Like this past weekend. A few years ago we decided to stop celebrating Valentine's day (it's pretty overrated) and celebrate the day we started dating (February 27, 1997). There tend to be less crowds and you never feel like you are putting the babysitter (or the grandparents) in a bind by sacrificing their own Valentine's day plans. It works for us. We made plans to head to beautiful Alderbrook resort http://www.alderbrookresort.com/ where we have celebrated a few anniversaries and birthdays in the past and on the way down on the hour long car ride, my very thoughtful husband presented me with the CD version of all of the mix tapes he made me when we were dating in college. We spent summers dating long distance (he lived in Washington and I lived in Indiana) and we sent many a letter in our day (e-mail hadn't quite caught on yet...crazy that we are that old!) including some various mix tapes that were played over and over again in my tape player. Isn't that sweet? He even put pictures of us when we were dating on the CD and meticulously wrote down every song title and artist. So if any of you wives are married to fellow engineers, know that they sometimes do have it in 'em.

Isn't this a beautiful view from our balcony?
Too bad it was a typical Washington day and it rained buckets!


2

A follower!

I was so excited when I peeked at my inbox today and saw a nice little e-mail from a friend from church. She's been reading along on the blog and was inspired to make her own version of the spring votive seen here


I think she did a wonderful job. Secretly I like hers better than my original! I love to see what my followers (or stalkers) are making, and if you are inspired to make something that I have shown you how to do, please e-mail me or link to it in the comments section. I would love to share what other people are doing. So thanks for sharing Terri! You rock!
0

Let's call him mat

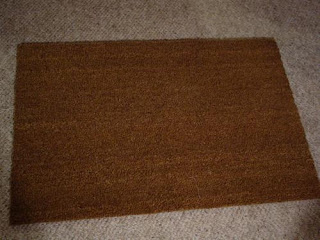
I saw this little mat on a trip to Ikea last week. It was screaming to me and I couldn't pass up this blank slate. I'm pretty sure it cost less than $8.

This was what I thought I would do with it.
What are those? Man hands? Yep, I set to work taping off the mat, but my hubby quickly stepped in and said he would be happy to help. He's pretty good at geometric shapes (he's a mechanical engineer after all!).
And then I took a bottle of black paint and a brush and set to work dabbing the paint on. I'm not sure how it will hold up with dirty wet feet, which is why I didn't take the time to put our last initial on yet. In the meantime, I think it looks pretty good.


3

A little birdie


Just wanted to share my newest change in decor. I picked up this bird and a nest for $1 each at Wal-Mart the other day and shoved them inside this ball. Seems like spring to me!
0

Are you kidding me?!

Buried deep in the comments section this morning I found this:
Hi, I'm nominating you for an award! Love your blog and all your projects!

I was so excited and honored to receive this award! And honestly, I am a little surprised that this little outlet of mine is actually being read by actual people!


1. Thank the person that gave you the award:
Thank you so much Adrianna and Susan for the recognition. I totally appreciate it! I must also say that their blog is one I have followed for awhile now and check daily, so it means a lot that someone who I think is so creative (I mean really, check out this clutch and this mod podge sceen printing tutorial) actually likes what I am doing. Thank you thank you thank you!

2. Pass this award on to 7 bloggers you've recently discovered and whom you think are fantastic
1. Adventures in Dressmaking
2. Craftaholics Anonymous
3.Everyday Chaos
4. Jones. Design.Company
5.The Train To Crazy
6.Happy Together
7.Little Birdie Secrets

3. Contact said Blogs to let them know they've won
Done and done!

4.State 7 Things about yourself:

1.I was married when I was 19 years old and 26 weeks pregnant. I signed onto this whole mom gig a whole lot earlier than I would have wanted but after having three kids (they are 11, 7 and 4), I am thankful that I did. I've been told by several midwives that had I not had kids in my early 20's, I might have had some real troubles getting pregnant and I don't think I would have dealt with infertility well. Despite the odds stacked against us, we are happily married and will celebrate our 12th wedding anniversary in June.

2.I'm a closet hippie mama. I believe (and practice) in selective vaccination, extended breastfeeding (I have a total of 5 years experience), using cloth diapers (sure makes potty training easier...my daughter trained at 9 months!), and recycling and reusing whenever I can. Garage sales are my favorite way of doing that and you can find me every Saturday garage saleing (yes, it's a verb) from April to September.

3.I have been on national television twice in one day (American Idol and Ellen) and our family can currently be found modeling on the Kelty camping gear boxes at your local Target.

4.I love to save money (see number 2 re garage sales), and often make a game out of how much I can save on my groceries each week (I even have the checkers and baggers playing my game with me!). Our family of five eats well on around $425 a month. And thanks to garage sales, we spend around $15 a month on clothes and shoes per person per month.

5.I love to travel, especially to warm places. I am from Indiana and moved to the Seattle area 10 years ago. I would prefer the weather to be either hot or cold, not mild, so I tend to try to escape to the sun as much as possible during our mild (aka dreary and yucky) months from October-April.

6.I am not a morning person but I wake up at 5:15 am four days a week to go to the gym and get in an hour and a half long workout. My working out started as a new year's resolution over two years ago as I was quickly approaching my thirties (yep, I kept mine!)! I used to be the person that said that I would only run when I was chased and my hubby and I made a pact to only start running or working out when we saw someone who had a smile on their face while doing it. Believe me...I looked, and those people are hard to come by! I do experience exercise ADD and need to change up my routine often so I won't get bored. My latest kick is spinning and weight training.

7.I was inspired (you could call it convicted) a few years ago to follow the example of a Proverbs 31 woman. It's why I do what I do on this craft blog, it's why I wake up early to hit the gym, it affects my parenting and the way that I look at my husband and our marriage, it's why I use my time as effectively as I can to squeeze in all the things that I can during the day. My hope is that as you join me on my journey to become this woman, you will also be inspired by what happens at this little blog I call Holy Craft.
2

Another t-shirt refashion

I happened to be at Wal-Mart today (I generally hate the store so I don't frequent it very often) and happened upon these cute juniors t-shirts on clearance for $3. I remembered seeing a refashion of one of the other shirts here http://atsecondstreet.blogspot.com/2010/02/1-t-shirt-refashion.html this week. So I picked it up and literally 10 minutes later had a dress for my peanut.

I started with this Large t-shirt (and really, it ain't that large!)
I put one of my daughters t-shirt dresses down on top to use as a guide for taking in the arms and chest.


I chalked up the line that I was going to serge on and set to work. I serged out the notch (almost looks like an upside down L) and then sewed along the seam to reinforce it.


And that's that! Sorry for the crummy shots, my daughter wasn't feeling well, so she wasn't the best model today.


4

The apple doesn't fall far from the tree

My seven year old daughter is constantly asking me to "do something crafty" with her. I wish I could come up with something on the spot, when she asks, but I just can't. In fact, tonight she asked while I was in the middle of making dinner. Thankfully, she found an outlet on her own. She pulled a bunch of scrap paper together and her and her 4 year old brother threw together this apple tree complete with squirrel and nuts.

0

Baby goodies

My daughter has had a student teacher in her classroom for the past 6 weeks. He is finished with his tour of duty in the second grade classroom and will be welcoming his first child (a girl) in May. I recently cleaned out my fabric stash and found not even 1/4 yard of this cute squirrel fabric and knew I had to do something with it. I decided to make a squirrel applique. Since he is having a girl and the fabric is blue, I thought she needed a little acorn hair clip to go with it. Because we all know those hairless infants all look alike and no new parent likes to hear "oh, your son is so cute" when it's really a girl! So this is what we came up with. I think it turned out really cute!


6

Korker hair ribbons

My daughter is nearly 8 and has never really been into hair thingies. Can you believe it's taken me this long into parenting a daughter to figure out how to make those little korker hair bows? I mean really?! Where have I been. So if you are like me, and haven't figured it out yet, here's a little tutorial to help you on your way. They are so easy and for me, it was about using up some of the ribbon I had lying around anyway.
Here's what you need: Scissors, pencils (the longer the better), ribbon, and clothespins and later, a sewing needle and thread

Start at one end of your pencil, clothespin in place the end of the ribbon and start wrapping around the pencil until the end. Put your other clothespin on to secure that end, cut off any excess ribbon at an angle and place aside.


You will want to cook a bunch. More than I have on this cookie sheet, but these were the only clothespins I could scrounge up. Cook in your oven at 275 degrees for 25 minutes. Let sit for about 30 seconds, then unwind from your pencil.


Cut each piece into 3-4 inch sections.


Get out your sewing needle and put a knot in the end about 3-4 inches up.


See where my finger is, that's where the knot is.


Push your needle through the middle of the first ribbon and keep stacking the ribbons on top in the order you want them. Then once your needle is through, go back through as close to the initial spot as possible.


Then, take your two ends of extra thread and tie them together in a knot. I always tie a few times, then I use the extra thread to tie it on to whatever hair accessory my korker is going on to. In this case, I tied it to a ponytail holder.


That's it! You can make them as full as you want them by adding more ribbon. Have fun with these!


3

Someone stole my camera!

This is what I get when I leave my camera lying around! What a goof!

0

Fabric coasters

I just spent a whole weekend repainting the furniture in our living room (http://holy-craft.blogspot.com/2010/02/out-with-old-make-it-new.html), I wasn't about to mess up all my hard work with water spots and stains, so I took some fabric scraps and made some coasters.

Here's how you do it. I was going to measure a square, but I found this handy little cardboard template just laying around and decided to use that. It's from a fat quarter and it isn't square, but almost. I thought it would work perfectly.
Then I pulled out some coordinating fabric that I had lying in my scrap bin and set to work. You need to fold your fabric in half (you need two of each piece to make one coaster) and use your template to cut the proper size.

I cut out batting to go inside as well (cut that just a tad smaller on all sides). Put the two right sides together and place the batting on top of one side. Stitch around closely to the edges and leave a small hole for turning. Trim your corners before you turn, then turn your fabric, press the open seam down, pin in place and then stitch around the outside. That's it, you are done!


2

Ruffle flower


I made this dress for my daughter yesterday and knew when I finished it that it needed a little something else. I had some fabric leftover, so I thought I would use that and make a few flowers to sew onto the bodice. It's not the best tutorial, but it will give you an idea of how to make a fabric flower to sew on to your next project.


I made three flowers, so I took three strips of fabric ranging in size from 1 1/2 to 2 inches wide and about 25 inches long. You can make them shorter both ways, however you don't want to go too short in the width or you won't have much fabric to work with.


I then set my tension on an 8 and my stitch length on a 4 and sewed along the edge of one side. It ruffles right up and will look like this.


Sorry about this picture, not quite sure what happened there, but it shows how I started with the inside of the flower by taking one end and wrapping it around and around pinching it at the base. I then took out my needle and thread and hand sewed the base of the flower where I was pinching together. Then I sewed that directly on to the dress. Easy as that!


3

What to do with a yard?


I happened to be shopping with my princess last week and came upon the half price red tag fabric sale. I decided to let Isabella pick some fabric out, at $2 a yard I couldn't go too wrong...or so I thought. My lovely daughter and I spent the next thirty minutes fighting over ribbon to accent the dress with! I was about to ditch the whole idea when I finally exasperated her enough to agree to my suggestions. I don't make many clothes because I don't think it's as economical as garage sale shopping but this dress cost around $3 to make, so it didn't break the bank. I will highlight a few of the things I did to make the dress, but I didn't make a pattern or measure so I can't really give you any specific tutorial, if nothing else you will find some inspiration.

I used two different dresses from my daughters closet to make the pattern. I folded the dress in half and used that to cut on the fold. Notice in the above picture I didn't go right to the edge of the fold, but instead gave myself about a half an inch of room. My fabric wasn't quite as stretch as the Jersey in the dress and I didn't want to mess with zippers or buttons.
I used the blue dress as a guide to make the arm and neck holes. I made this piece to be the back.

I had a little fabric left and racked my brain on how to make a front for the dress. I probably should have made the first cut on the fold as the front, but I made subtle pleats so it hid the seam that I was forced to make by putting the two front pieces together.
Then I cut the top. Again, I cut on the fold and used the blue dress as a guide. I only needed a front piece, since the back piece was cut from top to bottom.
I then used my old "change the tension and thread length" to make the bottom of the bodice gathered. This is when I stopped taking pictures of the process. But I finished the raw edges, pleated the bottom of the front, sewed the bodice and the front piece together, then sewed the two sides together and hemmed the skirt. It really only took me about an hour to make from start to finish...well, an hour if I hadn't been interrupted every few minutes to break up a fight or get a snack or ride bikes. And this is the finished product on my beauty queen. The ribbon is just tied around the middle with a bow in the back.


I added three matching flowers on the bodice. I will explain how I did that tomorrow.

4
Back to Top