Please tell me that I'm not the only one that hates to paint. Don't get me wrong, I love the way things look with a fresh coat of paint, I just don't have the time to brush on coat after coat of paint. I'm sloppy too. I usually just want to get the project done so I don't care what things get destroyed in the process. Which I must say, isn't the best attitude to take on. My dog has been several different colors because she's gotten too close to my project a time or two.
Not to worry! There is hope for people like us! I recently got a Finish max paint sprayer and I have been going to town! It's easy, fast and totally not sloppy at all! I can't wait to show you my first project!
I picked up this Adirondack chair nearly a decade ago at a garage sale for $5. It's seen better days but it's my favorite chair to sit in in my whole back yard!
The paint is chipping and in some places it was even coming totally off. Now, I'm a big fan of chippy paint, but chippy paint in the elements {and here in Seattle we have our elements!} can lead to rotting wood.
I filled up the Finish Max paint sprayer with some paint that I had on hand from a past project. Read the directions because some paints will need to be diluted in order to spray properly. Thankfully, my paint passed the test, no diluting needed!
Painting tip: it's best to start with your project upside down to get the best coverage. Plus, when you turn it right side up, the hard part has already been done and you will be surprised at how quickly the project goes!
Using the paint sprayer was easy! Just pull the trigger and start spraying. I put a drop cloth down but there was very little over spray. I was also shocked that there was so much paint left in the container when I was finished. I just figured the paint sprayer would waste paint but that was so not the case! I let my chair dry in the sunshine while I cleaned up the paint sprayer. I really thought that cleaning would be difficult, but I took out my hose and sprayed the spayer down. It didn't take much time at all to get it clean. Just do it as soon as you are finished because clean up will be that much easier!
I can't believe what a difference a coat of paint will make!
No more chipping paint. No more backyard eye sore! I'm pretty sure I got my $5 worth don't you?! I was impressed at how smoothly the paint went on. No dripping or puddling and no funky brush lines.
Because I love my paint sprayer so much, I want you to have one too! My friends at Home Right are giving one of my readers their very own paint sprayer. If you hate painting as much as I do, I promise you, you will be obsessed with this paint sprayer. And if you love painting...well, you will love this even more!
This giveaway is open to US residents only. Winner will be notified by e-mail so make sure you have your e-mail address enabled. The winner will be announced on Facebook and Twitter. It helps to follow along. Good luck!
disclaimer: thanks to Home Right for sponsoring this post and the giveaway. All opinions are 100% my own.
This post is brought to you by Tulip and Blueprint Social. All opinions are 100% my own.
The weather is getting warmer, the sun is shining and the friends are coming over in droves! We are always looking for fun {electronic free} activities for the kids, especially as they get older. My 13 year old daughter Isabella is very much like I was at that age. She is drawn to anything creative where she can express herself. Her friends are very much the same way. So one afternoon, a half a dozen girls gathered around my patio table for some tie-dye fun! But the fun didn't stop there! We created six different ways {most of them no sew} to restyle their t-shirts!
We started with this easy, one-step mess free kit from Tulip. I know, I know, mess free and tie-dye don't seem like they should go together, and to be honest, it did make my heart skip a beat when I thought of the old way I used to tie-dye, but I promise you, not a single article of clothing that we didn't want to get dyed didn't get dyed and thanks to the gloves {that were included} no one walked away with dyed hands. This kit actually made it less messy to tie-dye shirts than the kit we used to dye our Easter eggs!
There was a little prep work before the girls came over. I opened up the kit and spread out the plastic tablecloth {it's included!}. There are 18 bottles of pre-measured dye, so all I had to do was add water to each bottle. While I was doing that, the girls read through the {included} full color idea brochure so they could get an idea of the technique they wanted to try. The girls put on gloves {seriously, they thought of everything!} and I had each of them shake the bottles of dye up.
The girls prepped their shirts with rubber bands and set to work squeezing dye onto the shirts. Once the shirts were finished, I actually wrapped them up using the plastic tablecloth that was included. You could put them in a sealed baggie for 6-8 hours but I like using what I have and wrapping the shirts up in the plastic tablecloth worked out just great! Doing that, made clean up a breeze!
After the shirts sat for 6-8 hours, all you do is cut off the rubber bands, wash them, dry them and then they are ready to be restyled!
Restyled Six Ways
I have six different restyling methods for you, all using your average white cotton t-shirt.
Side Ties
Start by cutting off your sleeves and your neckline. Turn the shirt over {front side down} and widen the back of the sleeve on the back side only, giving your shirt a racer back look. Cut down both of the seams from the armpit down to the bottom. Line up one side of your shirt {front and back together} and cut about four inches in every half an inch or so from the armpit down to the bottom of the shirt. Do the same to the other side. Use about a half an inch strip about six inches long of the unused sleeve to tie up both sleeves.
Fringe
This fringe pattern is really fun! Start by taking off the sleeves, the neck and about two inches off the bottom of the shirt leaving you with a tank top style. Cut small strips about eight inches up on the front and back of the shirt. Start by tying each of the strings together. About an inch down from the tie that you just made, tie the far right string from one, to the far left string of the other. I made a little illustration for you. Use a piece of the cut off sleeve to tie the shoulders.
The Braided Back Tank
Cut the sleeves and neck off of your t-shirt. Turn your shirt over {front facing down} and widen the neck of the t-shirt. Once you widen the neck, you will also cut a straight line from the bottom of the arm holes all the way to the other side. You can now open up your shirt. On the back cut three straps about ten inches long. Pull those straps to curl the fabric and then braid them. Once it's braided, secure your braid with a few needle and thread stitches. Fold down the front flap with the neck and secure the braid with a few more stitches to the center back. Roll the extra material on both sides to the center where the braid is secured and cut a one inch strip from one of your unused sleeves and wrap that around to hide the seams. Secure in place with a few more stitches.
Bow Back T
Cut the sleeves and neck of your shirt as shown. Turn your shirt over {front side down} and widen the back arm holes on both sides, again, making a racer back style like the side tie shirt. Cut about an inch lower on the back neckline. About two inches down from the neckline, cut one horizontal slit going about eight inches long. Cut another slit two inches down from that one about the same length. Repeat until you have the desired amount of slits in your shirt. Use your discarded sleeve and cut off the end inch where the seam is. Use that length of fabric to wrap the middle of your cut slits and secure the bands in place with a few stitches. Repeat, until all of your slits are wrapped.
Baby Doll T
Cut off the sleeve and make a v-neck in the front of the shirt. Cut an "L" shape {following the red lines in the bottom left picture} on both sides of the shirt on the back. Open up the top of the shirt by cutting a straight line across at the top seam. On the back cut a four inch line down the back side of the shirt. Tie the front long strips in a knot. Connect the ends of the strips to the back two cut pieces by tying them.
One Shoulder
This one shoulder shirt requires cutting off half the shirt at an angle {leaving part of the shoulder in a tank style} and removing the remaining sleeve. Cut the remaining part of the top in half about four inches in. Then, cut four inches into the shirt starting below the armpit every inch and a half or so until you reach the bottom. Tie the cuts that you made together, starting with the cut you made in the sleeve and working your way down the shirt.
That's a lot of different ways to restyle a plain white t-shirt isn't it?! I know there are a lot more. Once you start restyling you can't stop!
I would love to see your t-shirt restyle creations. Share them with me on Instagram @holycraft1 and don't forget to use the hashtag #TieDyeYourSummer and tag @ilovetocreate.
There are so many photo sites out there now that it's hard to find the best one. I must be honest with you, for years I jumped between sites based on what coupon codes I could find and usually settled on the site with the best deals. This method didn't always work out in my favor! Sometimes, you really do get what you pay for!
I'm a big fan of giving personalized gifts. Snapfish is launching an amazing new version of their site redesigned from scratch. They listened to their customers and you can tell! I was able to design a personalized gift for my dad for Father's Day and it took me less than 5 minutes! The new site is even available on your phone or tablet so you can design where ever you are!
If you are my dad, stop reading now! You will spoil your surprise! If you aren't keep going so you can see how easy it was to make a personalized canvas from one of my favorite vacation photos.
Last year, my parents met our family in Maui for an extended family vacation. We spent our fair share of time relaxing on the beach and my oldest son actually snapped this picture of my dad, me and my husband shooting the breeze and watching the kids in the surf. It actually ended up being one of my dad's favorite pictures from the trip {mine too!} so I decided to make it into a photo canvas for him.
I went to the Snapfish site, clicked on the canvas and decor tab, selected the orientation and the size and uploaded my photo. That was it! In less than a week, my canvas was delivered right to my door.
I love how the canvas is wrapped all the way around with the image. I even get the added bonus of spending Father's Day with my dad for the second year in a row in Hawaii! This year, we are meeting up on the Big Island for a family reunion.
While we are talking about vacations, if you are anything like me, you are probably snapping most of your pictures with your phone. I know I am! I share some pretty good stuff on Instagram and I'm guilty of leaving my pictures stuck digitally and never printing them off. I am super excited that Snapfish offers square prints, perfect for those Instagram photos.
Back to dad now...There are lots of great personalized gifts you can make for father's day. Like a puzzle from one of your favorite photos, playing cards, magnets or travel mugs. You can even make personalized luggage tags and phone cases!
You can also Join Snapfish Superfans! to share your pictures and projects and have opportunities to win prizes and rewards! I promise you, the new Snapfish site isn't the same one you used 15 years ago! It's much better! Give it a shot. I promise, you won't be disappointed!
This is a sponsored post written by me on behalf of Sponsored by Purina for IZEA. All opinions are 100% mine.
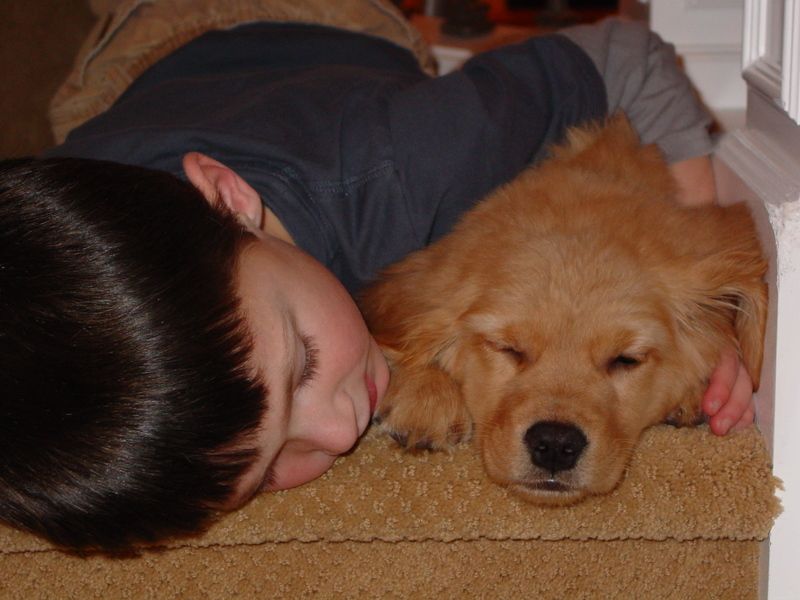
One of the best things that we have done as a family was adopt our nearly five year old golden retriever, Sophie. Sophie was a Christmas present for our family less than a week after we moved into our new home.
The kids all transitioned to a new school and on our daily walks to school, Sophie was a great conversation starter and really helped us break the ice and meet new friends. She's usually within reach, always keeping us company whether we like it or not! She greets us with a smile {yes, dogs smile} and a tail wag with what we call her "happy tail". Sometimes that happy tail hits the wall or door of one of the kids rooms that she's been guarding at night and wakes them up far earlier than they would like to be up! There is something magical about her because she can knock the biggest chip off even the most hormonal teenagers shoulder. She's pretty great! We love being her people and having her as our pup!
You all know the popular saying, the way to a man's heart is through his stomach? Well, that saying is pretty true with our furry friends too. Which is why I loaded up on some treats from Dollar General to show some love to Sophie.
It's quick, easy and affordable and you can find all of your pets favorites {Sophie loves ham bones and Purina Beggin' Strips}. Want to know if Dollar General has your pet's favorites? Check out the Dollar General Alpo Productslist.
Sophie immediately took her Purina Beggin' Bone and hid it in her favorite spot in the yard. I really only thought dogs did that in the movies, but she totally does it. It's like she's a real dog! Sometimes we forget because she acts so human.
Dollar General is hosting an Instagram contest where you can show your Dollar General pet haul using the hash tag #DGPetDash. The photo with the most likes will receive $100 worth of free pet food/treats in the form of 5 $20 manufacturer coupons from Purina.
Head to your nearest Dollar General, grab some treats or food for your furry family members and then snap a picture. Don't forget to use the hash tag #DGPetDash to be entered to win. And then, scratch your pet behind the ears for me. There is nothing better than having a pet!
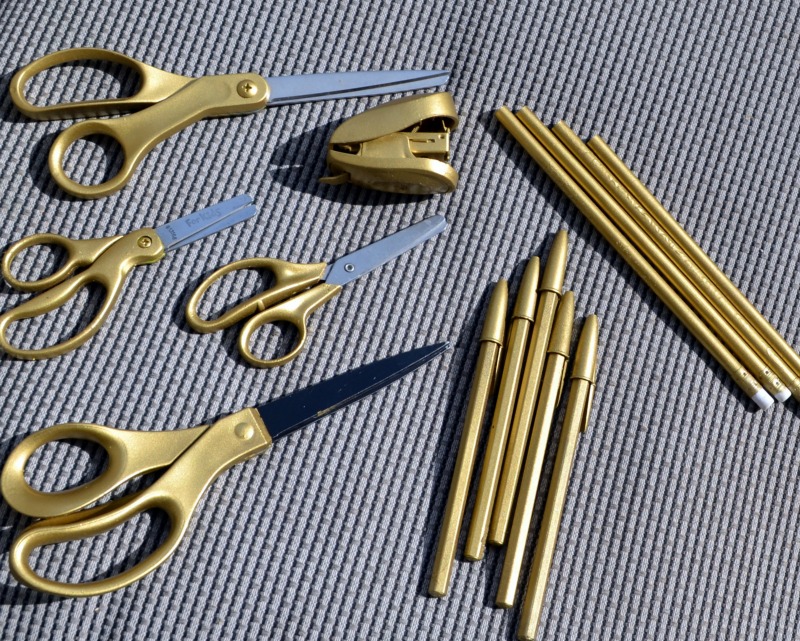
Am I the only one that wants to gold all of the things? I am loving this gold trend right now and love it even more when I can take some boring office supplies from my junk drawer and update them in a matter of minutes. This project didn't cost me a dime since I had everything on hand, but now, my office supplies look like a million bucks! It's so easy!
We all have a junk drawers with pens and pencils right? Why not use gold spray paint and make all of your supplies cohesive? I just love it when things match!
I can never find a pair of scissors when I need them, but when I do have them, they have all kinds of different colored handles. Nothing in my drawer matches. The pencils from my kids incentive programs at school never get used and my pens are just boring.
I changed that with a little bit of gold spray paint! Simply mask off the parts of your office supplies that you don't want painted {the erasers on the pencils and the blade on the scissors} and give your supplies a few light coats of spray paint.
Don't they look so much better now?! I'm happy to move them out of my junk drawer and onto my desk. I just love what a little paint can do to makeover something as ordinary as a pencil!
Are you loving the gold trend right now as much as me? What have you painted gold?
Many people underestimate the value of a handwritten thank you note. Some people want to send a quick e-mail thank you so they don't forget or think that a quick thank you in person is enough, but a hand written note is the best way to show your appreciation. I've got a few tips to help you write the perfect thank you note. Tips that may be helpful with graduation and wedding season approaching!
Tips for writing the perfect thank you note
Three lines are key
While it's more than o.k. to write more than three lines, I tell my kids that three lines in a thank you note is the minimum.
Start with your greeting {don't make it too stuffy and impersonal!}
If you ran into this person in the grocery store or at church how would you address them? Use that.
Thank you for...
The first line will include what it is that you are thanking them for. If you received flowers from a friend, you could say "I just wanted to send a note of thanks to let you know how much I appreciated the beautiful flowers." Or "Thank you so much for the beautiful flowers!"
How you use the gift
The second line includes how you will use the gift or how you appreciated the gift. Let's use my flower example again. My second line could say "They made me smile every time I walked past them." Or if you received money for a graduation gift, you would write in your second line, "I hope to use the money for books and school supplies." The gift giver wants to know that your gift was appreciated and how you are using or appreciating the gift that they gave you.
Make it personal
The final line is a closing line that you should make as personal as possible. If my friend sent me flowers I could close the thank you note with "I can't wait to catch up over coffee next week. See you Friday!" Or if this is a wedding gift you could say "It was an honor to have you celebrate our special day with us. We look forward to catching up with you at Christmas." You want to use your note to connect with the giver.
The signature
I almost always end my thank you notes with "Thanks again!" followed by my signature. You can't say thank you too many times!
Here is my sample thank you note for my friend that gave me flowers.
Dear Megan,
Thank you so much for the beautiful flowers! They made my smile every time I walked past them. You not only made my day, you made my week! I can't wait to catch up over coffee next week. See you Friday!"
Thanks again!
Rachel
A good thank you note is always handwritten. It's best to have thank you cards to send instead of notebook paper. You don't need anything fancy. I've even made it easy for you!
You can download two printable thank you cards {like the one pictured above plus a bonus!} designed by Wants and Wishes designs . Wants and Wishes is a printable party and wedding shop for all levels of crafters! Debbie is the amazing designer behind it all and was kind enough to offer two printable thank you notes just for you! Simply click here.
Do you ever find yourself at a restaurant with your family waiting for the meal to be served and taking the crayons from your kids so that you can color their coloring page menu? I know I'm not the only one! Lately, I've been getting the itch to color and thanks to pinterest and a long list of fabulous designers and contributors, there are lots of free printable coloring pages that will fulfill your need to color. I have gathered a few together for you. Color outside the lines if you want! No one is looking!
The site may not be in English, but the creations are amazing! Mcdid has several amazing coloring printables like this giraffe and the hello spring print featured above.
Zenspirations has this breathe print and several others that will inspire you to doodle.
Coloring page world has this beautiful tree and a few others to share with us.
Dover Publications offers this coloring page for free. You can visit their site to buy the full book.
Art is Fun offers 20 pages of downloads like this abstract fun page.
Beauty that Moves offers this free everything will be okay printable.


