Happy Halloween

Halloween Comments Pictures


Halloween is one of my favorite holidays.
It's a little damp here, but I can't wait to take the kids trick or treating!
Happy Halloween!
0

Book recommendations for you

It's been a few months since I have posted my book recommendations.
{If you are interested in seeing any of my past book recommendations click on the "reading" tab on my sidebar.}

Not because I haven't been reading, but because for the life of me I couldn't remember what books I had read!  Guess that's the problem with library books.  There isn't much of a trail!
I happened to be at Target today and walked down their "best sellers" aisle.
If you ever want to know what to read next, just take a little detour down this aisle at Target.
Seriously, it's what I do.
My little stroll reminded me of some of the recent titles I have read and that I would recommend to you.
 Gone Girl: A Novel
Gone Girl by Gillian Flynn
For months people were recommending Gone Girl to me.  Being forever cheap, I had to wait for a few months to find it in my lucky day section at my library.  It finally was in {I was on the wait list, but I was number 567!} and I set aside the new J.K. Rowling's book {sorry, just couldn't get into it}, to dig into this book.
I immediately was engrossed.  While I am still about 100 pages from the end of the book, every little guess I had about "who done it" has flown out the window with twists and turns and surprising revelations.  As you can guess, it is a mystery novel written about a husband and wife who are experiencing marital difficulties.  The wife goes missing on the couple's fifth wedding anniversary and every clue points toward the husband's involvement.  It's a book that is hard to put down, and I know you will love it too!
   Lone Wolf: A Novel
Lone Wolf by Jodi Picoult
A terrible accident forces a family that has been torn apart to come together and make a tough decision.  Family secrets, a father's obsession, a runaway son and an ex-wife are all brought together to make a hard choice that they will all have to live with in the end.  It will have you wondering what you would do in the same situation.
Where We Belong
Where We Belong by Emily Giffin
I'm not usually a fan of Emily Giffin's work, but actually found myself engrossed in this novel.  A 36 year old New York resident and TV producer is forced to revisit her past decision of placing her now 18 year old daughter for adoption years ago.  Both women take a journey together to find out what they have been missing in each other's lives and have a chance to come to terms with where each of them belong. 
 Behind the Beautiful Forevers: Life, Death, and Hope in a Mumbai Undercity
Behind the Beautiful Forevers by Katherine Boo
Just beyond the luxury hotels in Mumbai is a community called Annawadi.  Annawadi is a slum and during the book you are introduced to several hopeful members of the community.  The glimpse inside the life of a garbage sorter and the injustices of the cast system are eye opening.  It's a well written book with painful real life truths about this community.  
Just in case curling up with a good book doesn't sound as good as sitting down by the fire and getting lost in a television show, then I want to recommend my new favorite show to you.
PBS has done it again {no need to have cable!with the series Call the Midwife.
Call the Midwife is an intimate look into nursing and midwifery in 1950's East London.
The show follows a community of midwives that live with an order of nursing nuns.
You can catch up on any episode that you have missed here.
I haven't watched Downtown Abby, but I'm told if you like that series, you will like this one.  
So, what are you reading {or watching} now?
Anything you would recommend?
0

Book page and twine pumpkins

It’s hard to believe that the seasons are quickly changing, the pumpkin spice lattes are brewing and that fall is here already!
I was actually in Costco the other day and was surprised to find that the Christmas decorations were already up and ready for purchase.
I am happy to focus on one holiday at a time thankyouverymuch!
Which is why I made book page and twine wrapped pumpkins to celebrate the crispness in the air and the leaves falling from trees.
Want to know how to make some for your home?
Join me!  I am happy to share my tutorial.
By now, you may know about my little Dollar Store addiciton.
If you don’t, you should read up on some of the best things to buy at the Dollar Store here.
Don’t forget to check out the comments section.  It’s chock full of good tips from my readers.
To get started you will need some dollar store pumpkins.
 I put up a side by side picture of the before and after.
Aren’t they so much better after?!
Let’s get started making our mod podge book page pumpkins.
All you need is an old book, a paint brush, and mod podge…and of course, your pumpkin!
I painted mod podge on one side of my pumpkin, then slowly started layering book pages on.
Cover the book page with another coat of mod podge and press down into the creases of the pumpkin with your fingers.
This is a little messy, but so worth it!
Continue adding book pages until your whole pumpkin is covered.
While you wait for your book page pumpkin to dry, let’s get started on our twine pumpkin.
You will need twine (I got mine for $1 at a garage sale), a glue gun, lots of glue sticks, and your pumpkin.
Start on the bottom of the pumpkin pinching the end of the twine together and then slowly start wrapping in a circle around the pumpkin.
Glue as often as you can to hold the twine in place.
Remember to wrap tightly so the orange doesn’t show through.
 Continue wrapping the twine all the way to the stem.
Once you get to the stem begin to wrap the twine on top of itself.
Cut the end of the twine and poke it into the top of the stem.
That’s it!  Now you are ready to embellish your pumpkins.
I used a leaf from another decorative pumpkin that I have as a stencil.  You can easily make a large heart shape to get the same effect.
Cut the leaf out of several layers of book page paper (I used three layers).
Carefully pinch the middle of the leaf together, and glue.  This gives the leaf some dimension.
Glue your leaf into place on the pumpkin at the base of the stem.
I used thinner twine to make the vine tendrils.
Channel your inner pre-schooler and wrap the twine around a pencil to get the spiral.
I simply tied the tendril twine around the stem.
That’s it!  Now you have some very classic looking pumpkins to add to your fall display.
Each pumpkin cost me $1 to make since I had all of the supplies on hand.
Not bad for a buck, don’t you think?
0

faux leather finish with brown bags

Last month, I introduced you to a very talented local artisan and fellow mom of three.
Didn't you just love her French inspired dresser she made using an overhead projector?!

In case you missed it, you can see it here.
And don't forget to pin it so you can inspire others too!

This month Laddie is back to share another genius technique with my readers.
Since Laddie doesn't have her own blog {yet} please make sure you leave lots of nice comments for her and go and visit her facebook page to show her how much you appreciate her.

Hello again! This is Laddie from Re-New Furniture Finds & Re-Finishing.
 A BIG THANK YOU
 to Rachel for inviting me back for another guest post!

Today I'd like to share with you a faux finish that is in-expensive, easy peasy to do and the end result
is really super cool!

The first time I tried this technique was on the top surface of an end table.
It was a cool effect that resulted in a marbled faux leather look.

Then I had a client with a large plain 6 drawer pine Ikea dresser that needed
some spicing up for her teenage sons room. This finish was masculine and
perfect for this piece! She loved the idea of doing it on the drawer fronts
and her son loved the finished dresser.

So, recently she brought me a nightstand to do in the same finish
to go in his room and I thought I'd take you through the process with me.

The materials you will need are:
  • Brown masking paper or any light weight paper bag
  • Mod Podge
  • Foam brush
  • Glaze (I used Martha Stewart Black Coffee)
  • Scissors
  • Rag
  • Polyurethane (optional)
    The first step is to paint your furniture piece your desired color. In this case I used
    a dark brown semi-gloss.


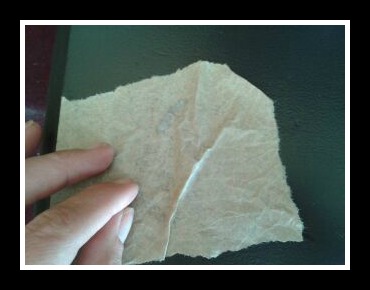
    Then after it has had plenty of time to dry, rip off strips of the brown paper masking
    and start crumpling it up
     and crumpling it up.
    Open it up and crumple some more
    and a little more
    until it is nice and soft.


    Start in the corners and work your way towards the middle.
    To get nice edges I cut the sides of  the crumpled paper to fit.


    Put a good coat of Mod Podge on the back of the paper
    with your foam brush and then place it in its corner.


    Leave it a little crumpled and layered with some creases.
     DO NOT SMOOTH IT OUT
     otherwise you loose your texture.


    Continue this process in the corners and then overlap a little and layer
    your way from the edges in to the center until the surface is completely covered.


    Now take your foam brush and coat the entire top surface with
    a layer of Mod Podge.
    Give this time to dry completely and then we GLAZE!


    The trick with glaze is to go light and use a little at a time. If it isn't enough
    impact you can add another layer. If you start off too heavy
    and dark it is much harder to reverse this process and go lighter.

    So with your rag dip it in the glaze and get just a little and start
    in the corner rubbing gently in a circular motion to get the glaze in to
    all of the creases and layered edges.
    You'll see that a little glaze can spread a long way!


    Keep going until all the paper is coated to your liking.
     Having some uneveness to your color
    and shading will help with the look so don't worry about being perfect!!
    By now you should have a really cool look going on!


    I use a light spray polyurethane just to protect it but the layer of Mod Podge
    has really already done that for you. If you are doing this
    technique on a table surface the extra protection is a good idea.


    Hope you give this a try on your next project! This
    is especially handy on pieces that have rough tops or drawer fronts
    that are beyond sanding! You can just HIDE the flaws!
    Try using newspaper or sheet music as an alternative with
    the same steps as above!

    Happy Re-Newing!

    Until next time, Laddie

    Isn't that a great technique?!  As Laddie said, it's a great technique to use if your furniture piece is just too far gone to save.  So simple, but so awesome.  Thanks Laddie!
    Don't foget to "like" Laddie on facebook and see what else she's been up to.
    And remember, show her some love today.  I kind of want to keep her around and see what's she's going to show us next!

    0

    Living well on less-saving money on your cell phone-why a pre-paid plan works for us

    Remember last month, when I introduced my new series called Live Well on Less?
    This new series doesn't come without homework.
    Last month I challenged you to start keeping track of every penny coming in and going out.
    If you haven't started keeping track of your finances I would suggest using a free service called Mint or paying for the Quicken program like we use.
    At the beginning of the month, I shared my first post in this series, which was how to live well on less-saving money on cable, internet and phone.
    During that post I didn't even touch on cell phones, but I promised that I would!
      Times, they are a changin' and it's rare for people to not have a cell phone these days.
    I got my first cell phone in 2000.  We had a small child, and I was commuting for school in a not so reliable car.  My in-laws paid for a year contract on the phone because it made them feel better that I had a cell phone that they could reach me at {or vice versa} since my son was in their care a few hours a week while I attended classes.
    We continued to pay for another year of service, but realized that we just weren't using our cell phones very often.  I rarely turned mine on and after thinking about ways to save on our household expenses, I made an impulse decision to cancel our cell phone service.  This was around the same time we cut cable...quite a year!
    We didn't miss having cell phones at all.
    I feel like the popularity of cell phones were just starting to really take off right as we canceled our plan, and I was happy to be able to focus my time and attention while I was away from home on my growing family.
    When my kids were little, we had lots of play dates and trips to the parks and museums. 
    I wanted to make sure that during that time my kids had my full attention and that they weren't sharing it with someone on the other end of my phone.
    We carried on without cell phones for around 7 years, but as the kids grew and their activities started taking us in several different directions, we were finally feeling the need to be able to communicate to one another.
    I remember driving home from the Seattle Science Museum with the kids and being stuck in rush hour traffic.  I was dying to have a phone so that I could call my husband so that he could start dinner so we could feed our family before having to head out to baseball practice.
    I tried to telepathically send the message, but unfortunately that didn't work, and my frustration got the best of me when I got home.  Sometimes wouldn't it be nice if your spouse could read your mind?!
    In 2009 we decided that we needed to jump back into cell phone ownership.
    My husband spent hours researching the best plan and realized that having a pre-paid plan through T-Mobile would probably be the best plan for our family.
    We found that we weren't big cell phone users during that two year period that we had cell phones, so we didn't think we would be talking excessively on our phones.  We didn't need a lot of minutes because we weren't using a lot of minutes.
     Having no contract was another big advantage to having a pre-paid phone.  We weren't locked in to any plan and could change how we used our service at any time.
    There was more initial expense for having a pre-paid plan.
    We had to add $100 to each phone through T-Mobile.
    Those minutes don't expire and any unused minutes roll over at the end of the year.
    It costs around 10 cents a minute to use the pre-paid phone.
    We had this phone plan for 3 years, and would still have it, if we didn't have a 14 year old who got his first cell phone and needed a phone that could text (ours could...just not well).  I actually wrote about how I didn't text (until this August...yep, welcome to the new millinium Rachel!) here.
    We have a new pre-paid plan that I will talk about in a minute.
    One of the requirements of the T-mobile pre-paid plan is that we had to add to it each year.  After the initial $100, we didn't have a specific amount we had to add each year, we just had to add something.
    Most years, that addition was around $15 since like I said, the minutes rolled over.
    In our three years of owning the phones (we had 2), our TOTAL for both phones over the life of the phone was $300.
    That comes to around $8 per month for 2 phones, and I know you are smart people, so it's a no brainer that each of our phones cost around $4 a month or $48 for the year.
    If you don't use your cell phone as your main phone line, and don't use an excessive amount of minutes, then a pre-paid program might be worth looking into.
    T-Mobile has been rated one of the best pre-paid plans out there.
    Which is why when we bought my son a new phone for his birthday, we decided to stick with the pre-paid route and got new phones that could text.
    Texting seems to be how kids these days are communicating, and we didn't want to hinder our son's ability to communicate with his friends.
    He does have a cell phone contract that you can read about here.

    When we were revisiting the idea of new phones, I did want to look into getting an iphone.
    I have an ipod touch and use it quite often and find it quite helpful.
    I could imagine that an iphone would be a good combination of all of the things that I could use (google maps, e-mail whenever I needed, texting, coupons!, information at my fingertips).
    However, the price tag for a smart phone was WAY more than we could justify.
    Even on the cheapest plan for just one iphone, we were looking at at least $80 per month.
    Not to mention the cost of the actual phone (which I hear is important), which could set me back several HUNDRED dollars!
    source
    Once I spent some time looking into it, having a smart phone was a want, not a need.
    In fact, really, having a cell phone at all sometimes seems like a want not a need.
    I could live my life without a cell phone, but remember, this series is not about living a depressing life, it's about living well on less.
    If you are tracking your finances as I mentioned in the introduction post of this series
    then you will know how much you are spending per month on your cell phone.
    In my experience, having a smart phone with a data plan is the most expensive type of cell phone plan you can be on.
    If you currently have a smart phone and are trying to save money, reevaluating your plan with less minutes, or less features is worth taking a look at.
    From my research, there are 3 carriers you can choose from with an iphone (I keep going back to this particular phone because it is the most popular smart phone and the one most people have), all three have very similarly priced plans.
    There doesn't seem to be a way to save too much money outside of going from the most expensive plan and downgrading to a lower level smart phone plan, however, like I mentioned, for one phone you are still looking at around $80 a month.
    source
    We "upgraded" our phones in August to the T-Mobile Sparq phone.
    Cost out of pocket was around $50 for each phone.
    We bought three of the same phone for a total of $150 (cheaper than an iphone).
    We stayed with a pre-paid phone plan but started with unlimited texting for $15 a month for my son.
    We quickly learned that if our son was texting, we would be texting, so we upgraded all three phones to the same unlimited texting plan.
    We pay around $45 a month (total) for three phones (we use minimal talking minutes now, but do still have them paid for in the plan).  We have 10 cents a minute calling and unlimited texting.  Of course, no data plan.
    Pre-paid phones work for our family.
    They may not work for yours, but for us, it's been a way to have a cell phone and save money.
    I don't know of too many contract plans, even with the simpilist of phones that still costs as little as we pay.
    Remember this blog series comes with homework.

    This week your homework is to:
    *look at what you pay for your current cell phone plan
    *how many minutes do you use?
    *are you paying for more minutes than you use or are you being charged for going over each month?
    *if there are several of people sharing a plan, could you save money by joining a family plan
    *spend time on your providers website to see if they have any specials or discounts you could take advantage of that you aren't already
    *are you paying for extras?
    *if you have been in a contract for some time, can you renegotiate to get a better deal?
    Do your homework and let me know what you find.
    Could you be saving money?
    0

    Picking the perfect bed for your child

    All of my kids started out sleeping in a crib.
    Well, not all of them.
    I went all hippy dippy when Owen was a baby and got this cool swing called an Amby baby Hammock.
    Loved it!
    How cute is he??!  What a peanut!

    Fast forward a few years, and all of the kids made the successful transition to a big kid bed.
    The decision on what type of bed {bunk bed, loft bed, twin or full} and what color {white, natural, black, blue} always required several trips to different local furniture stores to find the perfect transition bed for the kids.

    Hopefully, I can share a little of what I have learned from selecting several different beds (the count for three kids is up to 6 different beds).

    I have two boys.
    An industrial looking bed would be a great addition for a tween/teen room.

    If you want to go the bunk bed route, there are pretty cool looking bed for the boys while still playing on the industrial theme.

    There are bunk beds that have large sturdy stairs and great storage space for all of the little ones special things.

    I know my kids like to cuddle with just about every stuffed animal they have.
    Look for beds that help keep all of those collections organized and in their own space.  Especially if you have siblings sharing a room.
    As the kids grow, sports trophy's, school books and alarm clocks can take up the shelf space once reserved for their favorite teddy bear.

    The full or queen size bed under the twin is a rare bunk bed find I have heard.
    I know many of my friends are looking for this style since they use the upper bunk for sleepovers.

    Speaking of sleepovers, we like trundle beds.
    In fact, that's what we choose for our daughter's room.
    However, I must admit, we don't have a mattress for it and with carpet in the kids rooms, it makes it hard to pull out.  So keep that in mind.


    If you remember, last year we switched out my son's twin bed and got him a loft bed.
    The advantage of a loft bed is that it is a good use of space.
    You have your bed, a desk and often times a dresser all built into to the same footprint that a twin size bed would take up.

    I'm always a sucker for a white farm house style bed.
    I love that it's a style that can grow with your children from toddlerhood on through the teen years.
    The underbed storage is a major bonus!
    And it would be a great bed for a guest room once your child moves out.

    Sometimes it's nerve wracking thinking that the bed you choose for your toddler is going to be the same bed they will be sleeping in after puberty! 

    Always keep in mind your room size because in furniture show rooms, the bed sizes can be deceiving in large show rooms.  This is the reason we have stuck with twin beds for our kids. 

     Also, make sure that the bed you are selecting can grow with your child.  Your three year old doesn't have homework and won't need a desk for several years, but your teenager will.  

    Will your son or daughter want to sleep in a bunk bed when they are seniors in high school and are you o.k. with buying a new bed if they think it's "too babyish?"

    Lots of details to keep in mind, but don't worry, you have lots of options! 

    Sweet dreams little ones!

    disclaimer: this post is a sponsored post written on behalf of shop 4 furniture.  As always, all opinions are 100% my own.
    0

    Fall decor cheaply done, but not looking cheap!

     I'm a little slow at sharing some of the Halloween and fall decorations around my house.
    Forgive me.  Fall has been a busy time around our house this year.

    I don't like to spend a lot of money decorating for the holidays, and most years, the decorations I use are the same as the ones I had for the previous year, or ones that I pick up 90% off after the holidays.
    Those are the best ones because most of the time I forget that I have them and then it's a surprise when I unpack them for the holidays!  It's the little things people!

    I've found that you don't need to buy a lot of new decorations every year, just changing up where you have the items year after year sometimes helps.  I use a lot of my existing decor like this wire egg basket and this cloche and make them more festive by adding Halloween or fall items to them.

    My husband likes to joke that I can't leave any flat surface undecorated for too long.


    I *might* have a slight obsession with wreaths.
    I added this little "spooky" banner to my book page wreath that is in my entry and the leaf wreath on the right was a garage sale buy that I got years ago for $5.


    I decorated around it with some small lanterns and bronze jack o lanterns and dollar store spiders.


    Several years ago I shared with you my Beware sign that I made from scrapbook paper and an unfinished wood sign.  I still love it.


    This large woven bowl sits as the centerpiece on our dining room table.
    I filled it with some of my moss boxes and acorns that I got at a garage sale last summer.


    I have a small alcove on my front porch that houses some of my favorite vintage finds.
    I added this autumn pumpkin that I got this summer for $1 at a garage sale.


     My youngest son was asking if I would be adding the bird to Rocky's head this year.
    Don't know who Rocky is?
    It's our bear head.  You can read about him here.
    Of course we are going to add a bird to his head!
    Love those dollar store crows!


    Here's a close up of the decor on the mantle.
    I found the berry jar filler on super sale at Pottery Barn {and by super sale, I mean three boxes were less than $1 total} a few years ago.
    The {for real} vintage pharmacy bottles were bought at a garage sale a few years ago.
    Wish I had bought more because I think they are my favorite things!
    Did you get a chance to visit The Southern Institute for my book page and twine pumpkin tutorial?
     Not to worry.  I'll be posting the full tutorial next week in case you missed it.


    I took several of my original pumpkins that I made in the tutorial to Persnickety's and after taking them, I wanted to make some more.
    So I did.
    Cuz that's how I roll.


    Of course, I can't neglect decorating my very large kitchen island.
    I added a few candles and took a paper mache pumpkin and mod podged book pages to that too.
    No book is safe in my house!


     If you want to see my fall decor from last year, you can visit it here and see how many of the same items are being used in different places throughout the house.

    Total spent for fall decor this year $7.49
    Breakdown:
    $3.99 paper mache pumpkin
    $1 autumn sign for front porch
    $2.50 live gourds 
    How do you decorate for the holidays without spending a lot of money?
    0
    Back to Top