Garage Sale Finds Friday

Welcome back to another week of garage sale finds Friday, where I share with you my favorite garage sale finds.  

This week I've got some fun woody goodies and a pretty little something.  One of my finds even got a little transformation that will be revealed on Tuesday.  Wonder if you can guess which one.


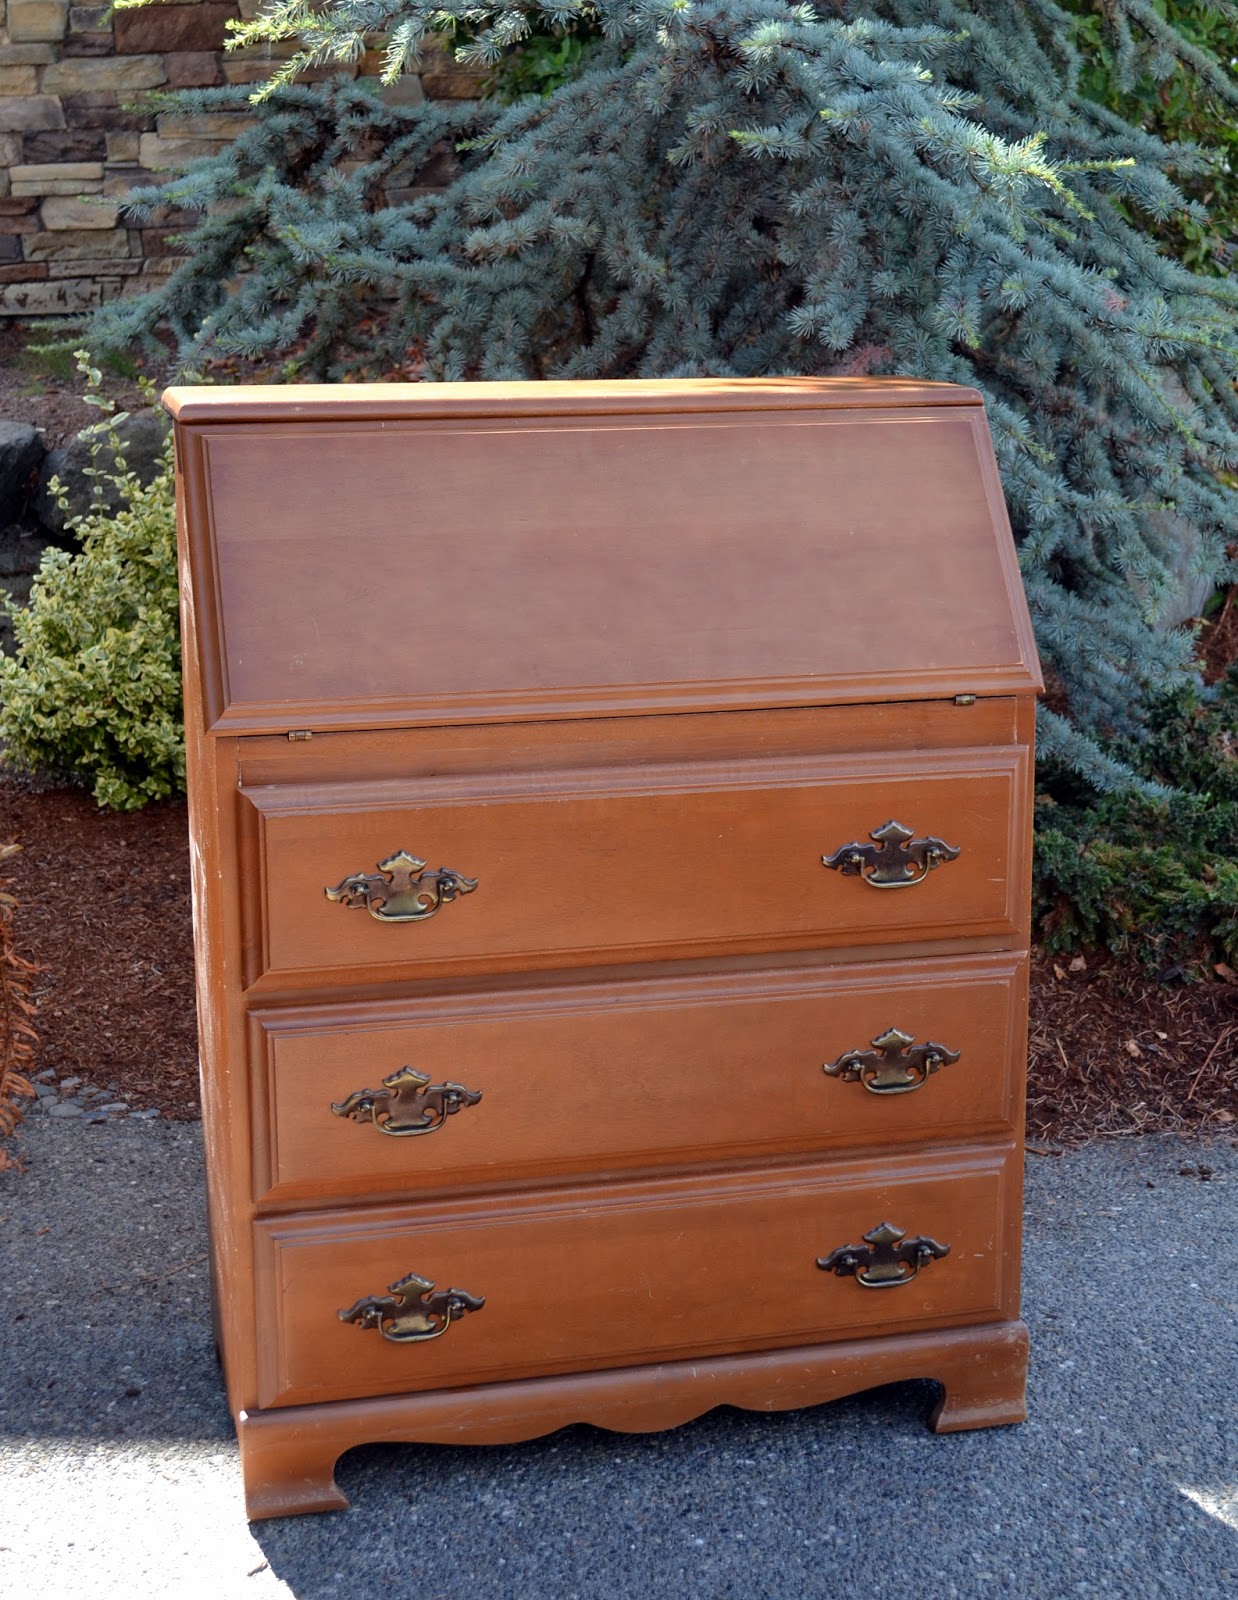
I'm a sucker for these old secretary desks. I just love how they open and hold all your desk goodies, but close and keep it all a secret. I love being able to close the door on messes!  

I rarely go to multiple day {or weekly} garage sales because so much of the good stuff has been picked over, but I happened on one that had been going every weekend and I hadn't been to it because we had been on vacation. This desk was originally marked $40, but they crossed it out a few times and it was down to $10.  No negotiating needed on my part. 


I rarely pass up mirrors at garage sales. This guy is heavy! You can't see it from the picture but the mirror is starting to do that cool patina aging thing where it turns colors and it's awesome.  There really is nothing special about the frame, I just loved the aging mirror part!  And for $5 I couldn't pass it up.


I love a good frame. I'm pretty sure this one used to hold a canvas of some sort because it's got a cool linen surround but the canvas is there no longer and for $2, it will be perfect for a holding some kind of sign or picture I create.


And finally, check out this adorable yellow plaid cup and saucer. Isn't it the cutest?  It actually came as a whole set but this guy was the oddball.  I just love how happy and yellow and fun it is don't you? I paid a quarter for this guy and have gotten a quarters worth of joy out of it already.


That's what I found this week.  What did you find?
0

Easy to make tassel pen and coordinating notebook with Duck Tape


It feels like summer just started, but really, it's starting to wind down a bit and we are beginning to think about heading back to school.  My kids have been doing this school thing for quite some time now. Two of the three no longer get lists of school supplies in the form of a checklist. They just know what they like and what works for them.

My daughter is obsessed with stationary supplies. I had no idea that was a thing. But then I started mentioning it to other people and apparently there are other people who love office supplies. Who knew? Maybe you {or one of your kids} is one of them!

I learned that one of the things that office supply lovers love is coordinating supplies in a great print. One of our best tricks is picking up Duck Tape and using that to update cheap school supplies.


A plain composition notebook on sale can be picked up for less than a dollar. One with a fun print is usually at least double. So why not make your own? Not only that, now you can use your Duck Tape to create coordinating supplies for everything from folders, to pencils and pens. The only thing stopping you is your creativity!

Tassels are hot this season, so not only did we want to coordinate some supplies, we wanted to do it in style!


To make your tassel pen, you are going to need a Duck Tape print you love and a solid color to coordinate. You will also need some scissors and some pens. I painted my pens gold before we started. You can find the tutorial here.


Start by rolling out your Duck Tape print about 20 inches. Cut the tape and fold the ends into the center so that the sticky parts are covered and you have a print on both sides.


Take your scissors and cut lines about 3/4 of the way up to make your tassels. Doing this on the whole strip of Duck Tape that you made.


Carefully roll the tape up as tight as you can focusing on the top, uncut part of your Duck Tape.


Use your coordinating solid color to create the top of the tassel and the "string" that will hold your tassel on to your pen.


Make a small piece that has been folded in on itself as the string and use another small piece to wrap around the top of your tassel to hold it in place. Don't secure the piece of Duck Tape that you use on the top of your tassel without adding your string to the inside.  Once you add that, you can close the tape up.


Secure the tassel with tape to your pen.
You can also use your Duck Tape to cover the front of a notebook or folder.


That's it! Now you have one of a kind coordinating school supplies to take back to school.


What school supplies will you update?
0

Tips from a cancer survivor on how you can support friends and family diagnosed with cancer


A cancer diagnosis can be a super scary thing. It seems like all of us have been touched by cancer at some point or another.  Perhaps, you have been on the receiving end of that diagnosis, or you have had friends or loved ones that have been.  
This past year alone, I've personally known a handful of people who have been diagnosed with some form of cancer.  I know there have been times when I wanted to help but I wasn't sure how. 
Recently, I asked some cancer survivors to share their insights and tips with us so that we can better support those around us when they are diagnosed.
1. Organize a Meal Train
It's one thing to offer a meal, but another to coordinate it. A friend with cancer isn't going to remember specific dates and offers and if you don't set it up for them, they probably aren't going to want to burden you. 
2. Hire a cleaning service
Someone going through chemo isn't going to feel strong enough to keep up with their daily chores. Having the help of a cleaning service {or a kind friend wiling to clean} will help with that burden.
3. Consider giving a gift that helps pass the time
My sister received a Kindle from her co-workers when she was going through chemo. Each session lasts around three hours, so having something to do during that time is helpful. Netflix offers year long subscription services in the form of a gift card, which could come in handy to help pass the time when your loved one is recovering from surgery or during treatment.
4. Flood their mailbox
While you may want to stop by and see your friend or loved one, they may not be up for visitors. Send notes and cards to let them know that you are thinking of them.
5. Don't take it personally
If your friend doesn't respond to your texts, calls or e-mails, don't take it personally.  It's an overwhelming time.  My friend Aimee says to keep pursuing them. They really do appreciate it even if they can't reciprocate.
6. Don't just offer...do it!
It's one thing to say "let me know if I can help" but another to pick a specific time and make it happen.  Be specific in your offers of help. 

7. Organize a Facebook group
People are going to want to help but won't exactly know what to do or how to help unless there is something specific. Setting up a Facebook list and adding the needs {grocery run, help with the laundry, carpooling kids} as they happen and then responding to those needs is a great way to support your friend or loved one. 
It may be really difficult to know how you can help your loved one with cancer, but hopefully these tips will give you a starting point. I would love to see this post help others, so if you have any other ideas that I missed, please leave them in the comments.  

0

A collection of the best stackable anniversary bands

My husband and I recently celebrated our 17th wedding anniversary. We spent some time celebrating in Cancun and we had our best time!

I am still a girl, and jewelry is never far from my mind.  I like diamonds and sparkly things, what can I say! I am loving the new stackable ring trend and think that it's a fabulous idea if you are looking for some sparkly way to remember your next wedding anniversary by.


I've rounded up a few of my favorites from Anjolee. Maybe you will find a favorite that you love too!


{from left to right, top to bottom}

Vintage princess cut eternity band
It's a ten Diamond band
Round Millgrain Diamond Anniversary Ring
Diamond Channel Band
Perfect Three Diamond Anniversary Ring


I'm more of a delicate ring kind of gal, since my wedding ring is sized at a 3.5. I have teeny tiny fingers! I have a channel set wedding band already, and played with stacking another eternity band like the everlasting love eternity ring under my existing wedding set.  You know...just getting an idea for our 20th wedding anniversary and all.  It was a seamless transition and blended in perfectly with my wedding set.


My current wedding set is soldered together, and when I travel, I switch out my wedding ring for a plain band. I love the idea of not soldering an anniversary band and having the option of wearing that when I travel instead.  Wouldn't want the guys flocking all over me once I take that ring off!


Are you loving the stackable ring trend as much as I am?  Do you have a favorite from my list?  I would love to hear from you!
I was given a silver and cz ring as compensation for this post. All opinions are 100% my own.  I wouldn't tell you about something I didn't love.
0

Garage sale finds Friday

Welcome back to another week of garage sale finds Friday, where I share with you my favorite garage sale finds.

But before we get started I want to let you in on something super fun!

Today I'm being featured on the Summer Spotlight hosted by Dwelling in Happiness, Kenarry: Ideas for the Home, Crafts by Courtney, 3 Little Greenwoods, Making It In the Mountains, and View from the Fridge. The Summer Spotlight showcases creative ideas from a different talented blogger each Friday throughout the summer months.  I am beyond excited to be a part of it!

Katie from View from the Fridge asked some really thoughtful questions and it was fun being a part of this summer series.

I encourage you to swing by and check out the feature about Holy Craft as well as the entire Summer Spotlight series HERE. You can also follow the hosts online to see the great ideas they share year-round:

Amanda of Dwelling in Happiness

Carrie of Kenarry: Ideas for the Home

Courtney of Crafts By Courtney

Ashley of 3 Little Greenwoods

Kristi of Making It In the Mountains

Katie of View from the Fridge

Summer Spotlight hosted by Dwelling in Happiness, Kenarry: Ideas for the Home, Crafts by Courtney, 3 Little Greenwoods, Making It In the Mountains, and View from the Fridge
--

O.k.  Back to business!  Because I know you all want to see what I found this week at garage sales.

This week, I stumbled onto a great vintage sale full of fun old trinkets and what the shops like to refer to as "smalls."  I had my best time digging through boxes and crates.

You know, you can learn a lot about a person when you are digging through their junk. 
I found this really cool pair of French binoculars in their original leather storage container.  They were so well cared for you can hardly tell they are nearly 100 years old!

I love vintage rulers. I've been on a mission for years to find enough wooden rulers to make a cool project that I've had rolling around in my head.  I may be getting close.


I also found this fabric measuring tape. It's the coolest measuring tape I've seen.  I have this tutorial for a measuring tape bracelet.  I may just make a few with this cool vintage tape.


I don't know what I'm going to do with this little magnifying glass, but it's so super adorable that I couldn't pass it up.  It would be great just sitting on a desk.


Poker anyone? These old poker chips are pretty cool aren't they?


Probably my favorite find of the day was this old number stamping kit. I love stamping metal and have made these spoon garden markers and this stamped initial necklace.


I bundled all of the items together and paid less than $5 for everything. I could have spent hours searching through all of the old crates and boxes this garage sale had.  It was treasure after treasure.
What do your favorite garage sales look like?o
Don't forget to head on over and check out the summer spotlight.  You might learn something about me you didn't know before! 
0

Handmade cards made from something {free} you would never expect!

Do you ever see something and inspiration just strikes? That happened to me earlier this week on a coffee date with my littlest guy. We were literally standing in Starbucks and I immediately wanted to get home to start crafting.


I whipped up these handmade cards in a matter of minutes.  You wouldn't believe the {free} thing that inspired me to make them.

Just sitting there at the pick up window at Starbucks were these beautiful cards full of information about the different countries and blends of coffee that Starbucks is now offering.  But I couldn't quite see past the amazing design.

These bad boys are printed on heavy card stock and have these amazing gold foil detail on every single one. I sort of looked around questioning if these were really free, because quite honestly it felt like manna from the craft gods.

So I did what anyone would do and collected a few of each one. I ended up getting about a dozen cards because crafting, that's what.


I found matching scrapbook paper that I had in my paper closet and picked up this set of ivory cards and envelopes from Joann's {50% off!}.


The inside of each of these free cards is just begging to be cut out so that you can make your own statement.  So I did just that. I used my exacto knife thingie {I have no idea what they are called but I love them!} and carefully cut around the white advertisement space.


This is the point where I wish I had a Minc {if you don't know what it is, seriously check one out!} 
but I don't and really if I bought one just for this project it would sort of defeat the point of free cards dontchathink.

Anyway, I unearthed my stamps and my gold embossing powder and used the coordinating plain paper to fill the space I just cut out.


I love the end result and for nearly next to free, I have a set of 12 note cards I can use for just about any occasion.

Thank you Starbucks!
Keep your eyes peeled at your local Starbucks for these cards.  Then go and make something. I'm sure inspiration will strike you too when you see them!
0

Netflix to the rescue for a playdate!

Can I be honest with you? I broke one of my parenting rules today. I've been at this parenting gig for a LONG time and one of my steadfast rules is that if you have a friend over for a play date, then there is no television.  Because...well...you have a friend over.  You should be playing, not watching TV.

But, there is this weird age that my younger kids are in that vacillates between playing and hanging out.  If you have a kid over the age of 9, you know what I mean. It's not that the kids are too cool to play, it's that sometimes they think they are too cool to play. 

Electronics and video games are far more engaging and with age, my kids and their friends are allowed to spend more time on these devices, which makes the imaginative play they were once so good at start to seem foreign.


 So I broke my rule.  But for good reason.  And shockingly, my plan seemed to work!


Netflix has an awesome new original series out called Dragons Race to the Edge.
It's an action packed story about what happens before How To Train Your Dragon 2...a prequel of sorts.

The boys had been outside playing with water balloons and had been running around crazy but had just come inside to tell me how bored they were and were wondering what else there was to do.

Well, I whipped out some trusty Dragon themed snacks {dragon scales were Doritos and Dragon Claws were Bugles} and let the boys sit down and watch one episode.


It didn't take long before they were engaging in imaginative play and pretending they were Hiccup and Toothless.


There was sword fighting and cardboard box building and Nerf wars that ensued all because they were inspired by the show and it's characters.

I'm sure you could even take some of the educational shows I mentioned last month, into a play date and create science projects and games that could keep the kids busy for hours.  
I may have to rethink my policy on TV and play dates. 
0

Transformation Tuesday

Welcome back to transformation Tuesday!  It's becoming one of my favorite new series on the blog.

I share with you on Friday my favorite garage sale finds, and then on Tuesday, I follow up with a transformation from the previous week. 

This past week, I bought all the large things.  I bought a rare art deco dresser for $20 that ended up being worth thousands, Ethan Allen pieces and some other large awesome goodies. Any idea what the transformation item will be this week?  

Think I painted some furniture? I did!  Bet you can't guess which item I painted.


I love painted furniture, but even I know that I shouldn't paint over a rare mint condition piece!  If you guessed that I painted the large wicker basket then you would be correct!  

Just to refresh your memory, I bought this sucker for only $2. It was brand new and in great shape. The seller was at a loss of what to do with it, and I had endless possibilities running through my mind.  


While I was out garage saleing, I found these three, new in the package chalkboard signs for $1. I knew they would work great with the laundry basket I was envisioning this wicker basket becoming. 


Painting wicker isn't the easiest thing you can paint. Actually, it's probably the hardest.  Thankfully, there is spray paint! I used Rustoleum because that stuff can cover up any surface and it doesn't drip or run!


I labeled each sign and tied them on.


I could have just as easily written 1, 2, and 3 for each child too.


I just love how this wicker basket transformed into the perfect laundry basket for our laundry room.

I just love transformations don't you? Any other suggestions for uses for this three compartment basket?  What would you have written on the signs?
0
Back to Top