Showing posts with label fall. Show all posts

I am thankful for...a free printable paper chain

I'm a sucker for a beautifully set table.  Though I have a confession. This is the first time I've taken out my great aunt's silver since I've had it and I only have one of these place settings, though I do love this pattern on the plate don't you? I also don't have enough matching glasses for our whole family. Hostess extraordinaire I am not!

Though if I could, I would set the dining room table like this and leave it. But right now it looks silly with only one place set. I digress...

Thanksgiving is the perfect time to set a fancy table complete with napkin rings. I love taking the time to reflect on the things that we are thankful for. I created a free printable for you that can double as a napkin ring for your fancy table and that can later on be made into a paper chain to display all of the things that you and your family are thankful for.


A small piece of tape holds this napkin ring together.  Once you take the napkin ring off, you can write what you are thankful for, untape it, and piece it back together again with another ring, making a chain of thankfulness.


I used this large hand drawn flourish from Lace and Yarn and designed the rest in the Silhouette software. I'm offering it to you to download for free, so that you can use it for your Thanksgiving table.



You can download the file here. I printed it out on card stock, though you could use any kind of paper that you think would work best. Each page prints out four strips of paper for the chain.
Let's count our many blessings this Thanksgiving! What are you thankful for?
0

Homemade Caramel Apple Pie


Holy Craft's newest contributor, Kate, has been busy in the kitchen!  Last week she shared with us M&M candy corn cookies {did you try them?}  and this week, she's sharing with us her homemade caramel apple pie.  It's part of the Wayfair Battle of the pies contest. 

Since you all can't try the pies in this competition, the way votes are counted is by engagement: make a comment, share a post, pin the image, like the picture, you name it, we will take it!  You can find all of Holy Craft's social media outlets on the far right side bar of this post.  

But most of all, we just hope you will enjoy this yummy spin on this classic favorite.


Caramel Apple Pie
{printable recipe}

Filling:

5-6 hard fleshed apple of choice peeled and cored {I used gingergold}
zest of one lemon
juice from one lemon
1 tbsp brown sugar
½ cup flour
¼ tsp nutmeg
¼ tsp cinnamon

Slice apples into thin slices {all the same size} and mix with lemon juice and zest. 


Mix flour, sugar, cinnamon and nutmeg in a bowl and toss with apple. Set aside.


Pie Crust:

12 tablespoons cold unsalted butter
3 cups flour
1 tsp salt
1 tbsp sugar
6 to 8 tablespoons {about 1/2 cup} ice water
OR
Make it easy and use a store bought pie crust {I personally love Trader Joes}

Cut butter into small cubes and return it to the refrigerator while you prepare the flour mixture. Place the flour, salt, and sugar in the bowl of a food processor fitted with a steel blade and pulse a few times to mix. Add the butter. Pulse 8 to 12 times, until the butter is the size of peas. With the machine running, pour the ice water in and pulse until the dough begins to form a ball. Dump out on a floured board and roll into a ball. Wrap in plastic wrap and refrigerate for 30 minutes.
Cut the dough in half. Roll each piece on a floured surface into a circle, rolling from the center to the edge, turning and flouring the dough to make sure it doesn't stick to the board. Fold the dough in half, place in a pie pan, and unfold to fit the pan. Repeat with the top crust and cut into strips. 
Fill in the bottom pie crust with apple mixture.

Arrange strips of pie crust into a lattice design on top.  Trim excess pie crust and crimp edges.

Caramel Sauce:

¼ cup brown sugar
¼ cup white sugar
4 tbsp butter
pinch salt
½ tsp cinnamon
In a sauce pan melt all the ingredients and keep warm until ready to pour on pie.
Pour all the caramel on top. 


Place foil on edges on pie and bake at 375 degrees for about 1 hour.

Enjoy a slice and share some with a friend!


Apples are perfectly in season right now and make the best pies. Make it even better by adding caramel to the top. It's sure to be a new family favorite!
disclaimer: as part of this competition we were given a Wayfair gift card. All opinions are 100% my own. I wouldn't share with you something I didn't love.
0

Fabric pumpkin tutorial

I've been on a role lately creating and crafting pumpkins for my fall decor.
Last week I shared with you a whole week of pumpkin projects from birch candle holders made from a faux pumpkin, to ruffle pumpkins and a few other projects in between.
This week I'm sharing with you a tutorial for fabric pumpkins.


It's been over a year since I picked up some designer fabric swatches from the Goodwill outlet in Seattle. Like any good hoarder crafter, I didn't know what I was going to do with the swatches at the time, but I kept them in a box ready to use when inspiration struck. They were great pieces of fabric, just not quite big enough to make a pillow, so I was stuck...until, I decided one day to make a fabric pumpkin. That's what everyone does with $280 a yard fabric right?!


I started by taking the fabric and cutting a rectangle.
You can make your pumpkins as big or as small as you would like.
Turn the fabric inside out and stitch up one side.
The other side will be on your fold, so no stitch needed.


 Turn your fabric inside out and move your seam down the middle.


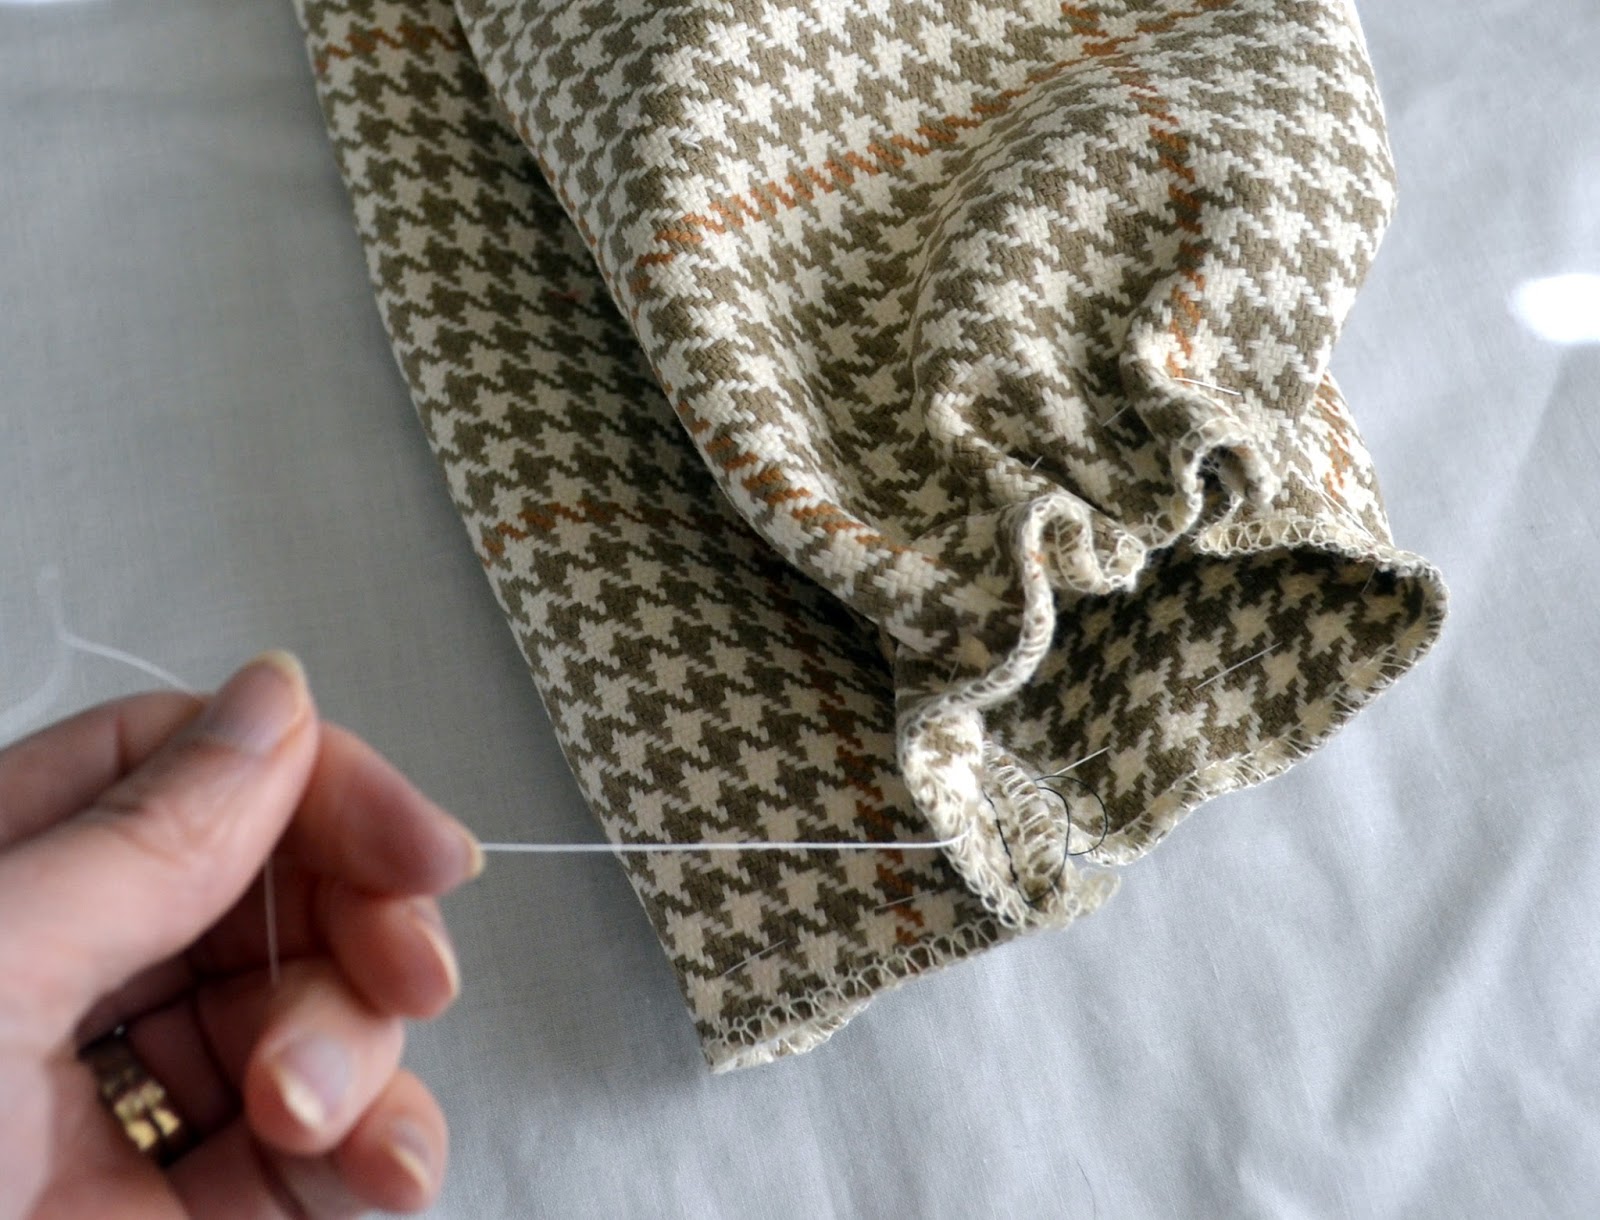
Take a long piece of thread and a needle and about a half inch from the bottom start making a wide stitch around the whole length of the bottom.


Once you sew all the way around the bottom gently pull your thread gathering the ends of your fabric.


From the inside of your pumpkin reach down to the base and pull the unfinished ends into the inside of the pumpkin and with your leftover thread stitch the ends together on the inside.


Fill your fabric tube with stuffing and repeat the same process on the top of your pumpkin that you did on the bottom.  This time, use an even longer piece of thread since you will be making the pumpkin segments with it.


Once your top is gathered squish together your pumpkin and push your needle and thread all the way through the bottom.  Once it goes through the bottom pull it up through the top.  Repeat this process as you make the various segments on your pumpkin.
Finish the end by knotting it.
Add a twig through the top for a stem.


They aren't perfect, but they are fun don't you think?!


0

ruffle pumpkin tutorial

Welcome back to Halloween craft week at Holy Craft.
I've been sharing a few of my favorite crafts that I have worked on from this season.


The first in the series was this birch candle holder made from a decorative pumpkin.


Then I showed you these glass knob pumpkins


and yesterday you saw these gussied up crows.


Today is our final day in Halloween craft week and I wanted to end it with a tutorial.


I ended up scoring about three yards of muslin in the free box this summer.
It didn't take me much time to figure out what to do with it.
I cut it up in about two inch strips
{muslin will tear, so you only need to make a small cut and then tear the rest}
I made multiple pumpkins, but one pumpkin will take 6 strips of 55" long muslin.


I used my sewing machine to ruffle the strips of muslin.
Simply turn the dial on the tension to the highest setting and the stitch length to the longest length.
Sew a straight line down the muslin, then pull one of the end strings gently ruffling your fabric.


I used a dollar store pumpkin and cut the stem off.


Using a hot glue gun, start in the center of your pumpkin and use the pumpkin's lines as a guide.


I found that it was easiest to make the ruffled pumpkins is you made them in segments.
I took my first muslin ruffle and started at the top, then worked my way to the bottom before coming up and around the top not quite halfway around the pumpkin.
Once your segments are created, go up and down as closely as possible gluing your muslin ruffles in place.


This is the segment completed.


Continue in the same way creating another segment on your pumpkin.
Filling in all of the orange space as much as possible.


I found a stick on a walk that I used as the stem.
Simply push the stem in to the top and it will stay in place.


I hope you had as much fun as I did sharing my Halloween crafts with you this week.
Don't forget to enter to win the Michael's #trickyourpumpkin sweepstakes on instagram.


0

Halloween crows

Welcome back to Halloween craft week at Holy Craft.
I've been sharing a few of my favorite crafts that I have worked on from this season.


The first in the series was this birch candle holder made from a decorative pumpkin.


Then I showed you these glass knob pumpkins


Today, I am showing you my gussied up crows.
I love the crows that you can buy at the Dollar store.
I usually pick up a whole handful of them.
This year, I decided to dress them up a bit.


I used this template for their book page witches hat.
Once the hat was cut out and glued, I used black crepe paper to embellish the hat.
I ruffled the crepe paper collar by using a needle and thread.
I simply pulled the needle and thread through the two pieces of crepe paper and pushed the crepe paper in a ruffle.
I cut a small x in the bottom of the hat and used hot glue to glue the hat to the crow.
I glued the two ends of the collar around the crow's neck.


He makes a nice addition to my book page wreath don't you think?


 Check back tomorrow for our final craft
{a tutorial}
in the Holy Craft Halloween craft series.

0

Glass Knob pumpkins with book page leaves

I'm continuing Halloween craft week on my blog.
Now that the weather has gotten a little nip in it, 
I've finally started crafting for fall.
You can join me!

On Monday I shared my birch candle holder made from a faux pumpkin.

Today, I'm going to be showing you my painted pumpkin with glass knob stem and book page leaves.

I didn't create a full tutorial because they are that simple!
I started with a pumpkin from the Dollar Store.
I removed the stem with a box cutter and spray painted the pumpkin white.
It will take several coats of spray paint to cover the orange.


I cut a book page in the shape of a leaf.
I didn't use a pattern, just did it free hand.
I was lucky enough to find 8 glass knobs for $2 {total} at a garage sale.
I used a hole punch to punch through the book pages that I stacked together,
then I put the glass knob screw through the hole in the book pages.
I finished by securing the knob in the pumpkin.
If you don't cut a hole through the top of the pumpkin when removing the stem, this step is easy because the pumpkin itself will secure the knob.

That's all it took!
Come back tomorrow to see the gussied up crows.
0
Back to Top