One of my favorite techniques has been freezer paper stenciling on t-shirts as seen here,
here,
here,
and here .

here,
here,
and here .


So if you missed my blog swap with Allison at A Glimpse Inside last week, I thought I would share with my readers how I brought this technique to decorating.
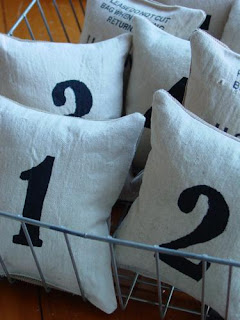
Aren't these mini decorative pillows cute? I'm excited to show you how to make them.


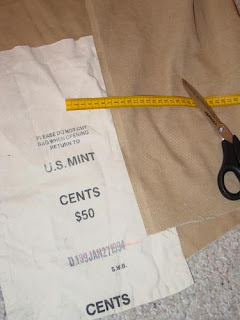
I found these vintage looking money bags at a garage sale for $1. I knew I could do something cool with them.
 I started by pairing the bags with some corduroy that I had in my stash.
I cut them down to 7 inches tall, 6 inches wide. I'm pretty sure most of you know how to make a pillow, so I won't bore you with that information. Make sure you leave a large enough hole to turn the fabric since it is quite thick. I like to use as much fabric as I can and not waste anything, so I used even the back of the money bags even though it didn't have any of the cool printing on it.
 They needed something so I printed up some numbers in Word and then traced them onto freezer paper. Cut the number out and iron them on to the fabric you are using. I used black paint and a sponge brush to fill the stencil in and let it dry. Once it's dry you can peel off the freezer paper.


Those are cute! I love crafts with numbers.
ReplyDeletehttp://embellishinglifeeveryday.blogspot.com/
Discovering freezer stenciling myself. Must be a trend - posted about it today myself as well! So much fun, and you do some great stuff with it! Loving those pillows, very french.
ReplyDeletewww.mesewcrazy.com
Adorable!!! And I love the basket!
ReplyDeleteThese are just too cute! I LOVE LOVE freezer paper stenciling. It's so much fun and versatile. I've actually been wanting to make large number pillows for my family room, but just haven't gotten to it yet. Thanks so much for sharing this great project!
ReplyDeleteThose are SO adorable!!!
ReplyDeleteVery cool! I love them!!!
ReplyDeleteWhat a great project, Rachel~ so graphic and fun! I haven't tried freezer paper stenciling~ thanks!
ReplyDeleteThis is great, Rachel. I'm going to have a go...
ReplyDeleteThank you for such clear instructions.
Sarahx
Ack! I love these! They turned out so cute and love that you used fabric from your stash, too.
ReplyDeleteThese turned out great! Great find on the bags, too! I keep saying I'm going to try these freezer paper stencils and I really am going to, before the year is up. I love the ones you've done for your son's shirts.
ReplyDeleteVisiting from Make It Yours Day!
I love them clustered in the basket, but I have a feeling my grandson would love to see them all over the house ;)
ReplyDeleteWould love for you to stop by this weekend and link up to Passion for Paint!
Thank you for this!! I am definitely going to give it a try! I love your number pillows, they are soooo PB! Theresa xoxo
ReplyDeleteThis is a great idea! I'd love it if you'd come link this at my linky party. Every Friday I host Home and Family Friday.
ReplyDeleteBecca
becca-homeiswheremystorybegins.blogspot.com
These are just so. stinking. cool. Love the idea!
ReplyDeleteToo cute! I have yet to try freezer paper stenciling... but you really made me want to! Thanks for linking to Weekend Wander. Hope to see you again next week!
ReplyDeleteKrista